Organizations can now utilize Azure Active Directory (AD) authentication for their Azure virtual machines (VMs) running Windows Server 2019 Datacenter edition or Windows 10 1809 and later. Using Azure AD to authenticate to VMs provides you with a way to centrally control and enforce policies. Tools like Azure role-based access control (Azure RBAC) and Azure AD Conditional Access allow you to control who can access a VM. This article shows you how to create and configure a Windows Server 2019 VM to use Azure AD authentication.
Note
Azure AD sign in for Azure Windows VMs is a public preview feature of Azure Active Directory. For more information about previews, see Supplemental Terms of Use for Microsoft Azure Previews.
There are many benefits of using Azure AD authentication to log in to Windows VMs in Azure, including:
- Utilize the same federated or managed Azure AD credentials you normally use.
- No longer have to manage local administrator accounts.
- Azure RBAC allows you to grant the appropriate access to VMs based on need and remove it when it is no longer needed.
- Before allowing access to a VM, Azure AD Conditional Access can enforce additional requirements such as:
- Multi-factor authentication
- Sign-in risk check
- Automate and scale Azure AD join of Azure Windows VMs that are part for your VDI deployments.
Note
Once you enable this capability, your Windows VMs in Azure will be Azure AD joined. You cannot join it to other domain like on-premises AD or Azure AD DS. If you need to do so, you will need to disconnect the VM from your Azure AD tenant by uninstalling the extension.
Requirements
Supported Azure regions and Windows distributions
The following Windows distributions are currently supported during the preview of this feature:
- Windows Server 2019 Datacenter
- Windows 10 1809 and later
Important
Remote connection to VMs joined to Azure AD is only allowed from Windows 10 PCs that are either Azure AD registered (starting Windows 10 20H1), Azure AD joined or hybrid Azure AD joined to the same directory as the VM.
All Azure global regions are currently supported during the preview of this feature
Important
The feature is currently not supported in Azure Government or sovereign clouds.
Network requirements
To enable Azure AD authentication for your Windows VMs in Azure, you need to ensure your VMs network configuration permits outbound access to the following endpoints over TCP port 443:
- https://enterpriseregistration.windows.net
- https://login.microsoftonline.com
- https://device.login.microsoftonline.com
- https://pas.windows.net
Enabling Azure AD login in for Windows VM in Azure
To use Azure AD login in for Windows VM in Azure, you need to first enable Azure AD login option for your Windows VM and then you need to configure Azure role assignments for users who are authorized to login in to the VM. There are multiple ways you can enable Azure AD login for your Windows VM:
- Using the Azure portal experience when creating a Windows VM
- Using the Azure Cloud Shell experience when creating a Windows VM or for an existing Windows VM
Using Azure portal create VM experience to enable Azure AD login
You can enable Azure AD login for Windows Server 2019 Datacenter or Windows 10 1809 and later VM images.
To create a Windows Server 2019 Datacenter VM in Azure with Azure AD logon:
- Sign in to the Azure portal, with an account that has access to create VMs, and select + Create a resource.
- Type Windows Server in Search the Marketplace search bar.
- Click Windows Server and choose Windows Server 2019 Datacenter from Select a software plan dropdown.
- Click on Create.
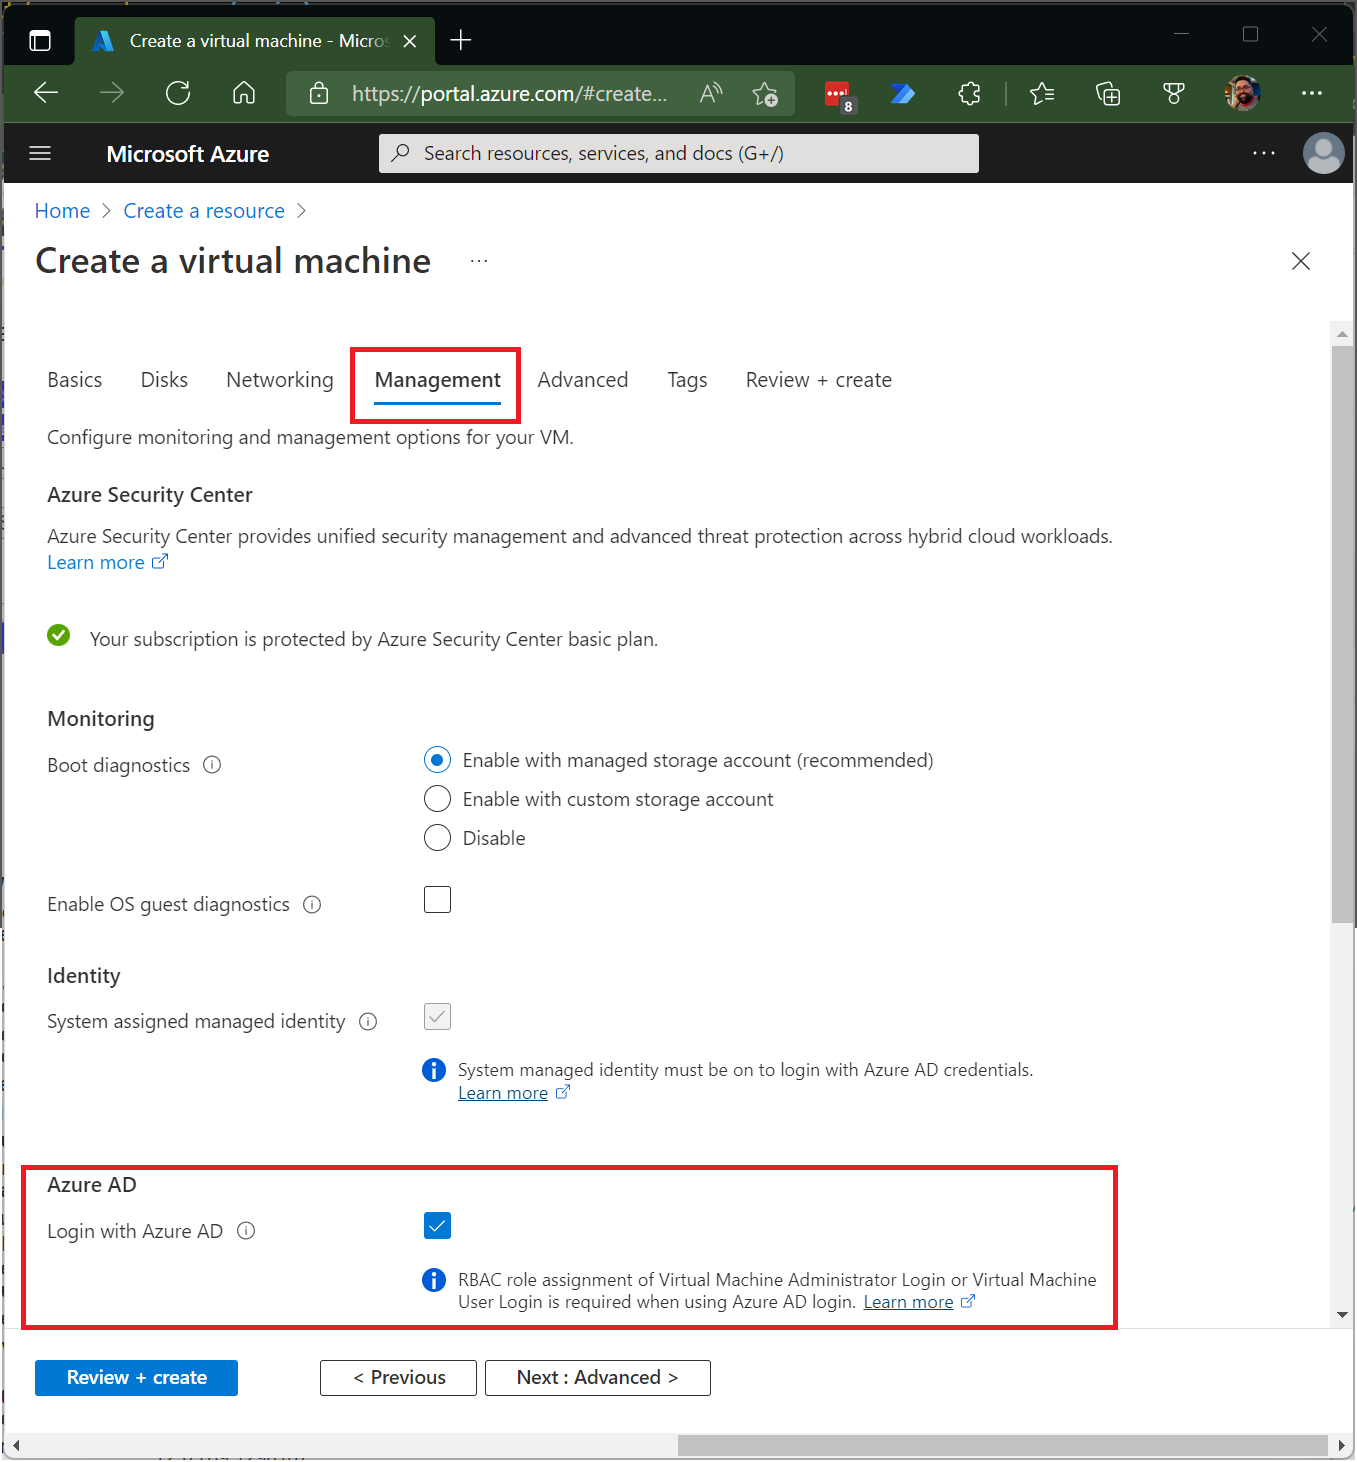
- On the "Management" tab, enable the option to Login with AAD credentials (Preview) under the Azure Active Directory section from Off to On.
- Make sure System assigned managed identity under the Identity section is set to On. This action should happen automatically once you enable Login with Azure AD credentials.
- Go through the rest of the experience of creating a virtual machine. During this preview, you will have to create an administrator username and password for the VM.
Note
In order to log in to the VM using your Azure AD credential, you will first need to configure role assignments for the VM as described in one of the sections below.
Using the Azure Cloud Shell experience to enable Azure AD login
Azure Cloud Shell is a free, interactive shell that you can use to run the steps in this article. Common Azure tools are preinstalled and configured in Cloud Shell for you to use with your account. Just select the Copy button to copy the code, paste it in Cloud Shell, and then press Enter to run it. There are a few ways to open Cloud Shell:
Select Try It in the upper-right corner of a code block. Open Cloud Shell in your browser. Select the Cloud Shell button on the menu in the upper-right corner of the Azure portal.
If you choose to install and use the CLI locally, this article requires that you are running the Azure CLI version 2.0.31 or later. Run az --version to find the version. If you need to install or upgrade, see the article Install Azure CLI.
- Create a resource group with az group create.
- Create a VM with az vm create using a supported distribution in a supported region.
- Install the Azure AD login VM extension.
The following example deploys a VM named myVM that uses Win2019Datacenter, into a resource group named myResourceGroup, in the southcentralus region. In the following examples, you can provide your own resource group and VM names as needed.
Azure CLI/Bash

az group create --name myResourceGroup --location eastus

az vm create \
--resource-group myResourceGroup \
--name myVM \
--image Win2019Datacenter \
--assign-identity \
--admin-username azureuser \
--admin-password yourpassword
Note
It is required that you enable System assigned managed identity on your virtual machine before you install the Azure AD login VM extension.
It takes a few minutes to create the VM and supporting resources.
Finally, install the Azure AD login VM extension to enable Azure AD login for Windows VM. VM extensions are small applications that provide post-deployment configuration and automation tasks on Azure virtual machines. Use az vm extension set to install the AADLoginForWindows extension on the VM named myVM in the myResourceGroup resource group:
Note
You can install AADLoginForWindows extension on an existing Windows Server 2019 or Windows 10 1809 and later VM to enable it for Azure AD authentication. An example of AZ CLI is shown below.
AzureCLI/Bash

az vm extension set \
--publisher Microsoft.Azure.ActiveDirectory \
--name AADLoginForWindows \
--resource-group myResourceGroup \
--vm-name myVM
The provisioningState of Succeeded is shown, once the extension is installed on the VM.
Configure role assignments for the VM
Now that you have created the VM, you need to configure Azure RBAC policy to determine who can log in to the VM. Two Azure roles are used to authorize VM login:
- Virtual Machine Administrator Login: Users with this role assigned can log in to an Azure virtual machine with administrator privileges.
- Virtual Machine User Login: Users with this role assigned can log in to an Azure virtual machine with regular user privileges.
Note
To allow a user to log in to the VM over RDP, you must assign either the Virtual Machine Administrator Login or Virtual Machine User Login role. An Azure user with the Owner or Contributor roles assigned for a VM do not automatically have privileges to log in to the VM over RDP. This is to provide audited separation between the set of people who control virtual machines versus the set of people who can access virtual machines.
There are multiple ways you can configure role assignments for VM:
- Using the Azure AD Portal experience
- Using the Azure Cloud Shell experience
Using Azure AD Portal experience
To configure role assignments for your Azure AD enabled Windows Server 2019 Datacenter VMs:
- Navigate to the specific virtual machine overview page
- Select Access control (IAM) from the menu options
- Select Add, Add role assignment to open the Add role assignment pane.
- In the Role drop-down list, select a role such as Virtual Machine Administrator Login or Virtual Machine User Login.
- In the Select field, select a user, group, service principal, or managed identity. If you don't see the security principal in the list, you can type in the Select box to search the directory for display names, email addresses, and object identifiers.
- Select Save, to assign the role.
After a few moments, the security principal is assigned the role at the selected scope.

Using the Azure Cloud Shell experience
The following example uses az role assignment create to assign the Virtual Machine Administrator Login role to the VM for your current Azure user. The username of your active Azure account is obtained with az account show, and the scope is set to the VM created in a previous step with az vm show. The scope could also be assigned at a resource group or subscription level, and normal Azure RBAC inheritance permissions apply. For more information, see Log in to a Linux virtual machine in Azure using Azure Active Directory authentication.
AzureCLI/Bash

username=$(az account show --query user.name --output tsv)
vm=$(az vm show --resource-group myResourceGroup --name myVM --query id -o tsv)

az role assignment create \
--role "Virtual Machine Administrator Login" \
--assignee $username \
--scope $vm
Note
If your AAD domain and logon username domain do not match, you must specify the object ID of your user account with the --assignee-object-id, not just the username for --assignee. You can obtain the object ID for your user account with az ad user list.
For more information on how to use Azure RBAC to manage access to your Azure subscription resources, see the following articles:
- Add or remove Azure role assignments using Azure CLI
- Add or remove Azure role assignments using the Azure portal
- Add or remove Azure role assignments using Azure PowerShell.
Using Conditional Access
You can enforce Conditional Access policies such as multi-factor authentication or user sign-in risk check before authorizing access to Windows VMs in Azure that are enabled with Azure AD sign in. To apply Conditional Access policy, you must select "Azure Windows VM Sign-In" app from the cloud apps or actions assignment option and then use Sign-in risk as a condition and/or require multi-factor authentication as a grant access control.
Note
If you use "Require multi-factor authentication" as a grant access control for requesting access to the "Azure Windows VM Sign-In" app, then you must supply multi-factor authentication claim as part of the client that initiates the RDP session to the target Windows VM in Azure. The only way to achieve this on a Windows 10 client is to use Windows Hello for Business PIN or biometric authentication with the RDP client. Support for biometric authentication was added to the RDP client in Windows 10 version 1809. Remote desktop using Windows Hello for Business authentication is only available for deployments that use cert trust model and currently not available for key trust model.
Warning
Per-user Enabled/Enforced Azure AD Multi-Factor Authentication is not supported for VM sign-in.
Log in using Azure AD credentials to a Windows VM
Important
Remote connection to VMs joined to Azure AD is only allowed from Windows 10 PCs that are either Azure AD registered (minimum required build is 20H1) or Azure AD joined or hybrid Azure AD joined to the same directory as the VM. Additionally, to RDP using Azure AD credentials, the user must belong to one of the two Azure roles, Virtual Machine Administrator Login or Virtual Machine User Login. If using an Azure AD registered Windows 10 PC, you must enter credentials in the AzureAD\UPN format (e.g. AzureAD\john@contoso.com). At this time, Azure Bastion can't be used to log in by using Azure Active Directory authentication with the AADLoginForWindows extension; only direct RDP is supported.
To log in to your Windows Server 2019 virtual machine using Azure AD:
- Navigate to the overview page of the virtual machine that has been enabled with Azure AD logon.
- Select Connect to open the Connect to virtual machine blade.
- Select Download RDP File.
- Select Open to launch the Remote Desktop Connection client.
- Select Connect to launch the Windows logon dialog.
- Logon using your Azure AD credentials.
You are now signed in to the Windows Server 2019 Azure virtual machine with the role permissions as assigned, such as VM User or VM Administrator.
Note
You can save the .RDP file locally on your computer to launch future remote desktop connections to your virtual machine instead of having to navigate to virtual machine overview page in the Azure portal and using the connect option.
Troubleshoot
Troubleshoot deployment issues
The AADLoginForWindows extension must install successfully in order for the VM to complete the Azure AD join process. Perform the following steps if the VM extension fails to install correctly.
-
RDP to the VM using the local administrator account and examine the CommandExecuti'n.log under
C:\WindowsAzure\Logs\Plugins\Microsoft.Azure.ActiveDirectory.AADLoginForWindows\0.3.1.0.
Note
If the extension restarts after the initial failure, the log with the deployment error will be saved as CommandExecution_YYYYMMDDHHMMSSSSS.log. "
2. Open a PowerShell command prompt on the VM and verify these queries against the Instance Metadata Service (IMDS) Endpoint running on the Azure host returns:
| Command to run | Expected output |
|---|---|
curl -H @{"Metadata"="true"} "http://169.254.169.254/metadata/instance?api-version=2017-08-01" |
Correct information about the Azure VM |
curl -H @{"Metadata"="true"} "http://169.254.169.254/metadata/identity/info?api-version=2018-02-01" |
Valid Tenant ID associated with the Azure Subscription |
curl -H @{"Metadata"="true"} "http://169.254.169.254/metadata/identity/oauth2/token?resource=urn:ms-drs:enterpriseregistration.windows.net&api-version=2018-02-01" |
Valid access token issued by Azure Active Directory for the managed identity that is assigned to this VM |
Note
The access token can be decoded using a tool like http://calebb.net/. Verify the "appid" in the access token matches the managed identity assigned to the VM.
3. Ensure the required endpoints are accessible from the VM using the command line:
- curl https://login.microsoftonline.com/ -D –
- curl https://login.microsoftonline.com/
<TenantID>/ -D –
Note
Replace <TenantID> with the Azure AD Tenant ID that is associated with the Azure subscription.
- curl https://enterpriseregistration.windows.net/ -D -
- curl https://device.login.microsoftonline.com/ -D -
- curl https://pas.windows.net/ -D -
4. The Device State can be viewed by running dsregcmd /status. The goal is for Device State to show as AzureAdJoined : YES.
Note
Azure AD join activity is captured in Event viewer under the User Device Registration\Admin log.
If AADLoginForWindows extension fails with certain error code, you can perform the following steps:
Issue 1: AADLoginForWindows extension fails to install with terminal error code '1007' and Exit code: -2145648574.
This exit code translates to DSREG_E_MSI_TENANTID_UNAVAILABLE because the extension is unable to query the Azure AD Tenant information.
-
Verify the Azure VM can retrieve the TenantID from the Instance Metadata Service.
-
RDP to the VM as a local administrator and verify the endpoint returns valid Tenant ID by running this command from an elevated command line on the VM:
- curl -H Metadata:true http://169.254.169.254/metadata/identity/info?api-version=2018-02-01
-
-
The VM admin attempts to install the AADLoginForWindows extension, but a system assigned managed identity has not enabled the VM first. Navigate to the Identity blade of the VM. From the System assigned tab, verify Status is toggled to On.
Issue 2: AADLoginForWindows extension fails to install with Exit code: -2145648607
This Exit code translates to DSREG_AUTOJOIN_DISC_FAILED because the extension is not able to reach the https://enterpriseregistration.windows.net endpoint.
-
Verify the required endpoints are accessible from the VM using the command line:
- curl https://login.microsoftonline.com/ -D –
- curl https://login.microsoftonline.com/
<TenantID>/ -D –
Note
Replace <TenantID> with the Azure AD Tenant ID that is associated with the Azure subscription. If you need to find the tenant ID, you can hover over your account name to get the directory / tenant ID, or select Azure Active Directory > Properties > Directory ID in the Azure portal.
- curl https://enterpriseregistration.windows.net/ -D -
- curl https://device.login.microsoftonline.com/ -D -
- curl https://pas.windows.net/ -D -
2. If any of the commands fails with "Could not resolve host <URL>", try running this command to determine the DNS server that is being used by the VM.
nslookup <URL>
Note
Replace <URL> with the fully qualified domain names used by the endpoints, such as "login.microsoftonline.com".
3. Next, see if specifying a public DNS server allows the command to succeed:
nslookup <URL> 208.67.222.222
4. If necessary, change the DNS server that is assigned to the network security group that the Azure VM belongs to.
Issue 3: AADLoginForWindows extension fails to install with Exit code: 51
Exit code 51 translates to "This extension is not supported on the VM's operating system".
At Public Preview, the AADLoginForWindows extension is only intended to be installed on Windows Server 2019 or Windows 10 (Build 1809 or later). Ensure the version of Windows is supported. If the build of Windows is not supported, uninstall the VM Extension.
Troubleshoot sign-in issues
Some common errors when you try to RDP with Azure AD credentials include no Azure roles assigned, unauthorized client, or 2FA sign-in method required. Use the following information to correct these issues.
The Device and SSO State can be viewed by running dsregcmd /status. The goal is for Device State to show as AzureAdJoined : YES and SSO State to show AzureAdPrt : YES.
Also, RDP Sign-in using Azure AD accounts is captured in Event viewer under the AAD\Operational event logs.
Azure role not assigned
If you see the following error message when you initiate a remote desktop connection to your VM:
- Your account is configured to prevent you from using this device. For more info, contact your system administrator

Verify that you have configured Azure RBAC policies for the VM that grants the user either the Virtual Machine Administrator Login or Virtual Machine User Login role:
Unauthorized client
If you see the following error message when you initiate a remote desktop connection to your VM:
- Your credentials did not work
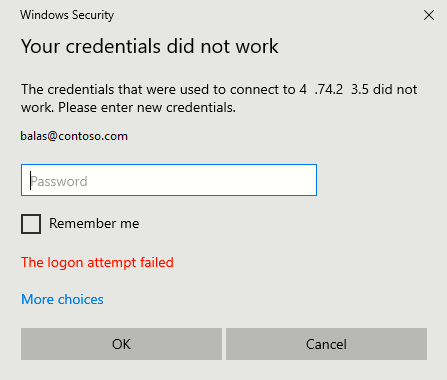
Verify that the Windows 10 PC you are using to initiate the remote desktop connection is one that is either Azure AD joined, or hybrid Azure AD joined to the same Azure AD directory where your VM is joined to. For more information about device identity, see the article What is a device identity.
Note
Windows 10 Build 20H1 added support for an Azure AD registered PC to initiate RDP connection to your VM. When using an Azure AD registered (not Azure AD joined or hybrid Azure AD joined) PC as the RDP client to initiate connections to your VM, you must enter credentials in the format AzureAD\UPn (e.g. AzureAD\john@contoso.com).
Also, verify the AADLoginForWindows extension has not been uninstalled after Azure AD join has completed.
MFA sign-in method required
If you see the following error message when you initiate a remote desktop connection to your VM:
- The sign-in method you're trying to use isn't allowed. Try a different sign-in method or contact your system administrator.
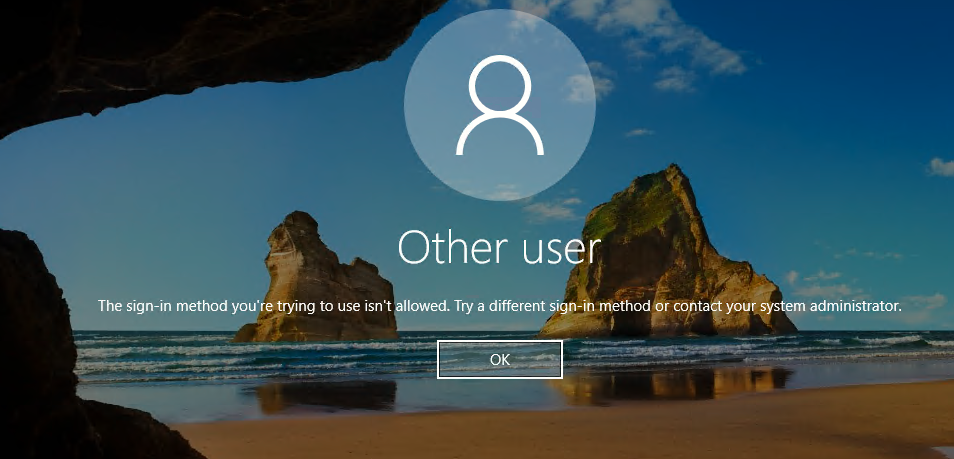
If you have configured a Conditional Access policy that requires multi-factor authentication (MFA) before you can access the resource, then you need to ensure that the Windows 10 PC initiating the remote desktop connection to your VM signs in using a strong authentication method such as Windows Hello. If you do not use a strong authentication method for your remote desktop connection, you will see the previous error.
If you have not deployed Windows Hello for Business and if that is not an option for now, you can exclude MFA requirement by configuring Conditional Access policy that excludes "Azure Windows VM Sign-In" app from the list of cloud apps that require MFA. To learn more about Windows Hello for Business, see Windows Hello for Business Overview.
Note
Windows Hello for Business PIN authentication with RDP has been supported by Windows 10 for several versions, however support for Biometric authentication with RDP was added in Windows 10 version 1809. Using Windows Hello for Business auth during RDP is only available for deployments that use cert trust model and currently not available for key trust model.
Microsoft Documentation: https://docs.microsoft.com/en-us/azure/active-directory/devices/howto-vm-sign-in-azure-ad-windows
Comments
0 comments
Please sign in to leave a comment.