Add or delete custom device images
If you want to use a custom device image, you can add it into your Azure subscription and then use it for provisioning Cloud PCs. You can use standard Azure Marketplace gallery images or create your own custom managed image. If you currently use a Shared Image Gallery in Microsoft Azure, you can convert one of those images into a managed imaged using the steps to export an image version to a managed disk and then create an image from a managed disk.
Note
- Windows 10 images should not contain Azure Virtual Desktop client components. Additionally, you cannot import Windows 10 Multisession images into Windows 365.
- For information about support for Windows 11 custom device images, see What's New for Windows 365 Enterprise.
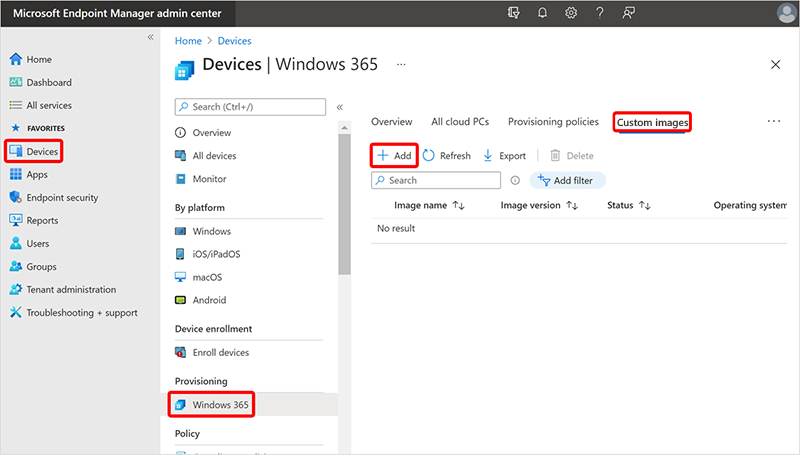
Add a custom device image
You can upload the custom image to the Windows 365 service by following these steps:
-
Sign in to the Microsoft Endpoint Manager admin center, select Devices > Windows 365 (under Provisioning) > Device images > Add.
-
In the Add image pane, provide the following information:
- Image name: The name of the image you want to add.
- Image version: A version number of the image with this format: Major(int).Minor(int).Patch(int) format. For example: 0.0.1, 1.5.13.
- Source Image: Choose an image to add. The list will populate with all custom images from your subscription that meet the pre-requisites.
-
Select Add to add the image to your device image list.
Delete a custom device image
You can delete a custom image from Windows 365 by following these steps:
- Sign in to the Microsoft Endpoint Manager admin center, select Devices > Windows 365 (under Provisioning) > Device images.
- On the Device images page, select the check box next to the image > Delete.
- Select Yes on the confirmation pop up to permanently delete the image.
Device images being used in a provisioning policy cannot be deleted. Delete the provisioning policy first and then the associated device image.
Convert an existing custom device image to a generation 2 virtual machine
To support Windows 11, your custom device images must be based on generation 2 (Gen2) virtual machines (VMs). If you already have custom device images based on generation 1 (Gen1) virtual machines, you can convert those custom device images by following the steps below. After you've completed these steps, all future Cloud PCs provisioned from the converted device image will be based on Gen2 virtual machines.
Windows 365 won't prevent you from provisioning new Cloud PCs from existing custom images based on Gen1 VMs. However, when you want to add new custom images, Windows 365 will only accept Gen2-based images. Gen 2 VMs are required to support Windows 11.
Convert to a generation 2 virtual machine
- Make sure that Hyper-V is installed on your management PC. For information on how to install Hyper-V, see Install Hyper-V on Windows 10.
- Download your existing custom image virtual hard drive (VHD) file from the Azure storage blob URL to your PC where you have Hyper-V available. The VHD file is the exact size of the OS disk, which can be a large file size. Make sure to use a fast, stable internet connection to download the VHD file, and prepare for long download times. For information on how to download a managed disk, see Download a VHD from Azure. You can also download the VHD by using Azure Storage Explorer directly, both as managed disk or storage blob VHDs.
- Switch to your local PC and open Hyper-V Manager.
- Under Actions, select New > Virtual Machine.

- On the Before You Begin page, select Next.
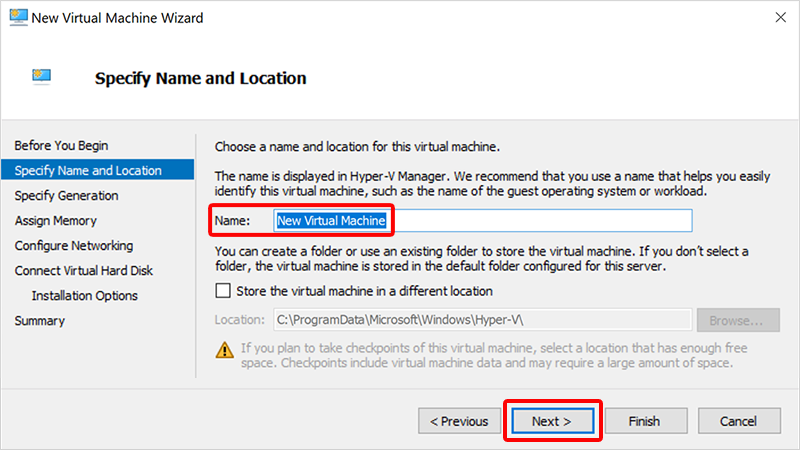
- On the Specify Name and Location page, type a friendly name, like CustomFinanceImageg2, and then select Next.
- On the Specify Generation page, select Generation 1 (not Generation 2). Gen2 is needed here to mount the disk and change the partition model to GUID Partition Table (GPT). Select Next.
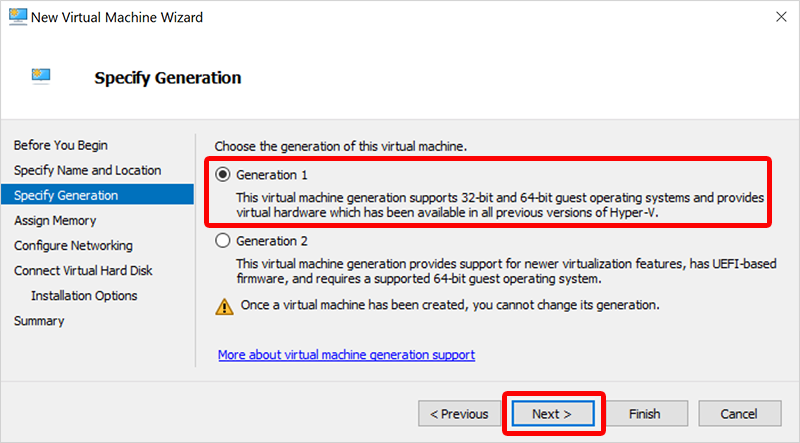 Hyper-V only supports Gen 2 images in VHDX and Gen 1 images in VHD. Azure only supports Gen 2 images in VHD. Therefore, we're creating a Gen 1 VHD image here in order to convert it to a Gen 2 VHD image.
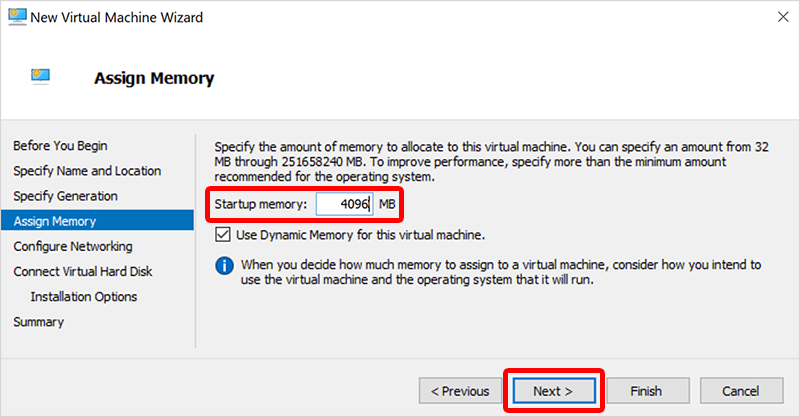
 - On the Assign Memory page, set Startup memory to at least 1024000 MB, preferably 4096000 MB. Select Next.
- On the Configure Networking page, select Default Switch > Next.
- On the Connect Virtual Hard Disk page, select Use an existing virtual hard disk.
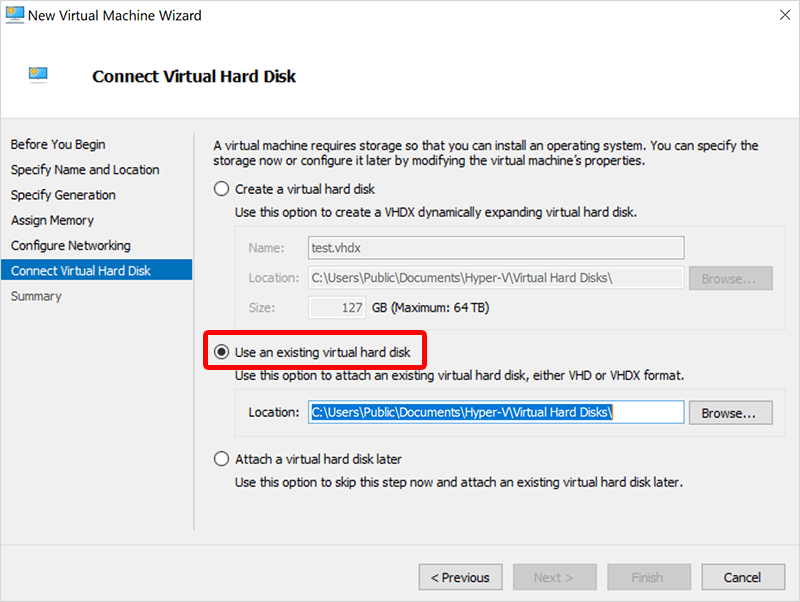
- For Location, select Browse and select the VHD that you downloaded earlier.
- Select Next and on the Summary page select Finish.
- Create a WinPE media ISO. For instructions on how to create an ISO, see Create bootable WinPE media.
- In Hyper-V Manager, under Virtual Machines, select the new VM, and then under Actions select Settings.
- In the left navigation pane, under IDE Controller 1, select DVD Drive.
- Under DVD Drive, under Controller, select IDE Controller 1.
- Select Image file and browse to the new ISO file you created.
- Select OK.
- Under Actions, select Start.
- Wait for the wpeinit command prompt to open.
- To convert the Master Boot Record (MBR) to the GUID Partition Table (GPT) partition, run the following two commands in the wpeinit window. The GPT is the new standard for gen2 based VMs.
- To determine the correct disk for conversion and validate it, run
mbr2gpt /validate /disk:0. - To convert the disk to the GUID Partition Table (GPT), run
mbr2gpt /convert /disk:0For more information on MBR2GPT, see the MBR2GPT.exe documentation.
- To determine the correct disk for conversion and validate it, run
- After the commands run successfully, dismount the WinPE ISO by following these steps:
- In Hyper-V Manager, under Virtual Machines, select the new VM, and then under Actions select Settings.
- In the left navigation pane, select IDE Controller 1.
- Under DVD Drive, under Controller, select IDE Controller 1.
- Select OK.
- Upload the converted VHD back to Azure. You can use Azure Storage Explorer. For other upload options, see Upload a generalized Windows VHD and use it to create new VMs in Azure.
Note
Make sure that the VHD remains VHD in fixed size. VHDX as format isn’t supported on Azure.
- Go to the Azure portal, open Images > Create.
- Fill in the required fields and make sure to select Gen 2 for VM generation.
- Select Review + Create.
- After the image is created, you can upload it to the Shared Image Gallery. For instructions on how to upload, see Upload the custom image to a shared image gallery.
- You can now add the device image to Windows 365. For information on how to upload custom images, see Add a custom device image.
Microsoft Documentation: https://docs.microsoft.com/en-us/windows-365/enterprise/add-device-images
Comments
0 comments
Article is closed for comments.