Overview
When you create a new Microsoft Azure Cloud Provider the HyperCloud™ Platform (HCP), you can:
Discover Resource Manager Network and Security as well as allow Administrators and Users to create and manage these following resources:
Resource Groups
Resource Groups are logical containers that hold your Microsoft Azure resources. All resources in a resource group must have the same life-cycle. You can deploy, update, and delete multiple resources in a resource group.
Create a Resource Group
To create a new Resource Group:
-
Login to your HCP account.
-
Navigate to Service Orchestration > Services > Resource Groups > New.

-
Select the Microsoft Azure cloud provider.
-
Enter a Name for your resource group. [1]
-
Click on Create Resource Group.
-
Once you've created a resource group, you'll need to create a Virtual Private Cloud (VPC) for the same.
-
Note:
-
[1] Resource names can contain:
-
Alphanumeric characters
-
Periods
-
Underscores
-
Hyphens
-
Parenthesis
Resource names cannot contain period.
-
Virtual Private Cloud (Microsoft Azure vNet)
Virtual private cloud in the HyperCloud™ Platform (HCP) is addressed as Virtual Private Cloud (VPC) or Microsoft Azure vNet.
Your VPC is:
-
Logically isolated from other networks
-
Has its own firewall capabilities
-
Scoped to a single Microsoft Azure Region.
-
A network made up of subnets.
-
A subnet is a range of IP addresses in your virtual network. Like VPC networks, subnets are scoped to a single Microsoft Azure Region.
-
Information: Microsoft Azure Virtual Network lets Microsoft Azure Virtual Machines (VM) securely communicate with:
-
Each other
-
Internet
-
On-premise networks
Create a Virtual Private Cloud (Microsoft Azure vNet)
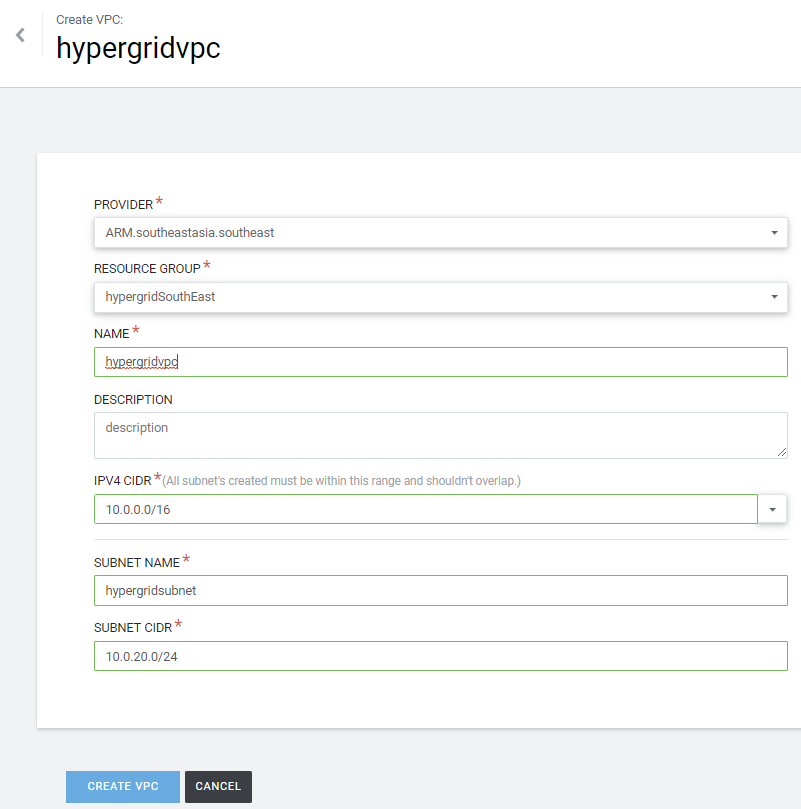
To create a Microsoft Azure VPC:
-
Login to your HCP account.
-
Navigate to Service Orchestration > Services > Networks > Virtual Private Cloud > New > Azure.
-
Select your Microsoft Azure cloud Provider.
-
Select your Resource Group.
-
Enter a name for your VPC.
-
Enter a description for your resource group.
-
This is an optional field.
-
-
Select your subnet IPV4 CIDR. [1]
-
Enter the Subnet Name and the Subnet CIDR for your VPC.
-
HCP automatically creates a subnet when you create a VPC.
-
You can add more subnets to your VPC later.
-
-
Click on CREATE VPC.
Notes:
-
[1] The HCP validates of your CIDR for validity and overlaps.
-
Newly created subnets must be within your IPV4 CIDR range.
-
Subnets cannot not overlap.
-
To know more about IPV4 CIDR refer to the article on Understanding CIDR notation when designing Azure Virtual networks and subnets.
-
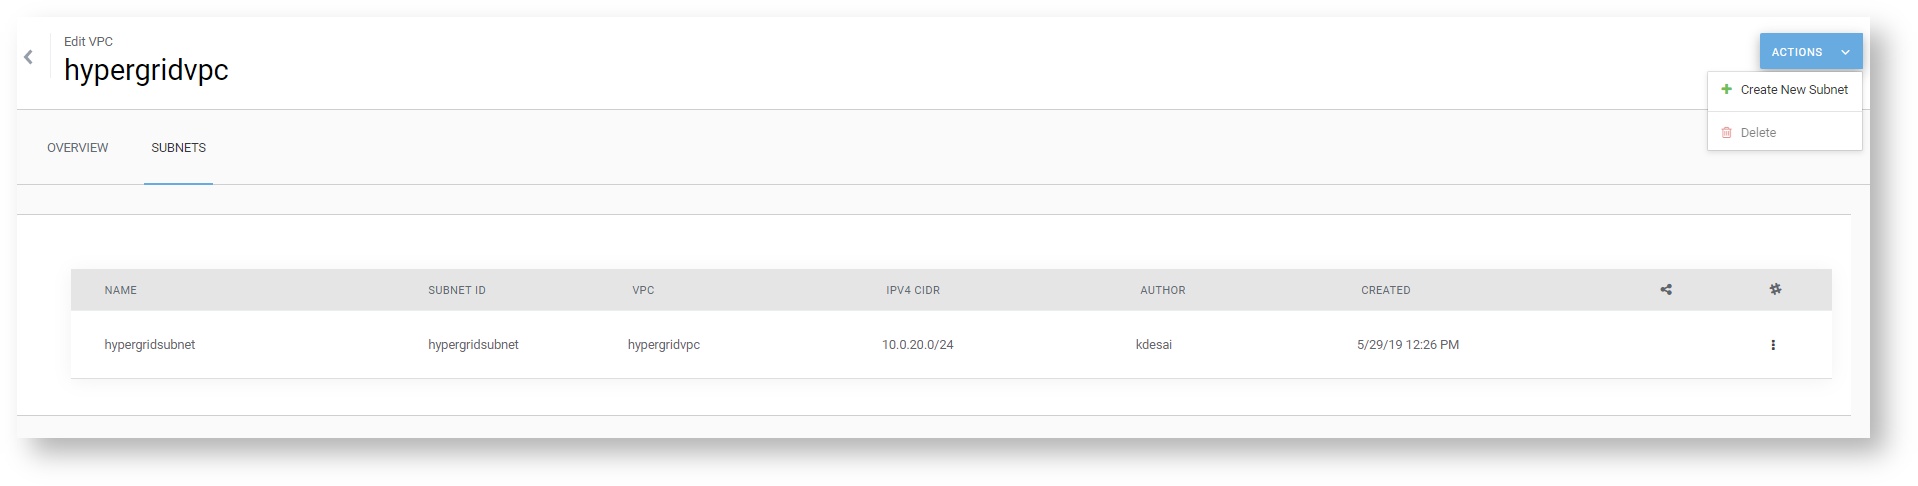
Create Subnets
To add more subnets to your newly created VPC:
-
Login to your HCP account.
-
Navigate to Service Orchestration > Services > Networks > Virtual Private Cloud > Click to select your VPC > Actions > Create New Subnet
3. Enter the following in the New Subnet dialog:
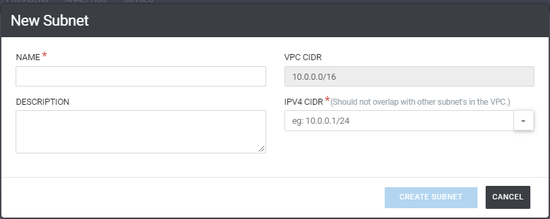
- Enter a Name for your subnet.
- Enter a Description for your subnet.
- This is an optional field.
- Select your subnet IPV4 CIDR.
- Click on Create Subnet.
Note:
-
You can delete inactive or unused subnets.
-
You'll not be able to delete a VPC unless you delete all the Subnets associated with the VPC.
Security Groups
Security Groups form an important layer of security firewall rules that:
-
Control your VM traffic
-
Let you filter your Microsoft Azure virtual network traffic
-
Lets you tag your resources for resource tracking and management
Create a Security Group
To create a Security Group:
-
Login to your HCP account.
-
Navigate to Service Orchestration > Services > Security > Security Group.
-
Click on New and select Azure.

4. From the Create Security Group dialog, select your Resource Pool.
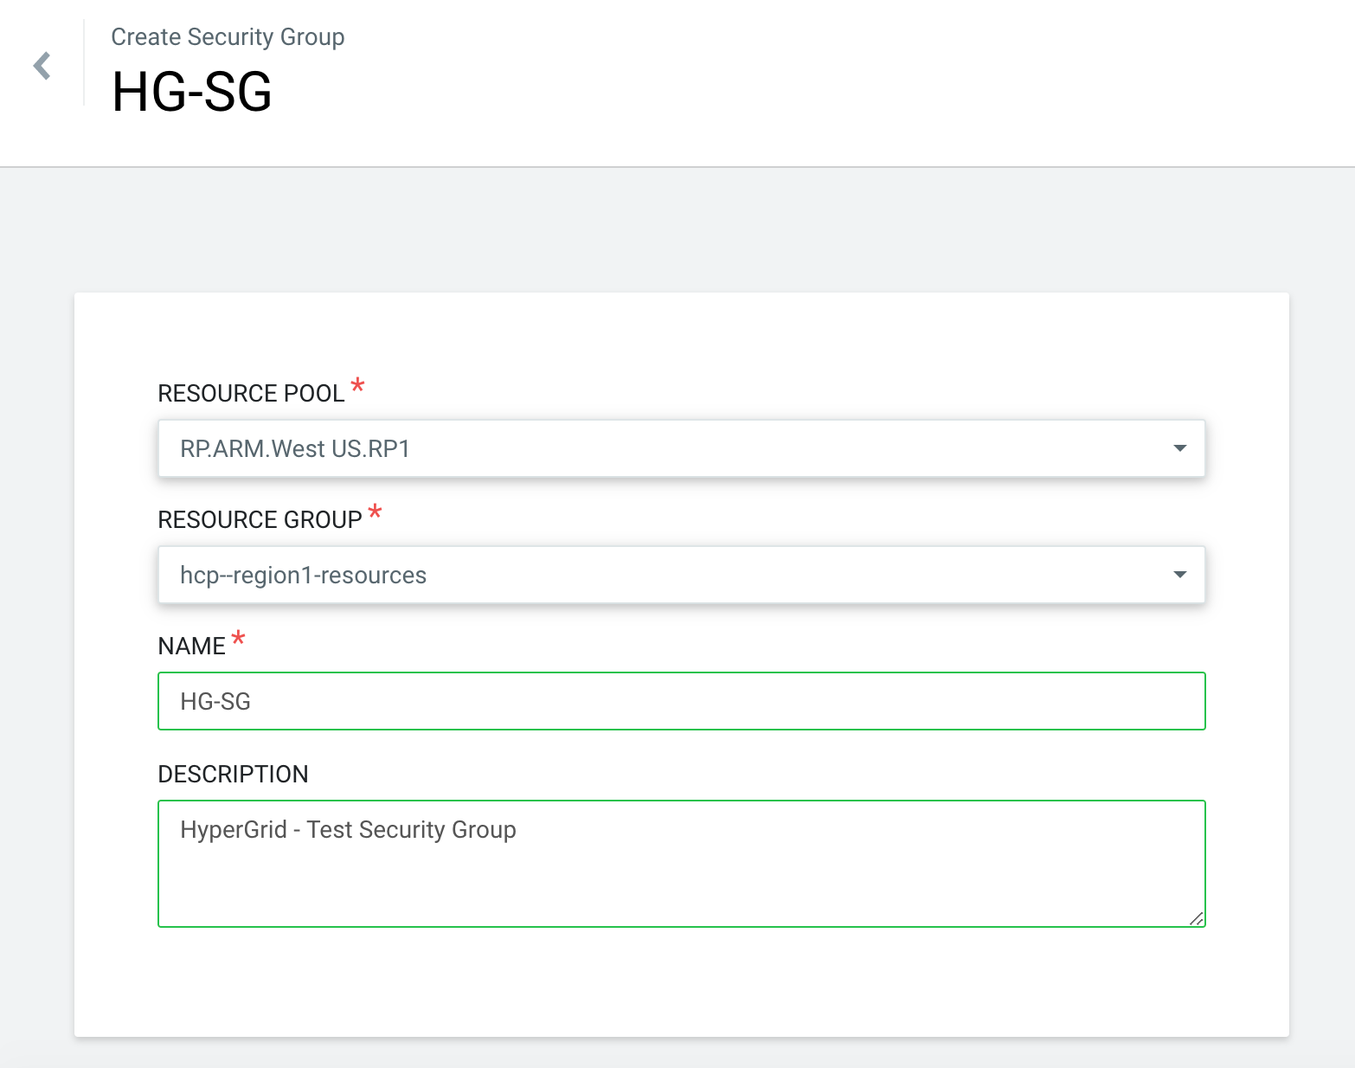
5. Select your Resource Group.
6. Enter a name for your Security Group.
7. Enter a description for your security group.
- This is an optional field.
8. Click on Create.
Create Inbound and Outbound Rules
Once you've created a Security Group, click your Security Group to add Firewall Rules.
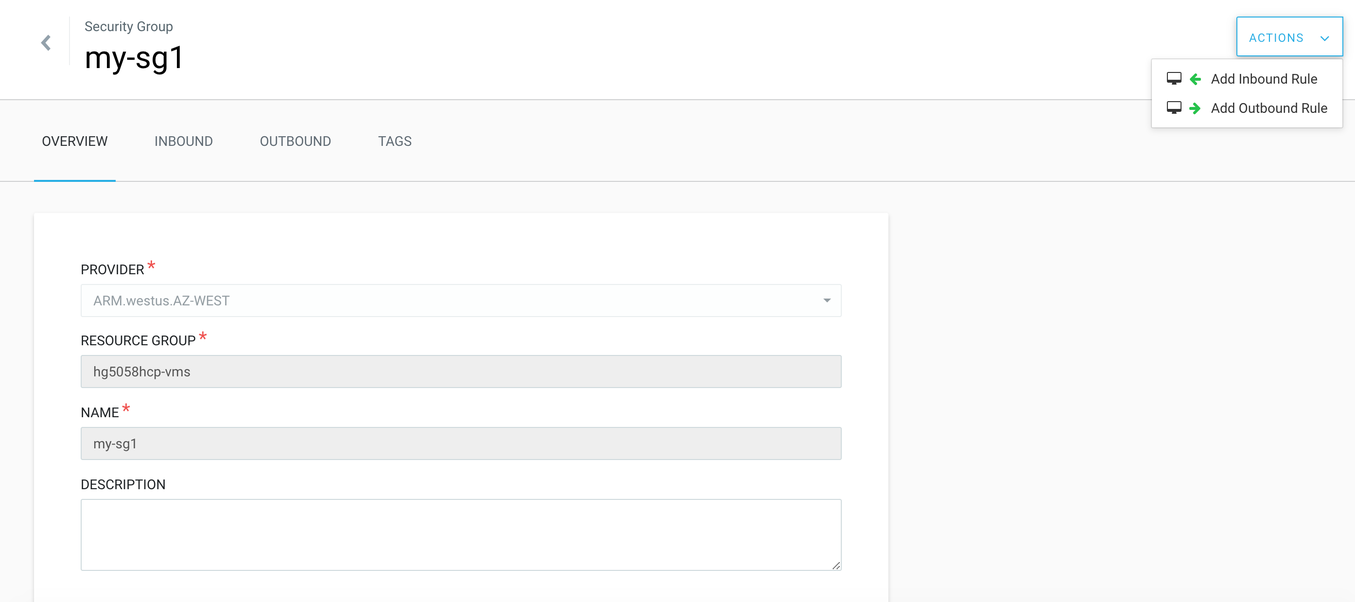
Add an Inbound Rule - Needs verification
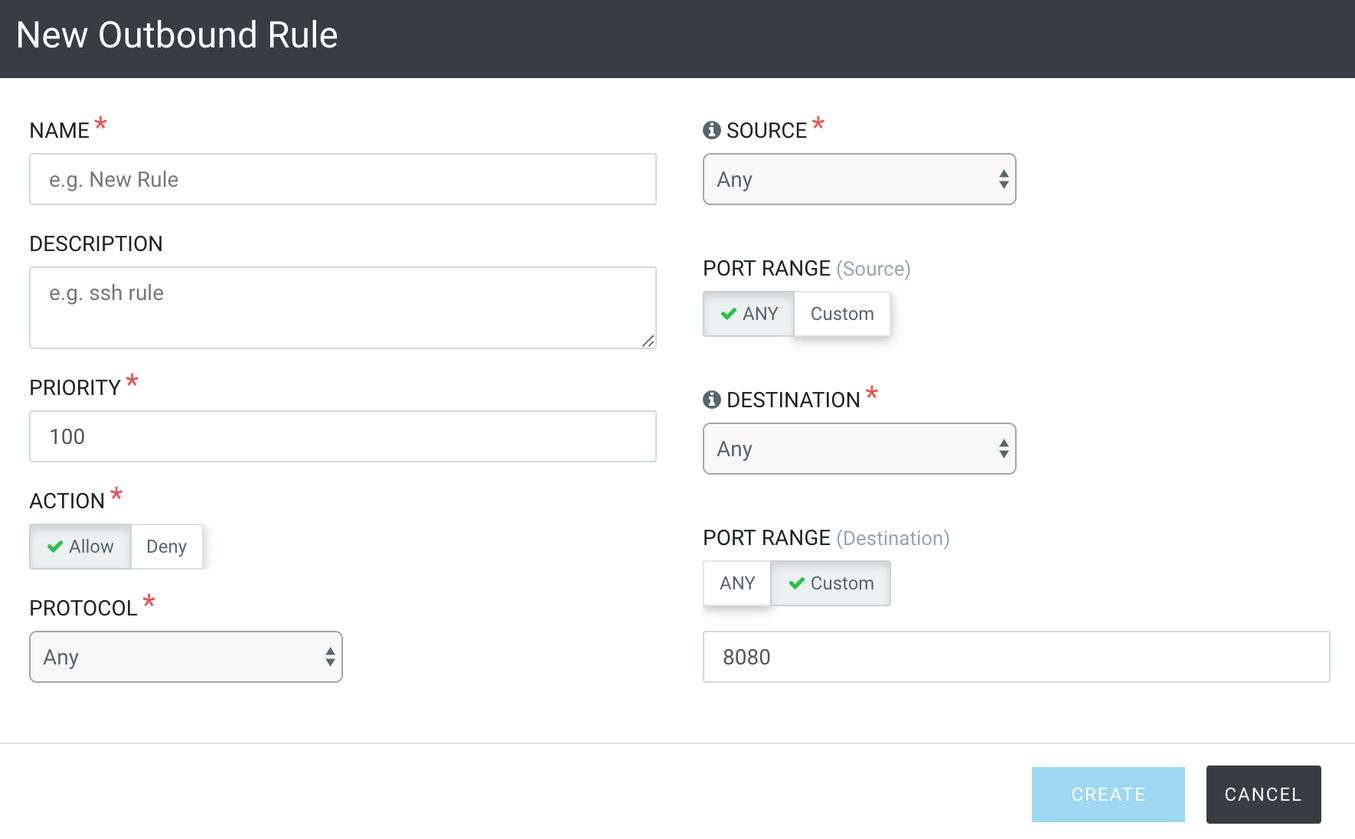
To add an Inbound Rule:
-
From the Security Group dialog, click Actions > Add Inbound Rule.

-
Enter a Name for your Inbound Rule.
-
Enter a Description for your subnet. This is an optional field.
-
Enter a value for the Rule Priority. This field determines the precedence that other rules will take over your rule.
-
Choose:
-
Allow or Deny to define the Rule Action that your firewall needs to perform.
-
Protocol from these options:
-
Any
-
TCP
-
UDP
-
-
Any or IP Range to define the IP filter of your firewall.
-
Any or Custom to define the port range filter of your firewall.
-
Any or IP Range to define the IP filter for the destination firewall.
-
Any or Custom Port Range to define the port filter for the destination firewall.
-
-
Add an Outbound Rule
To Add an Outbound Rule:
-
From the Security Group dialog, click Actions > Add Outbound Rule.
-
Rest of the process is similar to that of Adding an Inbound Rule.
-
Comments
0 comments
Please sign in to leave a comment.