Overview
HyperCloud™ Platform (HCP) allows users to create a virtual machine blueprint using VM creation wizard.
Create a VM blueprint
To create a VM blueprint:
-
Login to your HCP account.
-
Navigate to Service Orchestration > Services > VM > New.
-
This will initiate VM creation wizard. Follow the VM creation wizard as usual.
-
On the Review page, click on Save Blueprint Only.

5. This will open a Machine Compose Blueprint dialog pre-populated with the details you have chosen in the wizard.
-
You can modify the content if you wish so.
-
Provide a name to your blueprint.
-
Description is optional.
-
You can share this blueprint with other users using entitlement.
-
However note that in order to use this blueprint, entitled user also needs to have access to the resources used in this blueprint.
-
-

6. Click on Save Changes to save your blueprint.
7. Later you can use this blueprint for a single click VM deployments. Your blueprints can be accessed in the App Store.
Editing the Plugin in Blueprint
To edit plugin related information from the YAML file:
-
Login to the portal with the required credentials.
-
Navigate to SERVICE ORCHESTRATION > APP STORE.
3. From the left-navigation menu, click VMs. On the right side of the page, different VMs are displayed as tiles.

4. Hover the mouse pointer over the required tile, and click. The Details page is displayed.

5. Under the YAML section, click Show. The details are displayed.
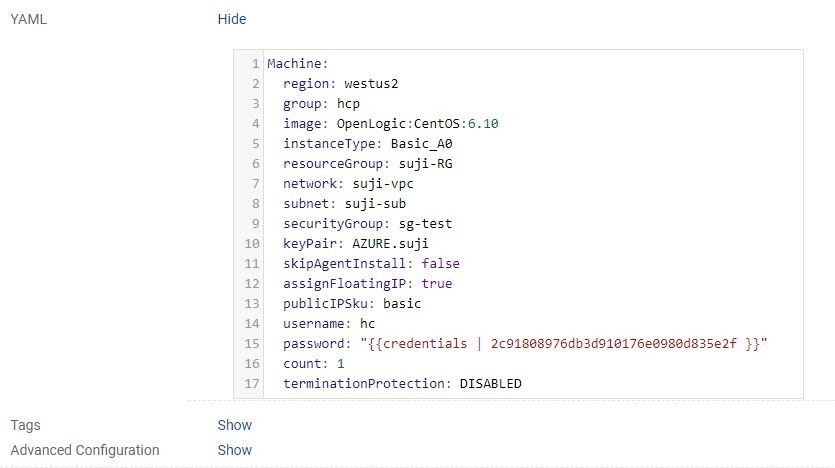
6. Click the Edit tab in the top right of the corner. The Machine Compose Blueprint page is displayed.

7. Click Create Machines. The VM is created successfully.
From the Advanced Configuration section, you can modify the following information and the same would be reflected in the YAML file.
-
Hostname
-
Instant Type
-
Subnet
-
Security Group

Comments
0 comments
Please sign in to leave a comment.