There are several capabilities in the Morpheus provisioning engine. Things ranging from application / service deployments via containers, virtual machines, and even bare metal. Deployment management and app template construction are also core aspects of the provisioning engine. Take advantage of custom tasks and workflows within any environment by building tasks and workflows from those tasks. There is a lot of information to cover with regards to provisioning but Morpheus makes it intuitive and smooth.
Requirements
Provisioning Instances and Apps typically involves many steps beyond starting a workload. Morpheus is centered around automating everything desired for your application to be fully operational, including networking, storage, hostnames, domains, dns, licenses, scripts/automation, scaling, load balancers, security, accessibility, governance, auditing, monitoring, backups, costs, sizing and on and on. Point being there is a lot that goes on when spinning up an instance or app, and to make the magic happen a few requirements need to be met.
VM Provision Steps
While an infinite number of steps can happen when provisioning an Instance or App using VM(s) in Morpheus, the basic order is:
-
-
Look for Virtual Image
Morpheus will check if the Virtual Image set on the Node Type or selected during provisioning is already available in the source Cloud. If not and it is an Uploaded/Local Image, Morpheus will attempt to upload the Image to the target Cloud.
Upload Image
For Uploaded/Local Images that do not exist in the target cloud, Morpheus will need to upload the Image. Ensure the Virtual Image is valid for the target Cloud, the Image meets the target cloud upload requirements, and Morpheus has network access and permissions to upload the image.
Virtual Images
While containers are the future, the most common provisioning method involves Virtual Machines, and the most important part of Provisioning a VM is the Virtual Image. When provisioning a VM, Morpheus will need to do a few things depending on the location of the Virtual Image and if agent install, console access, and script execution is desired.
- Synced Images need to be properly configured
-
Morpheus gathers as much metadata for synced images as possible, but depending on the cloud, os, image configuration, agent install settings, by default the synced Virtual Images may not be ready to provision until configured. The Virtual Image is already at the target Cloud, but datastore selection, credentials, cloud-init settings, and networks and security settings on the Virtual Image can cause provisioning issues.
- Local/Uploaded Virtual Images
-
Images uploaded to Morpheus are configured during the Add Virtual Image process, however Morpheus in most scenarios will still need to copy the Virtual Image to the target Hypervisor/Cloud upon the first provision to the target Cloud. In addition to the requirements for provisioning a synced Virtual Image, copying an uploaded Virtual Image to the target Cloud is required and network and image configurations can cause upload failures, resulting in provisioning issues.
- Marketplace Images
-
AWS and Azure marketplace Images can be provisioned using the generic Amazon or Azure Instance Types, or added as Virtual Images as scoped to Node Types for custom Instance Types. Marketplace items provisioned/added to Morpheus still fall upon the requirements of the target Cloud, such as matching the region with the Image and licensing.
Synced Images
When a Cloud is added to Morpheus, all available Images/Templates records from that Cloud will be synced in regardless of Inventory settings on the Cloud. These Image records will be available in the Virtual Images section and can be provisioned by using the target clouds generic Instance Type, ie VMware, Amazon, Azure, Openstack etc Instance Types, or by creating custom Instance Types and selecting the Image on a Node Type.
Install Agent
On by default, uncheck to skip Agent install. Note this will result in the loss of utilization statistics, logs, script execution, and monitoring. (Some utilization stats are collected for agent-less hosts and vm’s from VMware and AWS clouds).
Username
Existing Username on the Image. This is required for authentication, unless Morpheus is able to add user data, Cloud-Init, Cloudbase-Init or Guest Customizations. If Cloud-Init, Cloudbase-Init Guest Customizations or Nutanix Sysprep are used, credentials are defined in Administration > Settings > Provisioning and User Settings. If credentials are defined on the Image and Cloud-Init is enabled, Morpheus will add that user during provisioning, so ensure that user does not already exist in the image (aka
root). For Windows Guest Customizations, Morpheus will set the Administrator password to what is defined on the image if Administrator user is defined. Do not define any other user than Administrator for Windows Images unless using Cloudbase-init. Morpheus recommends running Guest Customizations for all Windows Images, which is required when joining Domains as the SID will change.Password
Password for the Existing User on the image if Username is populated.
Storage Provider
Location where the Virtual Image will be stored. Default Virtual Image Storage location is /var/opt/morpheus/morpheus-ui/VMs. Additional Storage Providers can be configured in Infrastructure > Storage.
Cloud-Init User Data
Accepts what would go in runcmd and can assume bash syntax. Example use: Script to configure satellite registration at provision time.
Permissions
- Set Tenant permissions in a multi-tenant Morpheus environment. No impact on single-tenant environments.
-
- Visibility
-
- Private
-
Image is only available in the specified Tenants below.
- Public
-
Image is available to all Tenants.
- Tenant
-
If Visibility is set to Private, specify Tenants the Image will be available for.
Auto Join Domain?
Enable to have Instances provisioned with this image auto-join configured domains (Windows only, domain controller must be configured in Infrastructure > Network and the configured domain set on the provisioned to Cloud or Network).
VirtIO Drivers Loaded?
Enable if VirtIO Drivers are installed on the image for provisioning to KVM based Hypervisors.
VM Tools Installed?
On by default, uncheck if VMware Tools (including OpenVMTools) are not installed on the Virtual Image. Morpheus will skip network wait during provisioning when deselected.
Force Guest Customization?
VMware only, forces guest customizations to run during provisioning, typically when provisioning to a DHCP network where guest customizations would not run by default. This is required for host/computer name definitions. domain joining, licenses and user definitions when using DHCP.
Trial Version
Enable to automatically re-arm the expiration on Windows Trial Images during provisioning.
Enabled Sysprep?
Applicable to Nutanix Only. Enable if the Windows Image has been sysprepped. If enabled, Morpheus will inject Unattend.xml through the Nutanix API (v3+ only).
Agent Install
When provisioning an instance, there are some network and configuration requirements to successfully install the morpheus agent. Typically when a vm instance is still in the provisioning phase long after the vm is up, the instance is unable to reach Morpheus, or depending on agent install mode, Morpheus is unable to reach the instance.
The most common reason an agent install fails is the provisioned instance cannot reach the Morpheus Appliance via the appliance_url set in Administration > Settings over both 443 and 80. When an instance is provisioned from Morpheus, it must be able to reach the Morpheus appliance via the appliance_url or the Agent will not be installed.
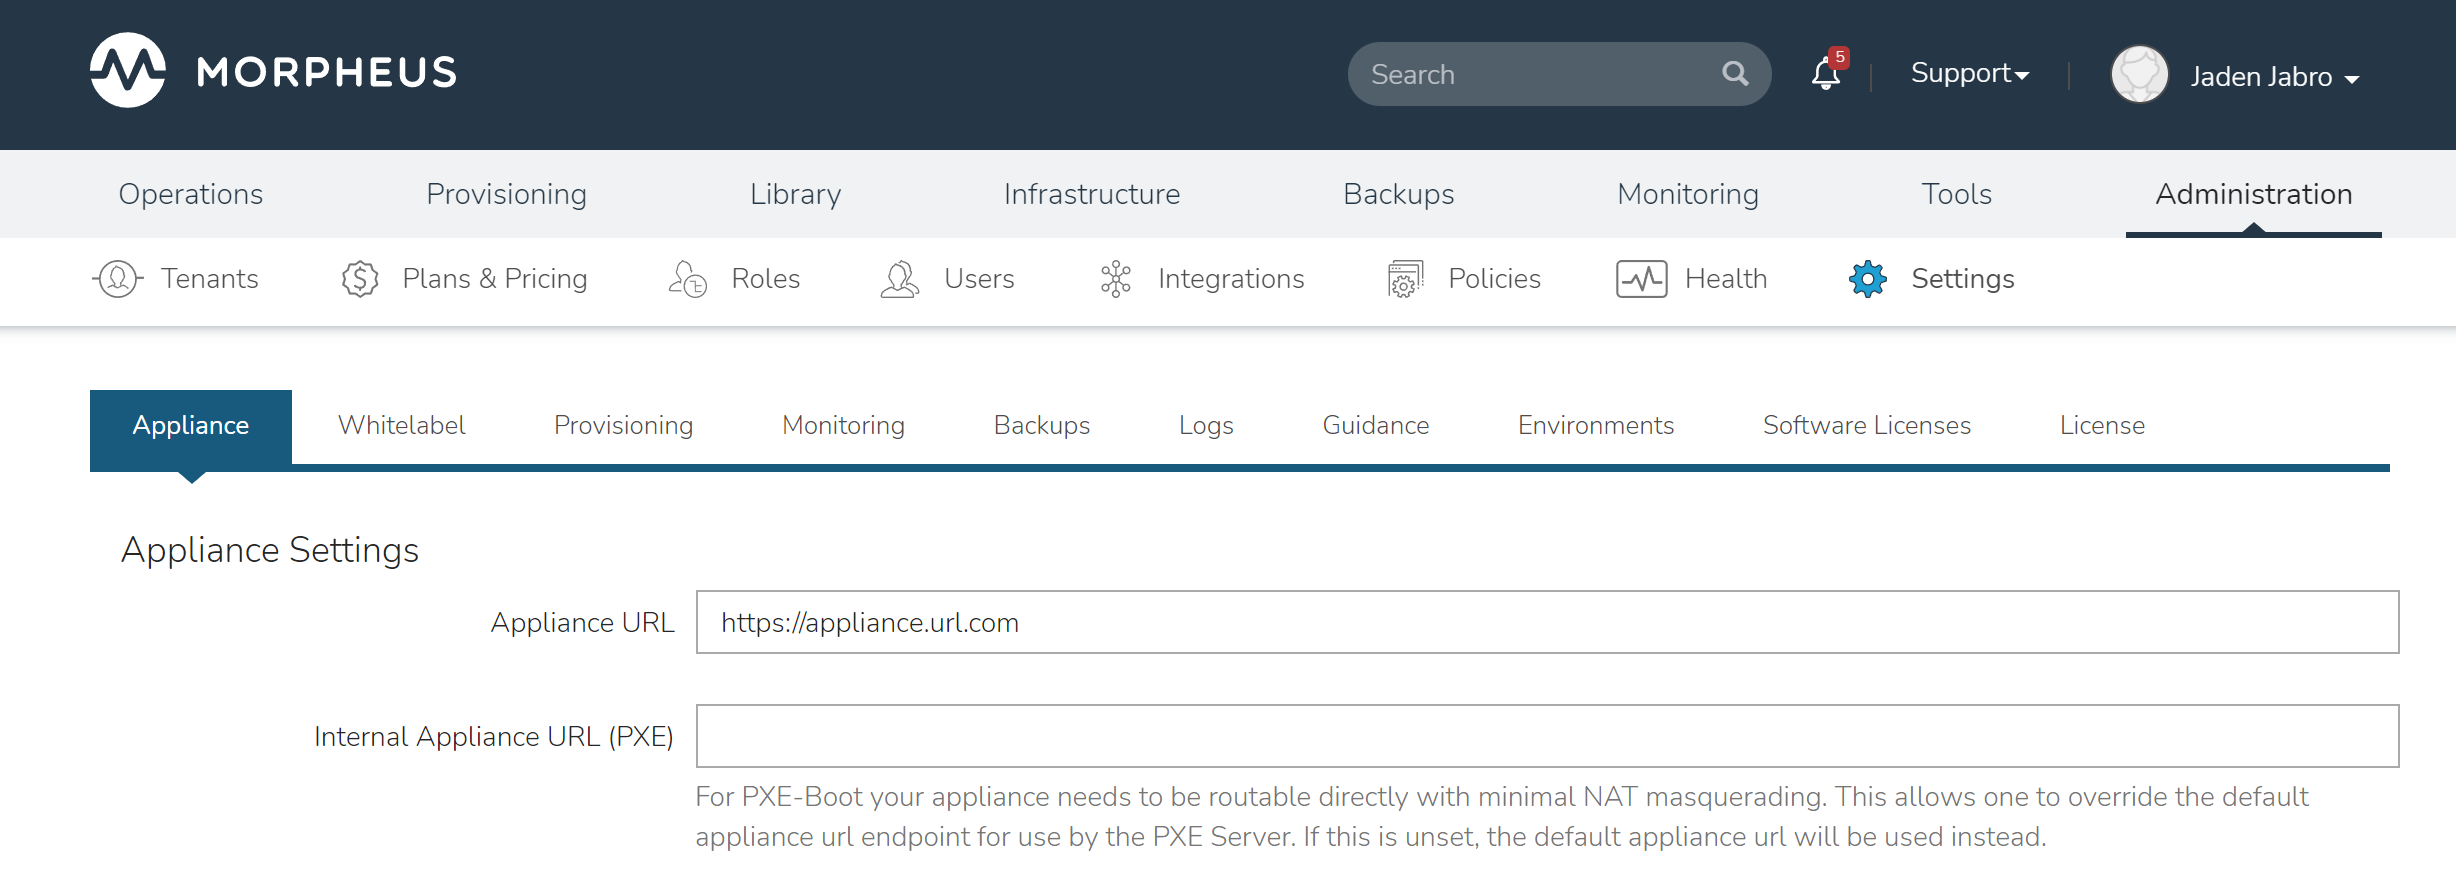
In addition to the main appliance_url in Administration > Settings, additional appliance_urls can be set per cloud in the Advanced options of the cloud configuration pane when creating or editing a cloud. When this field is populated, it will override the main appliance url for anything provisioned into that cloud.
Agent Install Modes
There are 3 Agent install modes:
-
ssh/winrm
-
VMware Tools
-
cloud-init
For All Agent Install modes
When an instance is provisioned and the agent does not install, verify the following for any agent install mode:
-
The Morpheus appliance_url (Administration > Settings) is both reachable and resolvable from the provisioned node.
-
The appliance_url begins with to
https://, nothttp://.SSH/Winrm
Linux Agent
-
Port 22 is open for Linux images, and SSH is enabled
-
Credentials have been entered on the image if using custom or synced image. Credentials can be entered on images in the Library > Virtual Images section.
Windows Agent
-
Port 5985 must be open and WinRM enabled for Windows images.
-
Credentials have been entered on the image if using custom or synced image. Credentials can be entered on images in the Library > Virtual Images section.
VMware tools (vmtools) rpc mode
-
VMware tools is installed on the template(s)
-
Credentials have been entered on the Image if using uploaded or synced image when Cloud-init or Guest Customizations or Sysprep for Windows are not used. Credentials can be entered on Images in the Library > Virtual Images section.
Cloud-Init agent install mode
-
Cloud-Init is configured in Administration > Settings > Provisioning section
-
Provisioned image/blueprint has Cloud-Init (linux) or Cloudbase-Init (windows) installed.
Provisioning Concepts
Morpheus is a powerful infrastructure-agnostic Cloud Application Management Platform. Compared to other CMP platforms in the space, some terminology and concepts may differ. These concepts are documented in this section along with places where terminology may be slightly different compared with other platforms or with common industry parlance.
Morpheus refers to itself as a CAMP (Cloud Application Management Platform) as opposed to a (Cloud Management Platform). While that may seem minor, it actually is a big deal. Many CMP applications start at the IaaS layer and work up to the application layer (often needing additional PaaS architectures to fill out the model). Morpheus was designed from a middle-ground perspective. As such, some concepts are a bit different. This provides a more complete platform that allows for greater capabilities out of the box as will be seen when these concepts are covered.
Instances
Morpheus starts with provisioning Instances. In some platforms, an Instance is representative of a singular object like a virtual machine in Amazon AWS. In Morpheus, this concept was rethought. An Instance is more of a representation of a resource or service. This service may involve several virtual machines or several Docker containers.
For example, in the Morpheus Instance wizard, MongoDB is an option and contains several Instance configurations. One of these configurations is a full MongoDB cluster consisting of either seven virtual machines or seven Docker containers. Rather than representing these directly as seven individual “instances”, Morpheus groups them together into a singular Instance of a service that contains multiple containers or virtual machines within it. This even allows for Instance actions that can be performed to expand capacity on an Instance (either horizontally or vertically). In the past, a database server may have been representative of a singular server, but this model has drastically changed in a big data world. This same concept also can apply to something like a simple Apache web server where there are 10 copies of a web server which are horizontally scaled out to handle traffic.
When viewing an Instance detail page, one is able to look at details and statistics specific to a virtual machine or container. Morpheus simply helps simplify the management model for tracking these services.
Containers / Nodes / Virtual Machines
In relation to Instances, an Instance can have many nodes. A node is a generic representation of a container or a virtual machine. In most cases, Morpheus will represent a node as a Container or Virtual Machine depending on the provisioning engine used for the Instance. Node is just a generic naming representation when referring to these types of items. The public Morpheus developer API, however, often refers to both virtual machines and Docker containers as “containers”. The UI was since updated to better delineate this concept for easier understanding but, in essence, the name is valid for both concepts of containerized environments as well as Virtual Machines. In fact, one can even think of a Docker Host as a Hypervisor (which we do).
Hosts / Servers
This concept is mostly tailored to users of Morpheus who are responsible for managing and maintaining the underlying infrastructure integrations. A Host typically refers to a Docker Host in which a container (within an Instance) is running, or a hypervisor that virtual machines can be provisioned onto. A server is the underlying general representation of a physical or virtual server. It could be a Host representation, a Virtual Machine, or even a Bare Metal delineation.
When a user provisions a VM-based Instance, a corresponding server record is created to represent the link to the actual resource via the underlying provisioning engine. This may seem a bit odd but provides an aspect of Morpheus that is quite powerful. This singular concept is what allows Morpheus to ingest “brownfield” environments. We do not need to start clean. Morpheus can be integrated into existing environments and manage existing virtual machines. The way Morpheus does this is by periodically syncing existing VMs from the added cloud integrations. A server record will be created and periodically updated (every five minutes, by default) with realtime information and changes. This, in essence, provides CMDB-like capabilities as well. When a server is discovered, the user (given the appropriate access) can convert the virtual machine to a managed Instance. When this is done, a corresponding Instance is made in the provisioning section of Morpheus and the Morpheus Agent can optionally be installed to provide more refined guest operating system-level statistics and logging.
Apps
On top of all the previous concepts, Morpheus provides an Apps layer. An App is a collection of Instances linked together via application tiers. Tiers allow the user to define segregated sections of connectivity between the various elements (Instances) within an application. Once these Instances are all linked together in an application concept, this may affect Instance environments and provide service discovery capabilities for them to cross connect. There are several service discovery aspects within Morpheus as well as integrations with services.
App Blueprints
An App Blueprint allows a user to define an application structure for easy reproducibility and deployment into various environments. They can be used to mix and match various Instance types to provision an application dependent on multiple layers of services.
Catalog
The Catalog presents a simplified self-service view where users can select and deploy Instances, Blueprints or Workflows with pre-defined configuration in just a few clicks and without presenting an overwhelming list of options. Selections are presented as tiles and users can add items to a cart as if shopping on an eCommerce website. For users who tend to provision regularly from a small selection of Instance Types and configurations, the catalog is an easier option compared with the much more detailed and option-rich Instance provisioning wizard.
Configuring Catalog Item Access
Within the Catalog, users are presented with selections based on their User Role. Additionally, Catalog Item access can be set on the Tenant Role to restrict certain items from all users in the Tenant. By default, User Roles have no access to any catalog items. Thus, administrators will need to enable access to some Catalog Items in order for users to make use of this view.
Configuring Global Access:
-
Full: Gives access to all Catalog Items
-
Custom: Gives access to individually-selected items from the list below
-
None: No access is given to any Catalog Items
Tip
When giving Custom access, be sure to set access on some of the individual catalog items to Full in order to reveal those items to the Role group.
Catalog
The catalog shows the complete list of predefined items available to the user for provisioning. Catalog items are not created here, however. For more on creating catalog items, see the Catalog Items tab in the Morpheus Library section (Library > Blueprints > Catalog Items).
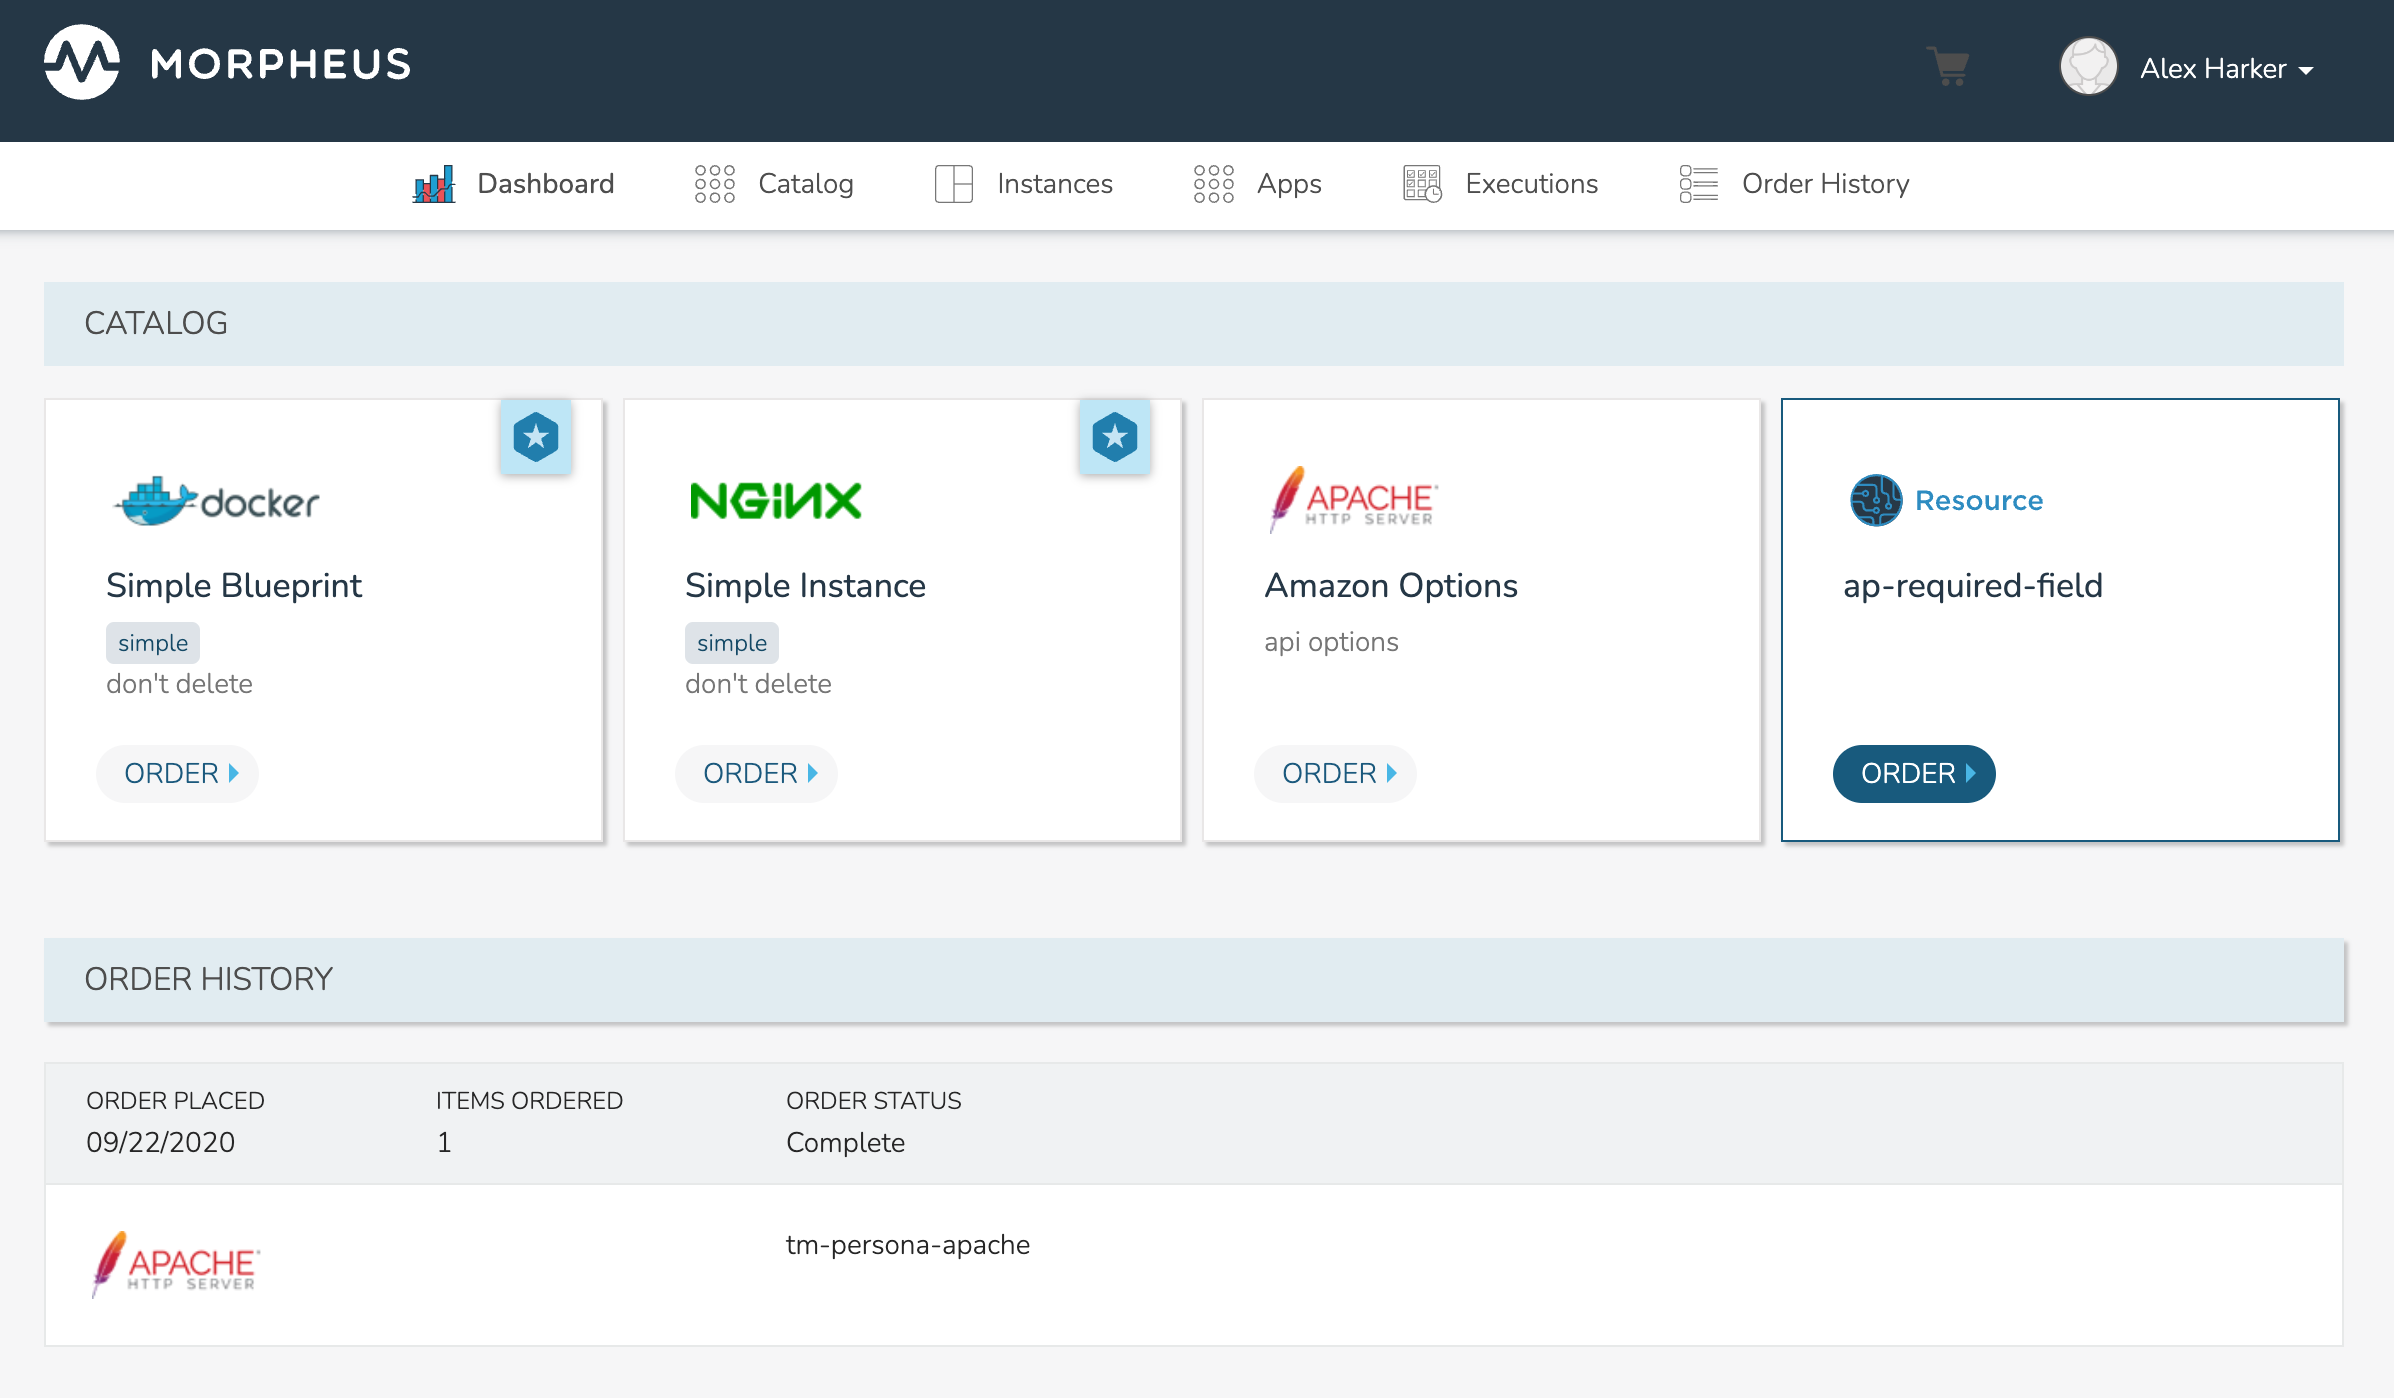
Placing Orders
From the Catalog page, select the tile for your chosen item to see any custom options that may need to be set prior to provisioning. The catalog shows a complete list of items but the list can be filtered by entering search terms or by selecting a category. When adding or editing catalog items, an optional category may be set which aids in filtering for environments which have a lot of catalog items to select from.
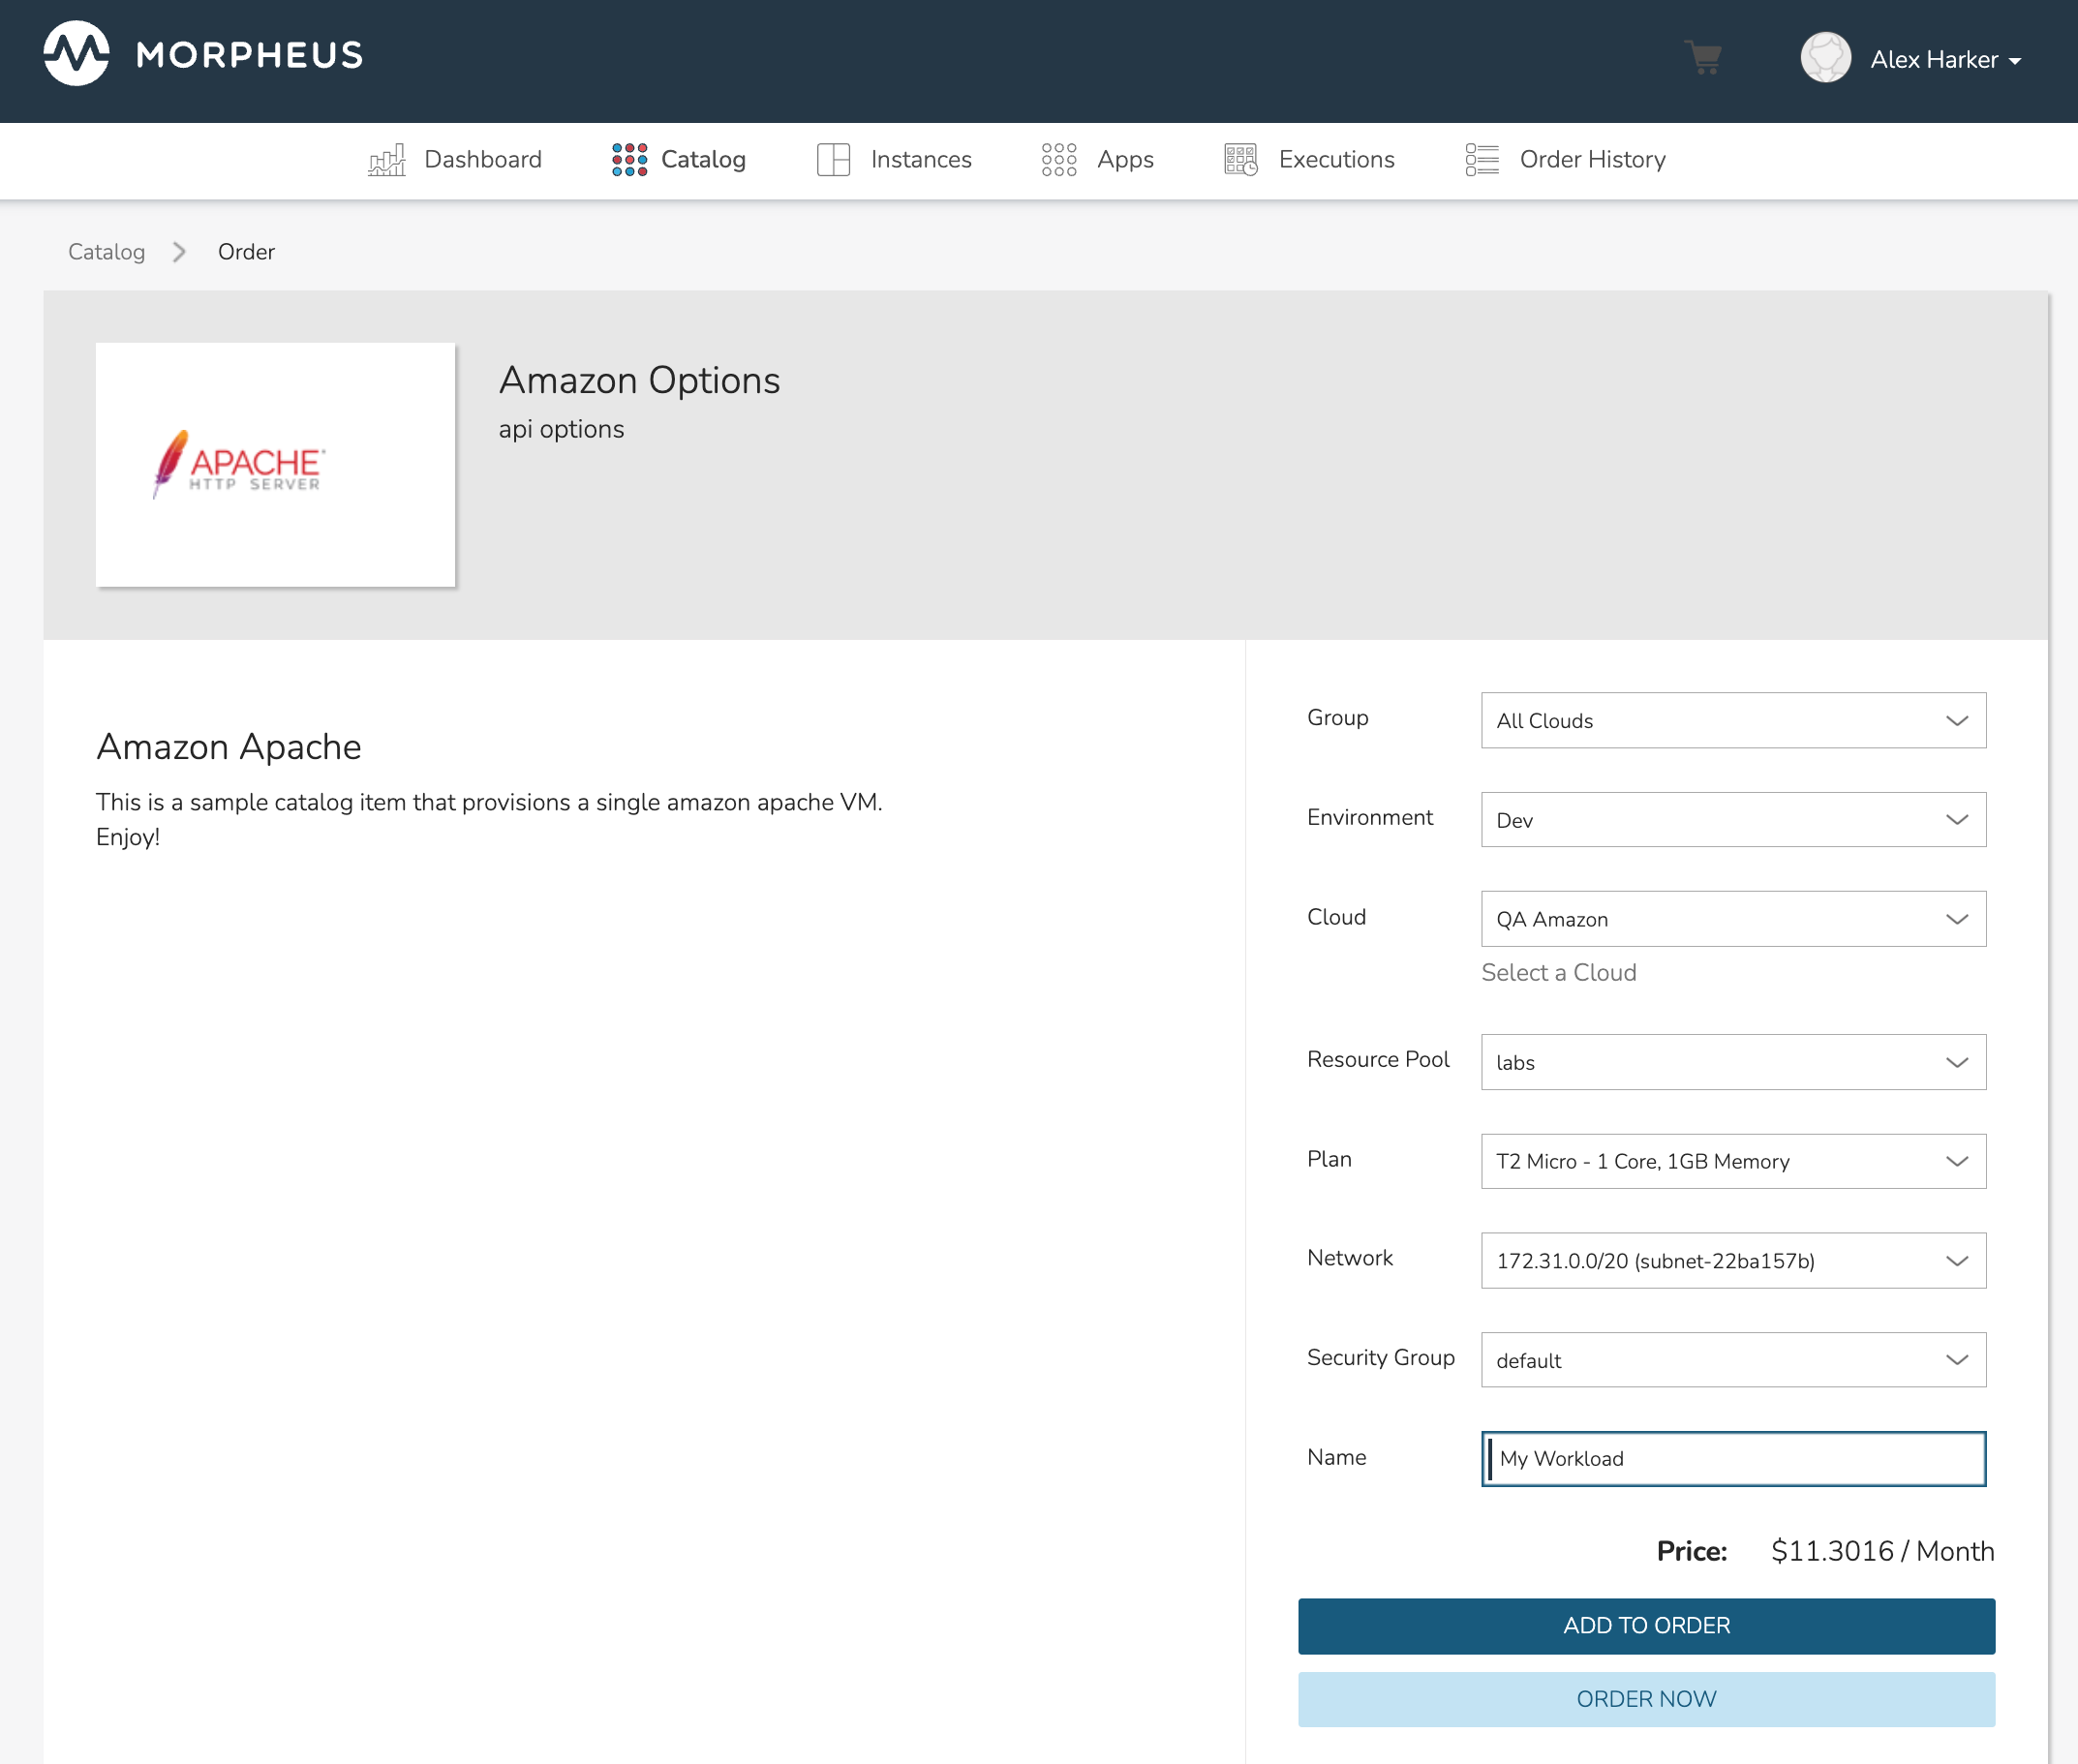
Once the item is in the cart, make any additional selections to complete the order. Once finished, proceed to the cart by clicking on the cart icon at the top of the application window. Each selected item is listed along with its estimated cost. The total estimated cost for the entire order is also computed.
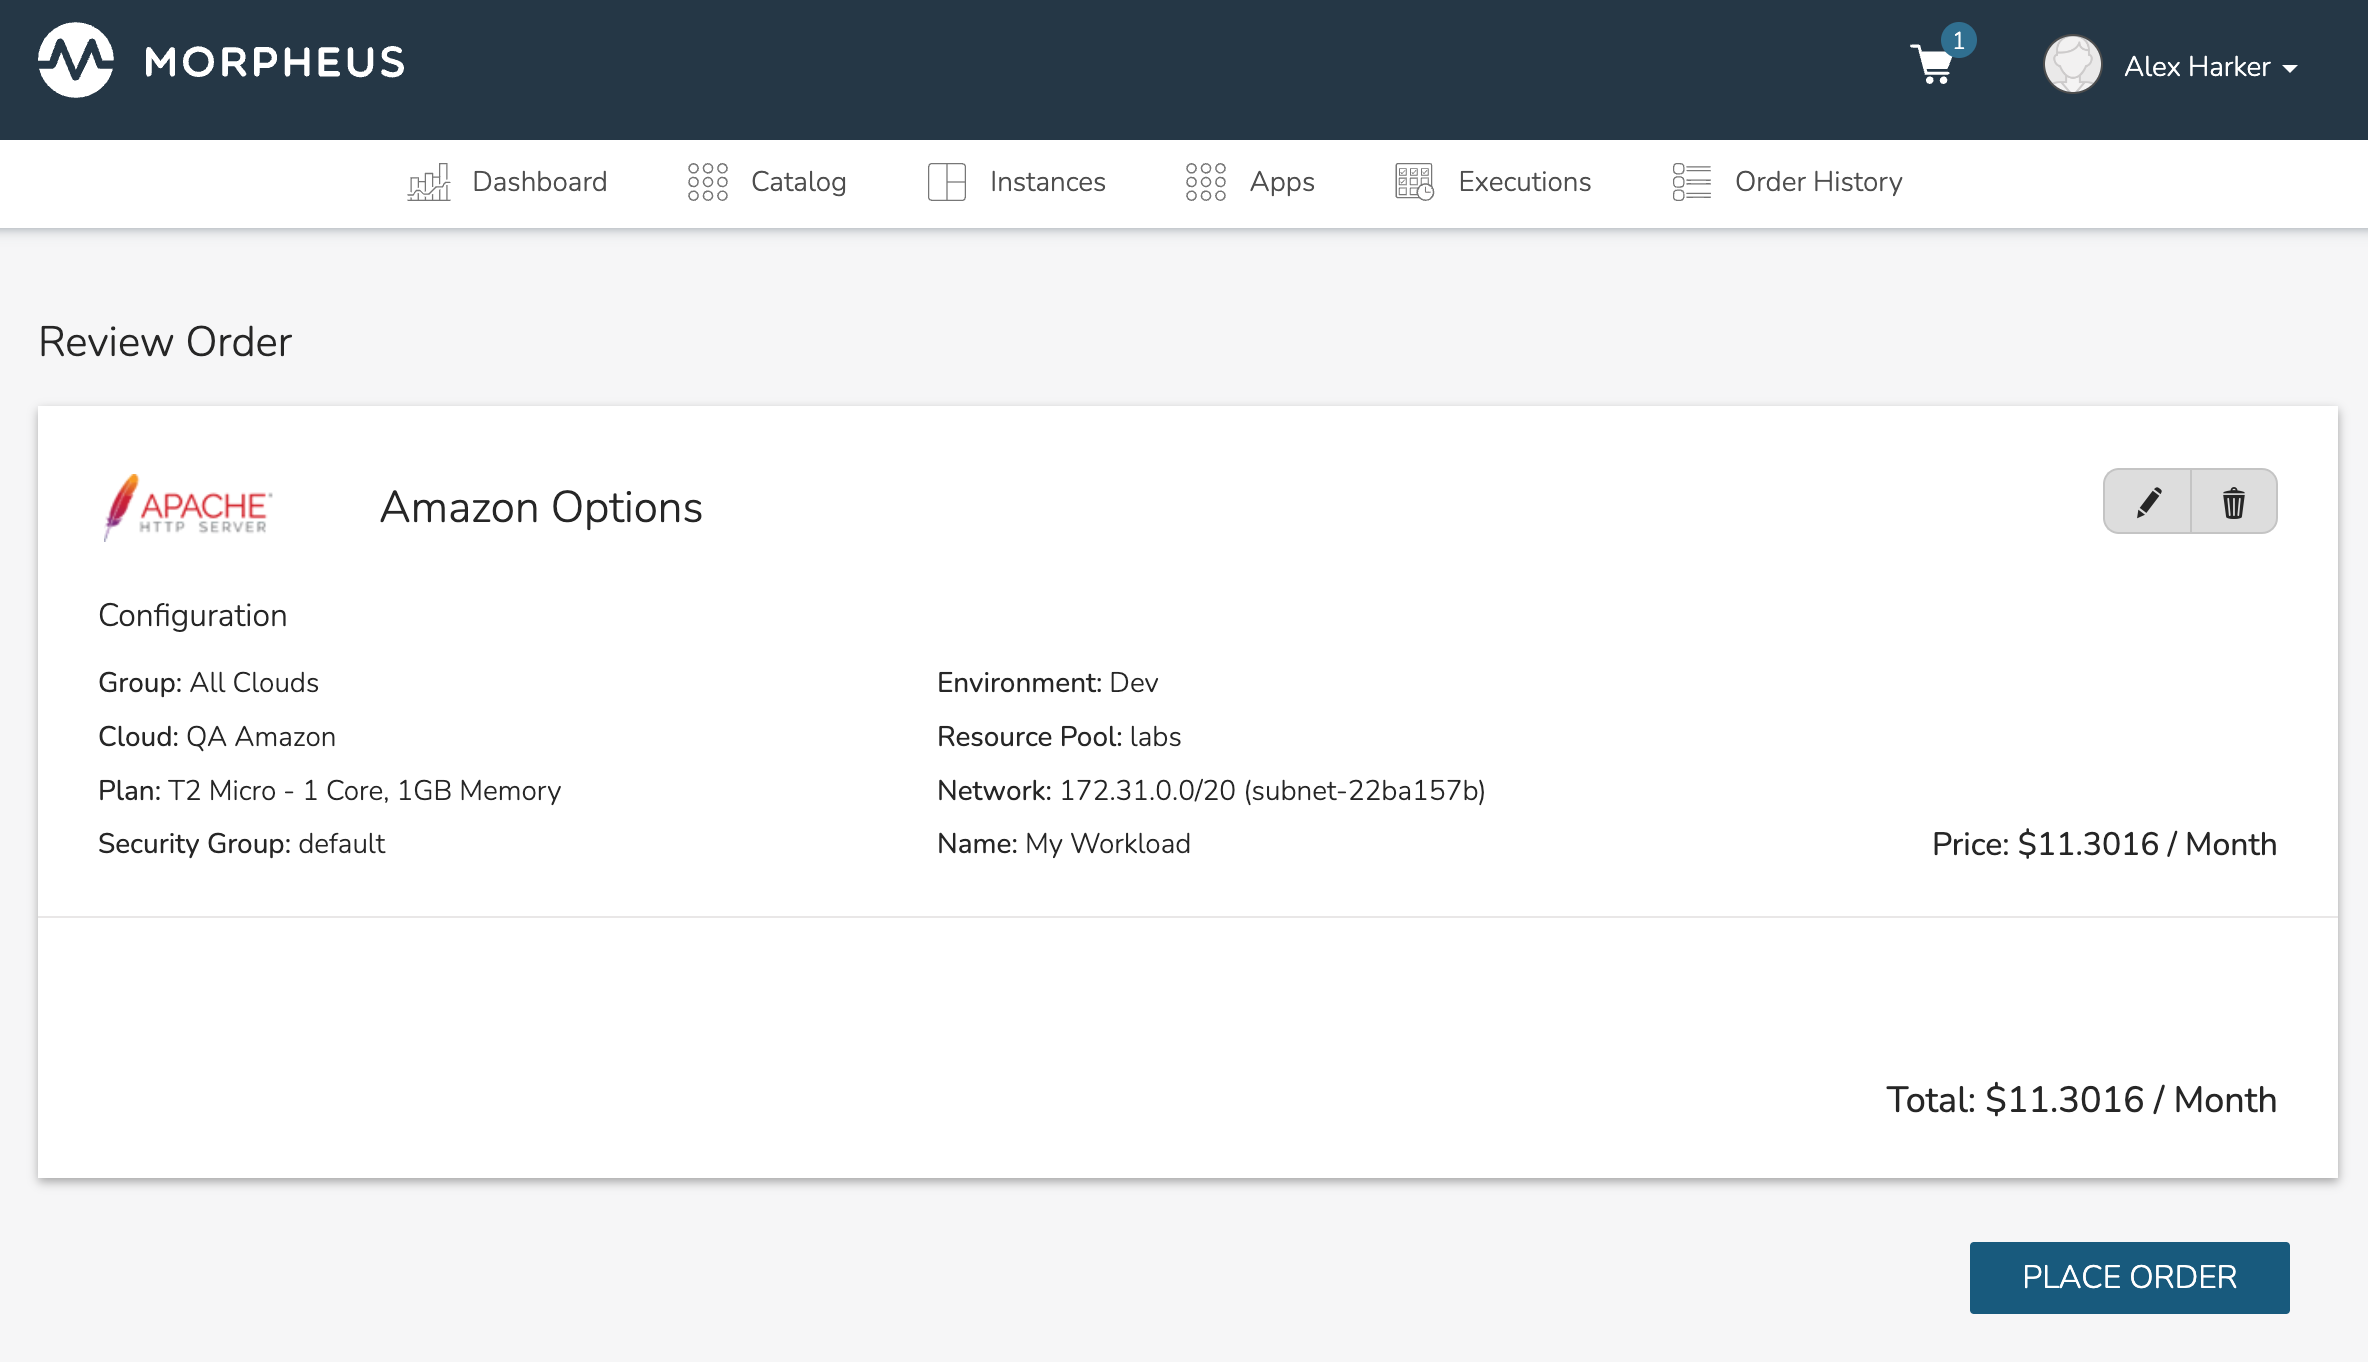
Once PLACE ORDER is clicked, the provisioning process will begin and the user is redirected back to the catalog page. Any new orders can now be viewed from their respective list pages. Depending on whether you’ve ordered an Instance, App, or Workflow execution, navigate to the appropriate list page for your item to view it.
Order Detail
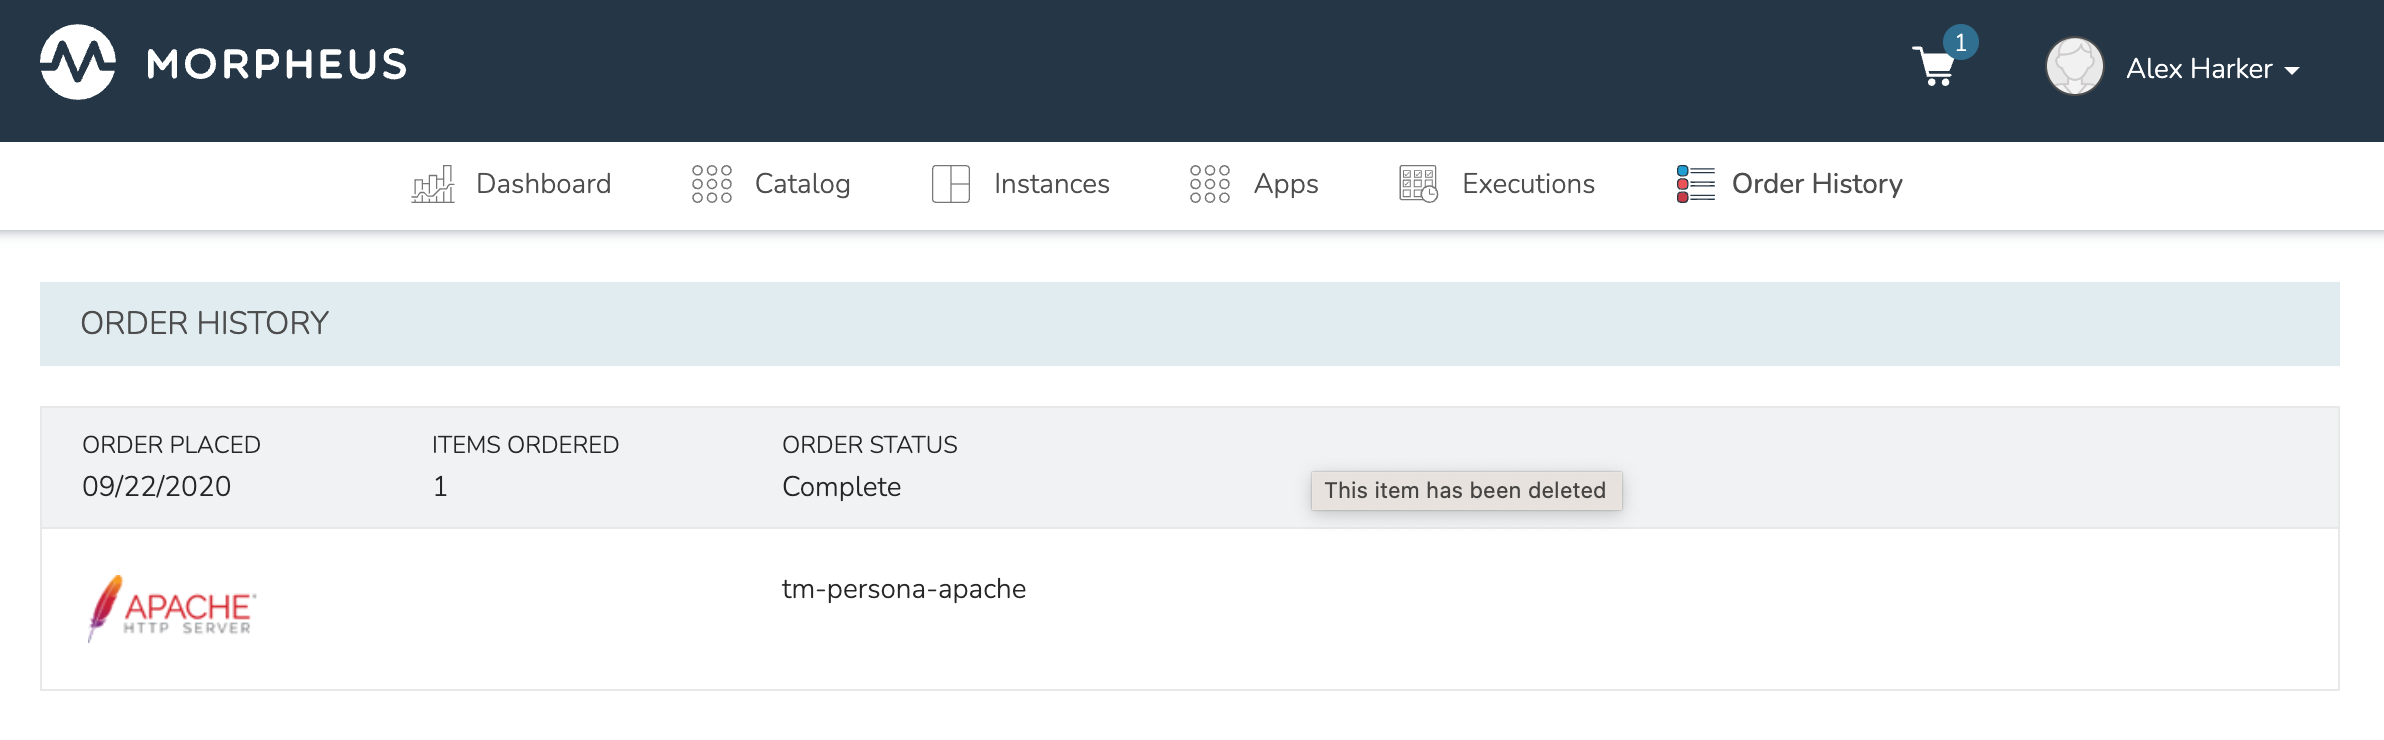
The Order Detail page includes a complete list of orders and some basic details about them. If the item still exists, you can link through to the detail page for the item (whether that be Instance detail, App detail, or Execution detail). When the item name is not hyperlinked, the item has been deleted but the record of the order remains in the history.
Instances
Instances are a great starting point for taking advantage of self service features and spinning up both VMs and containers. In Morpheus it may be advisable to cover the definition of a few terms used within the application so as to reduce confusion. These concepts are also covered in greater detail in the Provisioning Concepts section.
- Instance
-
A set of containers or virtual machines that can correlate to a single horizontally-scalable entity or a service suite, like a database. It is important to note that an Instance can contain one or more containers/VMs depending on the Instance type and configuration.
- Container
-
Typically a docker container provisioned via a Morpheus Docker host.
- Virtual Machine
-
A virtualized compute server provisioned onto various hypervisor hosts.
The top of the main Instances page shows overall statistics for the listed Instances, including count, status, and resource utilization. You can search for Instances by name, or filter by group, instance type, or category.
Creating Instances
The Instance catalog is the one-stop shop for selecting items to be provisioned and pieced together. It contains not only basic container and VM options but also tailored services for SQL databases, NoSQL databases, cache stores, message busses, web servers, and even full-fledged apps. The list contains a lot of items to choose from and they are represented to the user based on what provisioning engines are enabled and integrated in the Morpheus environment.
To get started, simply click the + ADD button in the upper right of the Provisioning > Instances section. A modal will display allowing the catalog to be searched. Once an item is selected it is just a matter of following the steps through the wizard.
Converting Discovered Resources to Managed Instances
When creating new cloud integrations (or updating existing ones), users may opt for Morpheus to onboard any existing resources that currently reside in the Cloud. For example, these may be virtual machines that exist on vCenter hosts prior to integration with Morpheus, EC2 instances pre-existing on an Amazon AWS account, or virtual machines that are running on a KVM host. With the Add/Edit Cloud modal open, mark INVENTORY EXISTING INSTANCES for Morpheus to automatically onboard these resources. Not only will Morpheus inventory these instances at the time the cloud is integrated (or updated), it will also continue to poll the target cloud every five minutes (by default) for newly added or removed servers. Users can see these discovered servers by looking in Infrastructure > Compute. Depending on the type of resource, it may appear on the Virtual Machines tab, the Containers tab, or another tab. Additionally, we can see a list of discovered servers on Cloud detail pages (Infrastructure > Clouds > Selected Cloud). Just click on the tabs for VMs, Containers or Hosts tab. Discovered resources will be indicated as such whereas containers which are associated with a managed Instance will be marked as a “Managed”.
Additionally, Morpheus allows users to convert discovered resources into managed Instances. Begin from the server detail page (Infrastructure > Compute > Virtual Machines > selected machine) and from the ACTIONS menu select “Convert to Managed”. At this point, we must make a number of selections:
-
Assign to the primary Tenant or one of the Subtenants
-
Select a Group (this dropdown contains a filtered list of Groups which the associated Cloud is in)
-
Username and password for a seeded account
-
Opt to install Morpheus Agent or not (for more on Morpheus Agent, click here)
-
Select the Instance Type which should be associated with the new Instance containing this VM
-
Select a version number for the Instance (such as 20.04 for a basic Ubuntu Instance)
-
Select a Layout, Instance Types often have multiple Layout configurations
-
Identify the operating system
-
Select a Plan (this dropdown contains a filtered list of plans which correlate to the size of the VM)
Finally, click EXECUTE. Once this process is completed, the server will be indicated as “Managed” in the servers list. Additionally, a new Instance will appear on the Instances List page (Provisioning > Instances). We can now work with it in the same way we can work with any other Instance, such as by adding it to an App or expanding the Instance horizontally with added nodes.
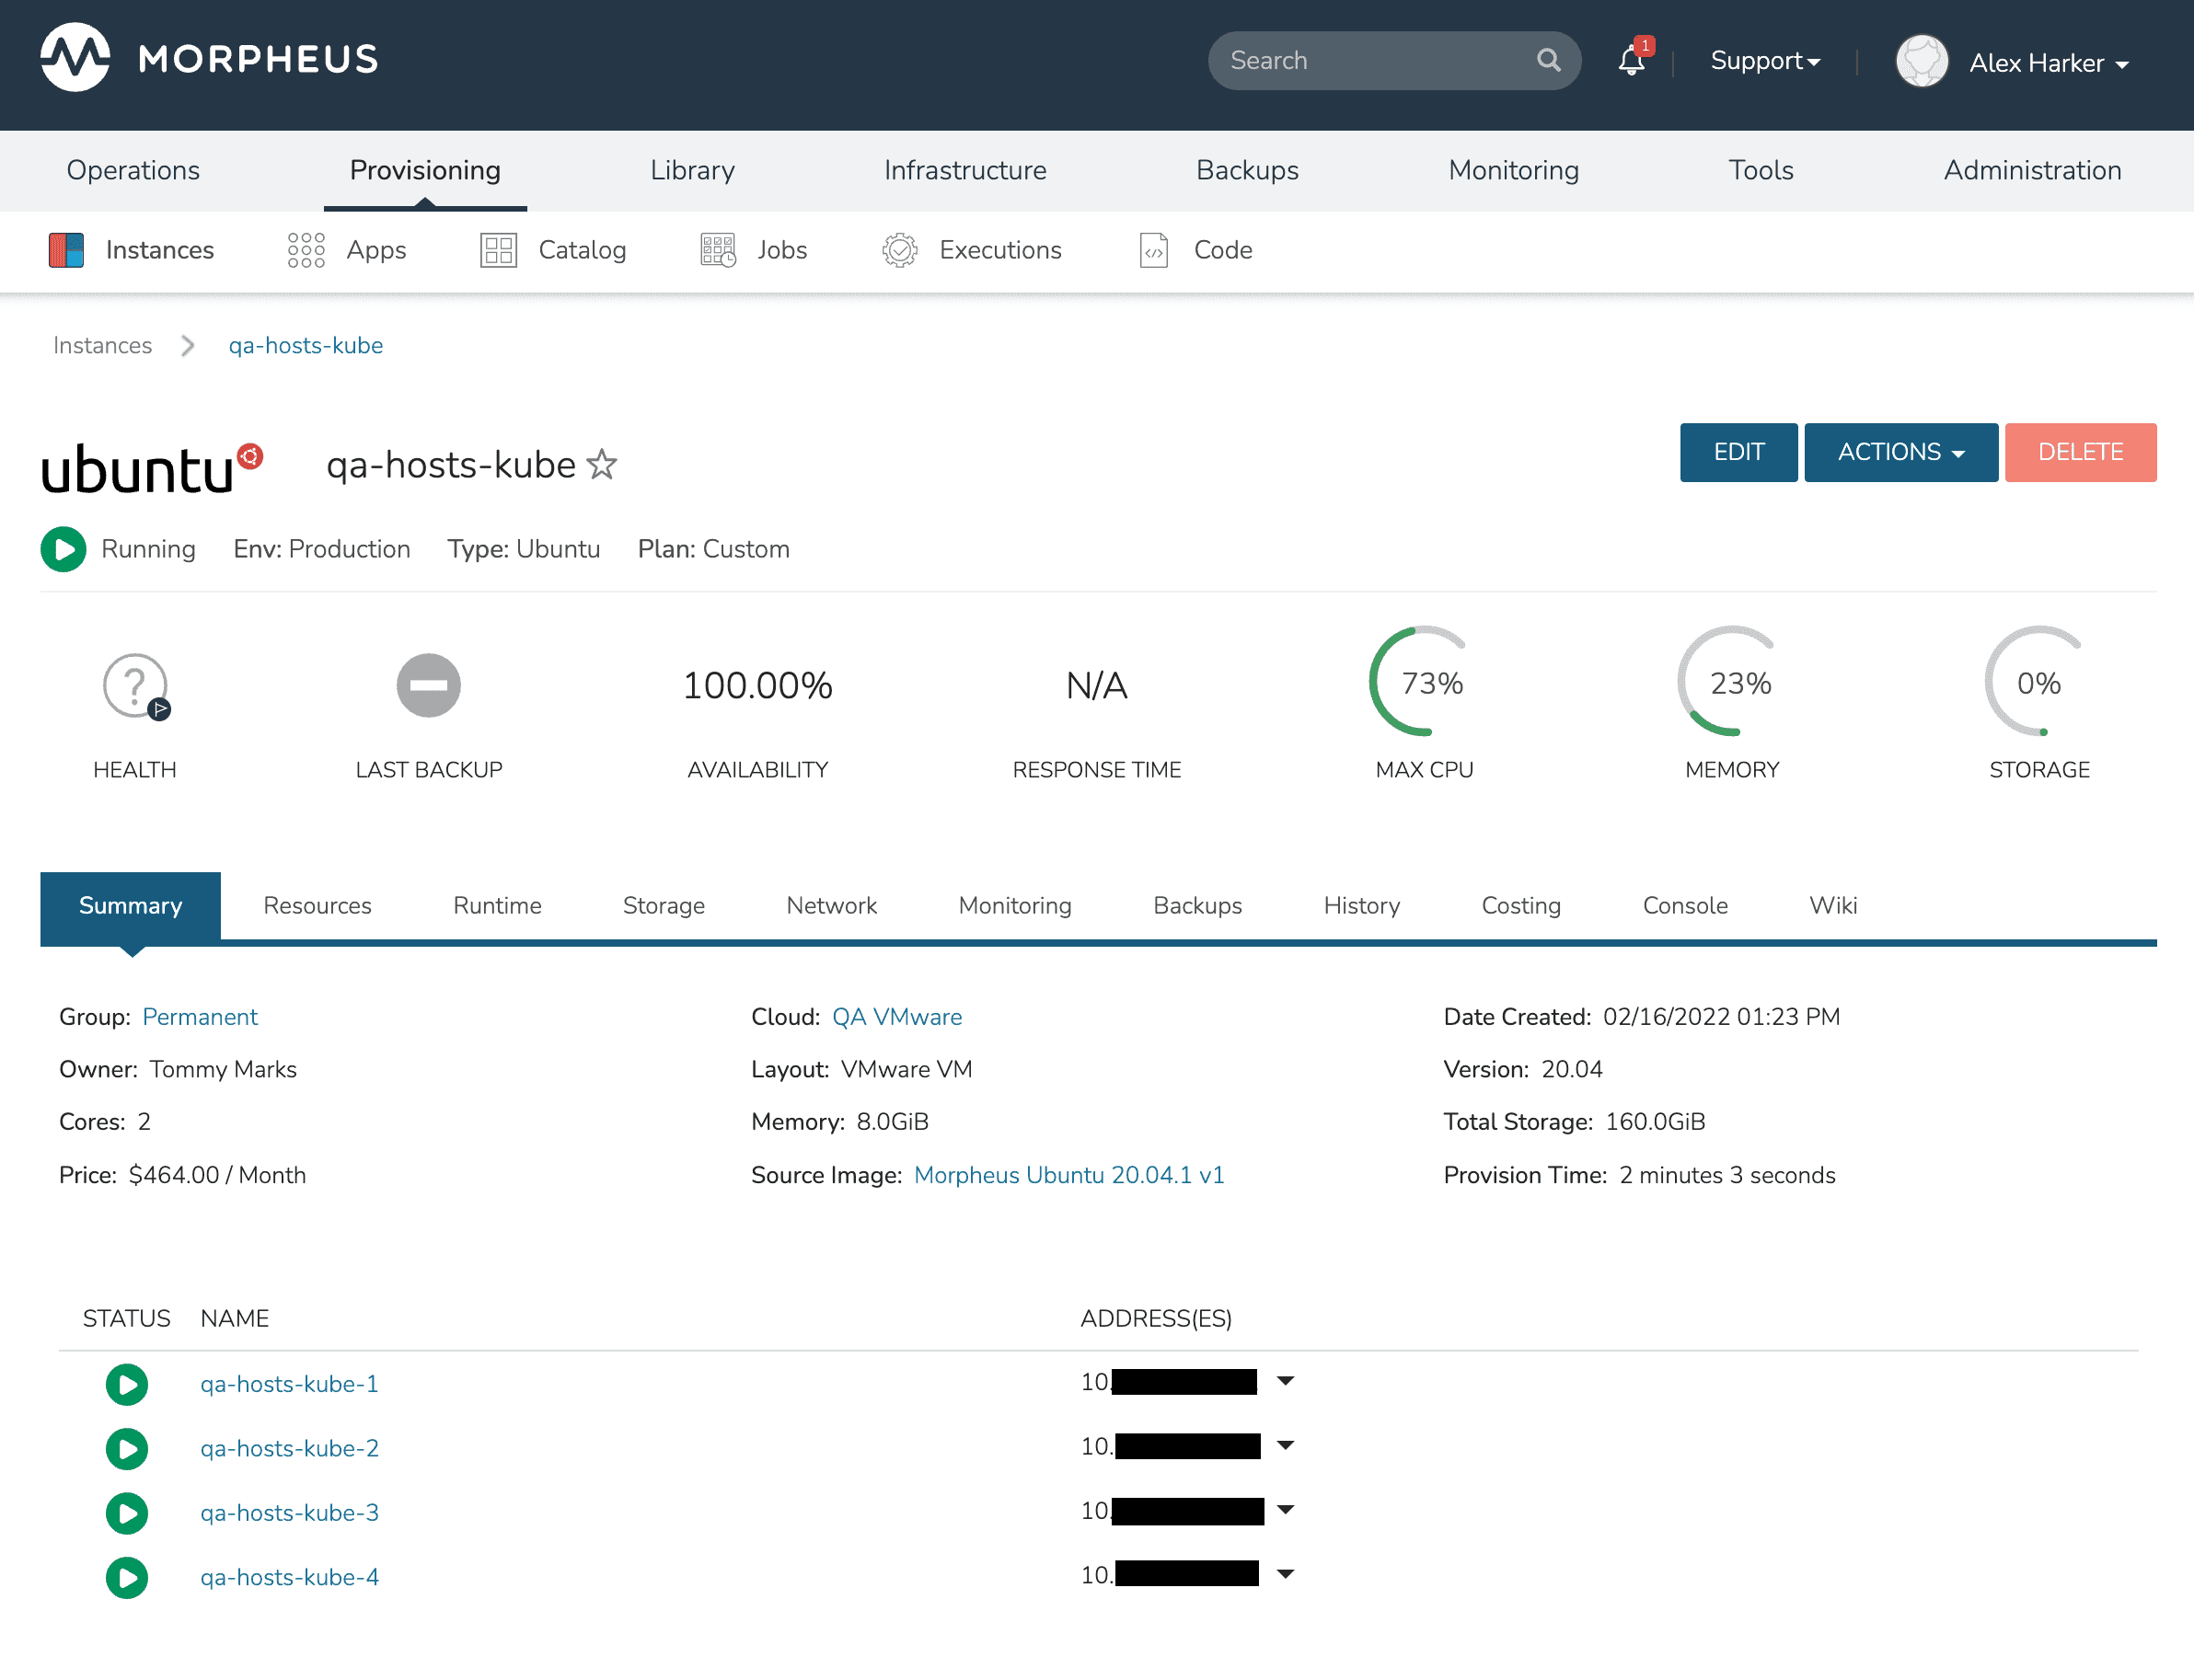
Instance Details
The instance detail page is where you can view and fully manage an instance. To get to an instance detail page, navigate to Provisioning > Instances, and click on an Instance. Please note Instance details and actions will differ between Instance types and user permissions.
There are several sections within an Instance page that provide useful capabilities to the user.
- Summary
-
Basic information, stats and status information
- Deploy
-
Track deployment history for instance types that support deployments or manually kick off a deployment (only visible for Instance Types that support deployments)
- Settings
-
Some Instance Types support custom configuration settings (for example, MySQL presents the my.ini)
- Resources
-
VMs, containers, or other resources associated with the Instance are listed here. Some Instance Types, such as XaaS Instances, will not have resources and the tab is not displayed
- Runtime
-
View the environment variables presented to the Instances or exported to the Instances via Apps (more on this in the Apps section). Users may also see Imported environment variables that may be referenced by the running Instance.
For Instances that support load balancing and auto scaling, configure auto scaling thresholds and load balancer settings in the Scale subsection that pertain to a particular Instance.
The software subsection will show any tracked software which is Installed as part of the provisioning process and is being tracked.
- Storage
-
See storage information associated with the Instance including the list of volumes and controllers which are associated with each machine that makes up the Instance.
- Network
-
Useful for configuring network interfaces for your VMs or security groups which allow access to the Instance.
- Monitoring
-
Quick summary of the monitoring system and all checks that were configured to test the state of the Instance. Stats views (memory, cpu, etc.) can be zoomed out to a 90-day view if desired (in global settings, ensure your stats retention setting will support this). Logs and guidance for the individual Instance are also shown in their respective subtabs.
- Backups
-
Quick backup dashboard. Useful for viewing historical backups and snapshots as well as adding new backup jobs.
- History
-
See historical information related to automation which has been run against the Instance. This is useful for examining automation which was run as part of a phase of a Provisioning Workflow. Users can also drill into the Workflows to examine individual Tasks, including viewing the output from these Tasks to confirm success or troubleshoot issues.
- Costing
-
Invoices pertaining to the Instance are displayed here. See the Instance level or host level invoices along with individual line items. In the History subtab view historical pricing data to monitor trends. In the Prices subtab view any prices which have been created and used to build a metered costing profile for the workload.
- Console
-
Access the Instance or container via a client-less Console supporting SSH, RDP, VNC, or even hypervisor-level remote consoles.
- Wiki
-
View the Wiki page for this Instance or edit the existing Wiki page (which may currently be blank). The content field supports markdown formatting, see the main Wiki section of Morpheus documentation for additional details.
Managing Instances
Instance actions allow you to perform numerous management tasks on instances. The actions available depend on the instance type, hypervisor, roles permissions, and instance state.
- Edit
-
Edit the Name, Description, Environment, Group, Metadata, Tags, and Owner for the Instance.
- Delete
-
Deletes the Instance.
Apps
Apps allow instances having general relationships to be grouped in a clean and organized manner. App functionality enables full control of which instances belong in an app as well setting Firewall and Access Control List (ACL) rules. Use Apps to structure all necessary components into a single place. Add checks and groups for web servers, database nodes, etc.
Apps can be created from Blueprints, which are made in Library > Blueprints > App Blueprints or from Existing Apps.
Creating Apps
New Apps can be created from Blueprints or using existing Instances.
Creating Apps from Blueprints
-
Click +ADD on the right side of the main Apps section in Provisioning.
-
Select an existing App Blueprint and click NEXT.
-
Enter a Name for the App and select a Group. Default Cloud and Env can also be selected.
-
Click NEXT. Blueprint configurations matching the Group, Cloud and Environment selections will auto-populate the configurations of the Instances in the App. If no Blueprint Configuration matched the Group, Cloud or Env selections, the Instances will have default configurations.
-
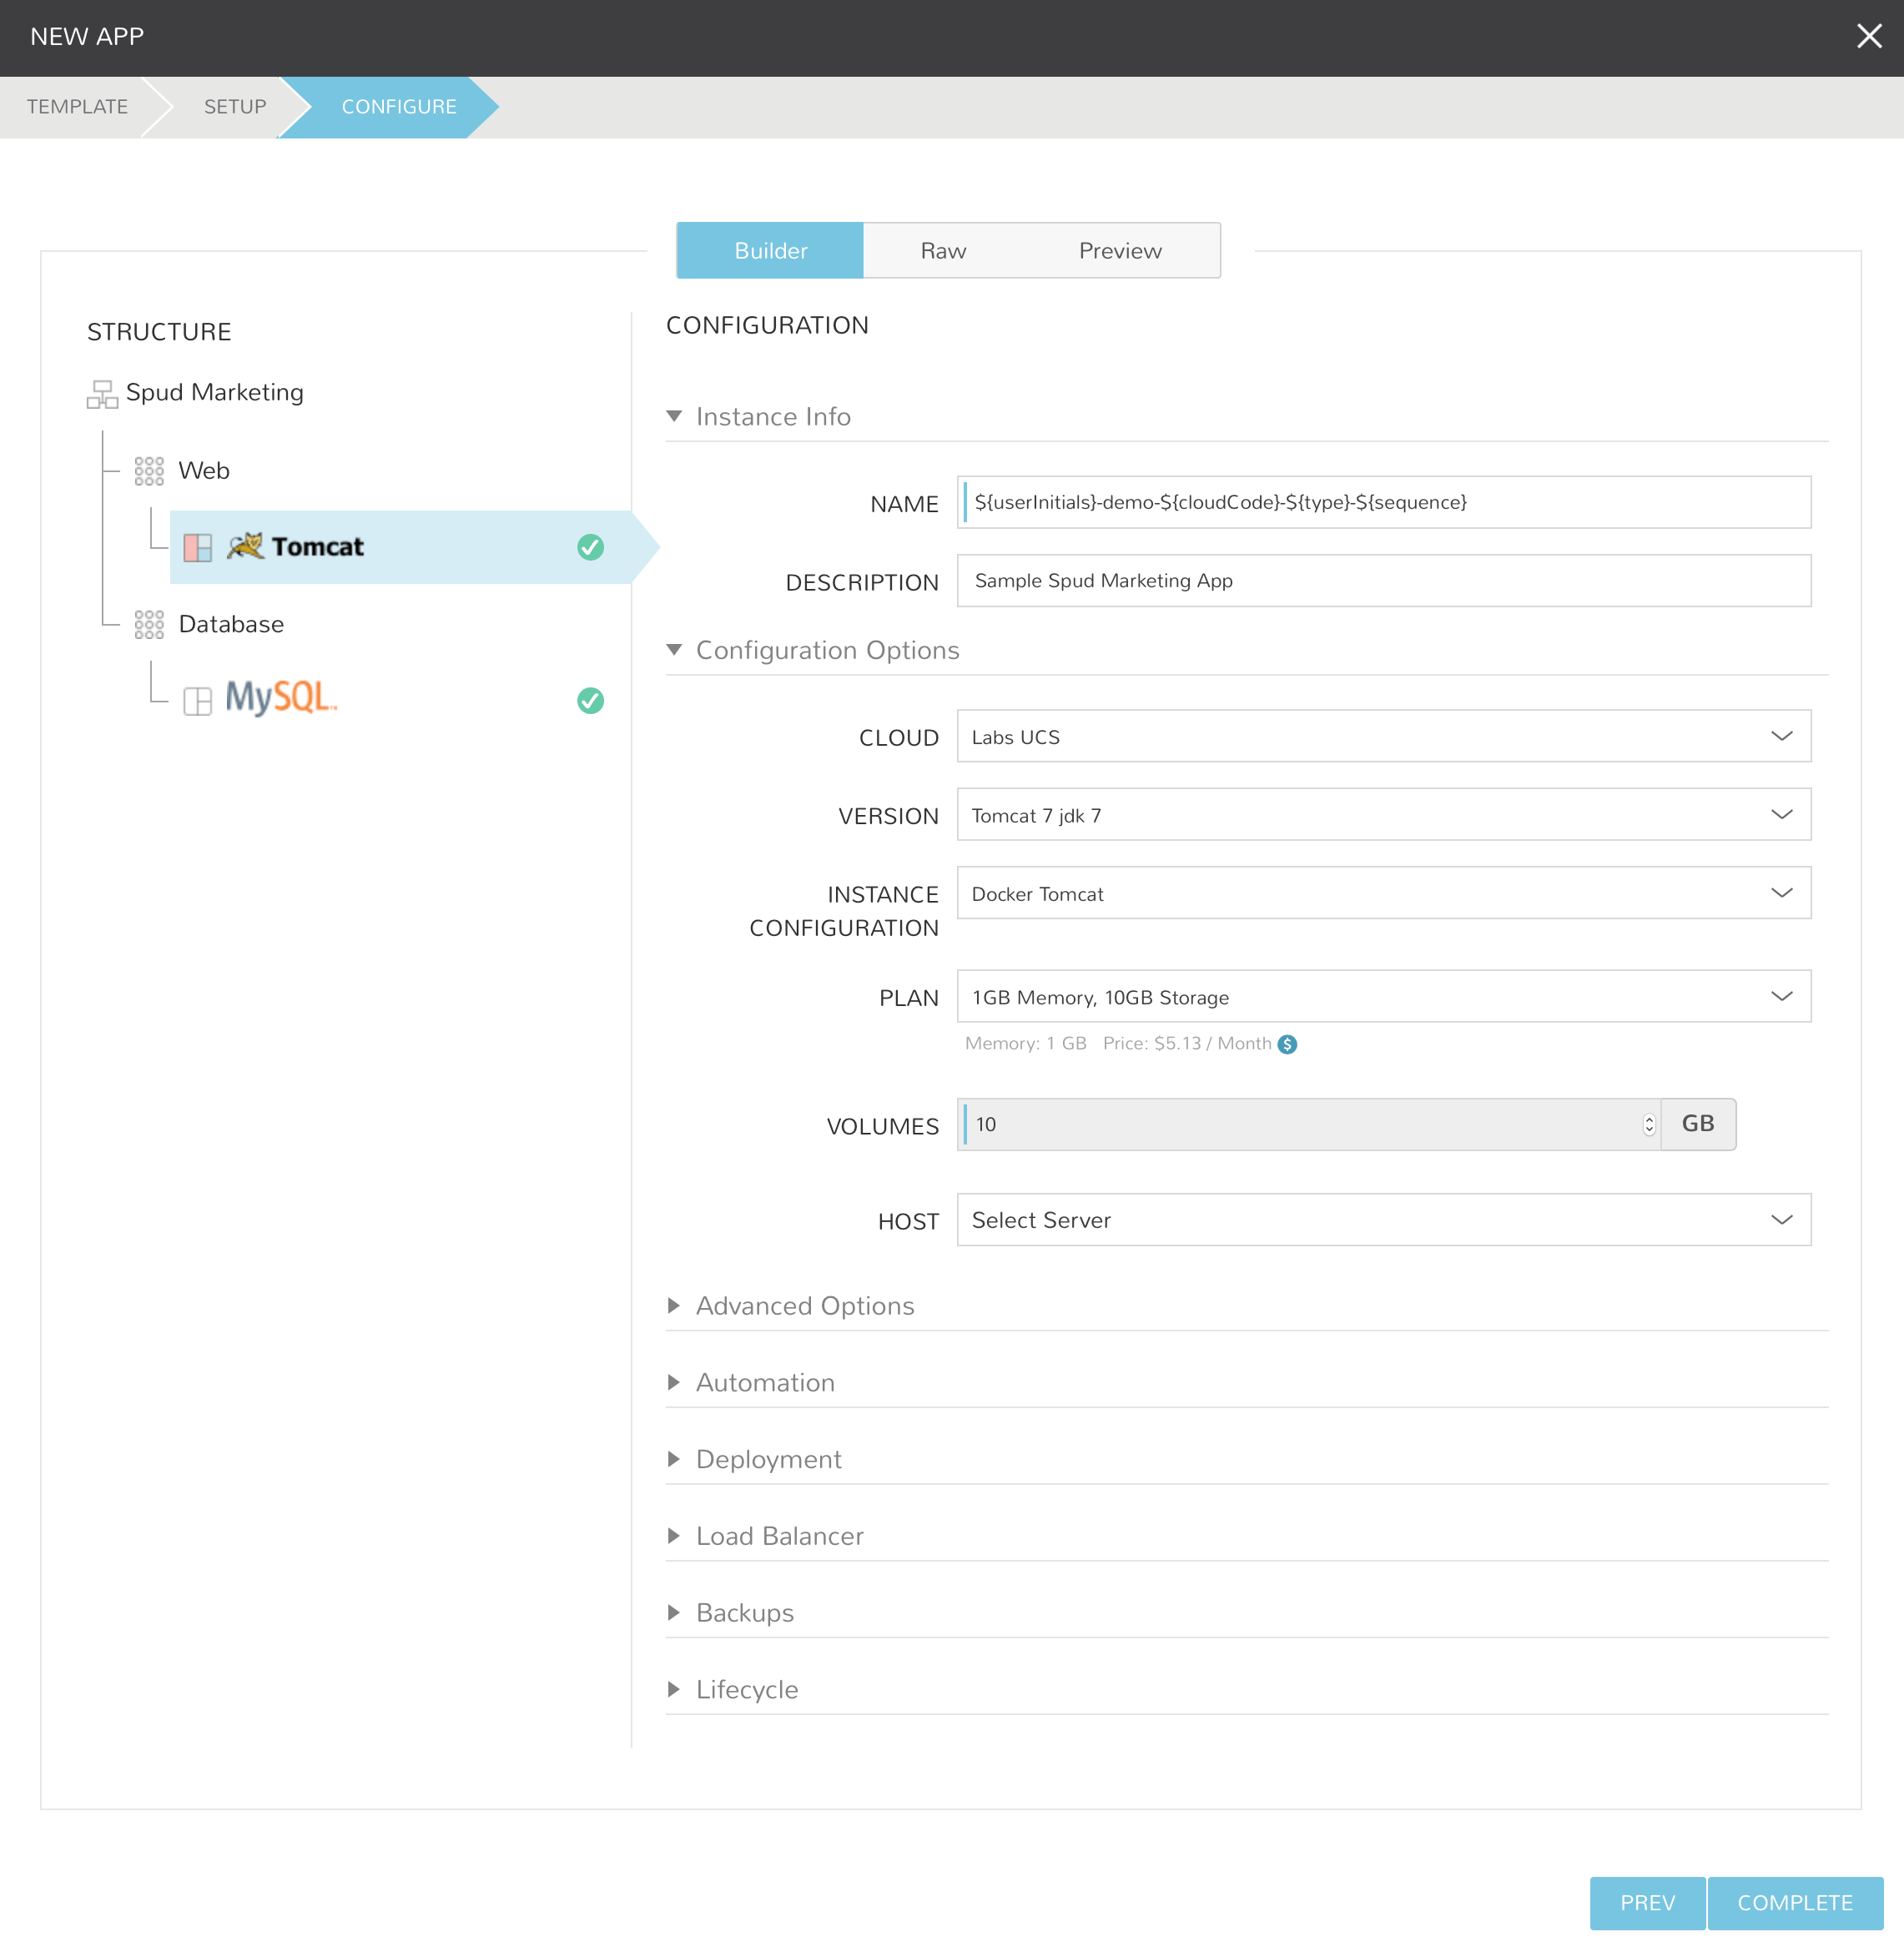
Configure your Instances. Depending on the Blueprint Configurations settings, instances may already be fully configured. Fields that are locked in a Blueprint cannot be edited when creating an App.
-
Select COMPLETE and the App will be created, and the Instances will begin provisioning.
Creating Apps from Existing Instances
-
Click +ADD on the right side of the main Apps section in Provisioning.
-
Select
APP FROM EXISTING INSTANCESfrom the Blueprints list and click NEXT. -
Enter a Name for the App and select a Group. Default Cloud and Env can also be selected.
Note
Only instances within the selected Group and Cloud will be available to be added to the App.
-
In the STRUCTURE section, select + to add a Tier
-
Select or enter a Tier Name.
-
Select the Tier to set Boot Order, rename, or once multiple Tiers are added, connect the Tier to other Tiers.
-
In the STRUCTURE section, select + in a Tier to add an Instance
-
Select the Instance Type of the Existing Instance to be added to the App.
-
In the STRUCTURE section, select the Instance.
-
In the CONFIGURATION section, select the Cloud the Existing Instance is in. Existing INSTANCES that match the Group, Cloud and Instance Types set will populate.
-
Select the desired Instance from the INSTANCES list. Selected instance will show in the SELECTED INSTANCE section.
Note
Only one existing Instance can be added per Instance. To add multiple Existing Instances, repeat the step above including adding an Instance for each Existing Instance to be added to the App.
-
Once all Existing Instances have been selected, click COMPLETE.
-
A new App will be created out of the Existing Instances.

Managing Apps
App Status
App Status is determined by the status of the Instances within the App or by the DELETE action. All Instances in an App must be in ‘Running’ status for the App status to equal ‘Running’.
App Statuses Status Icon
App Status
Status Reason

Running
All Instance Statuses = Running

Failed
Any Instance Status = Failed

Pending
Any Instance Status = Pending

Pending Removal
Any Instance Status = Pending Removal

Provisioning
Any Instance Status = Provisioning

Removing
The DELETE action was trigger on the App

Unknown
Any Instance Status = Unknown, or the App is empty
Editing an App
The EDIT action allows permissioned users to update an Apps metadata, Environment, Group and Owner.
-
Navigate to Provisioning > Apps
-
Select an App from the list to view the App detail page
-
Select EDIT
-
Update the following
- NAME
-
App Name
- DESCRIPTION
-
App Description
- ENVIRONMENT
-
App Environment
- GROUP
-
App Group assignment
- OWNER
-
User assigned as Owner of the App
-
Select SAVE CHANGES
Deleting an App
The DELETE action allows permissioned users to delete an App and, by default, all Instances within the App.
-
Navigate to Provisioning > Apps
-
Select an App from the list to view the App detail page
-
Select DELETE
-
The DELETE APP? confirmation modal will be displayed:
- Remove Instances
-
Deletes all Instances associated with the App - Enabled by Default
- Preserve Backups
-
Preserves Backups of the Instances associated with the App - Disabled by Default
- Preserve Volumes
-
Preserves Storage Volumes of the Instances associated with the App - Disabled by Default
- Force Delete
-
Forces deletion of the App - Required when any Instances associated with the App are in “provisioning” state - WARNING Force deleting may cause orphaned infrastructure or resources. - Disabled by Default
-
Select DELETE to proceed with deleting the App, or CANCEL to abort the delete action.
Exporting Configuration JSON
To export an App Blueprint as JSON:
-
Navigate to Provisioning > Apps
-
Select an App from the list to view the App detail page
-
Select ACTIONS > Export
-
The App export file will be downloaded to your computer as
{app_name}.jsonJobs
Jobs are for scheduled execution of Automation Tasks and Workflows. Jobs can be set to execute on a schedule, at one specific point in time, and/or execute manually (on-demand). Jobs are linked to existing Tasks or Workflows, and allow for custom configuration options. Jobs can be associated with Instances, Servers, or have no association, such as a job for an SSH task.
Jobs allow for scheduled execution of nearly anything as Tasks Types include Bash, Powershell, HTTP/API, Ansible, Chef, Puppet, Groovy, Python, jRuby, Javascript, and library scripts and templates, which can be configured for resource, remote, or local execution targets. If you need something to execute on a schedule, Morpheus Jobs can deliver.
Jobs are configured in the
JOBStab, and theJOB EXECUTIONStab contains Job execution history with result output.Jobs
Required Role Permissions Click to Expand/Hide
Creating Jobs
Note
Jobs require existing Tasks or Workflows. See the appropriate section of Morpheus docs for more on creating Tasks and Workflows.
To create a new job:
-
Navigate to Provisioning > Jobs
-
Select + ADD
-
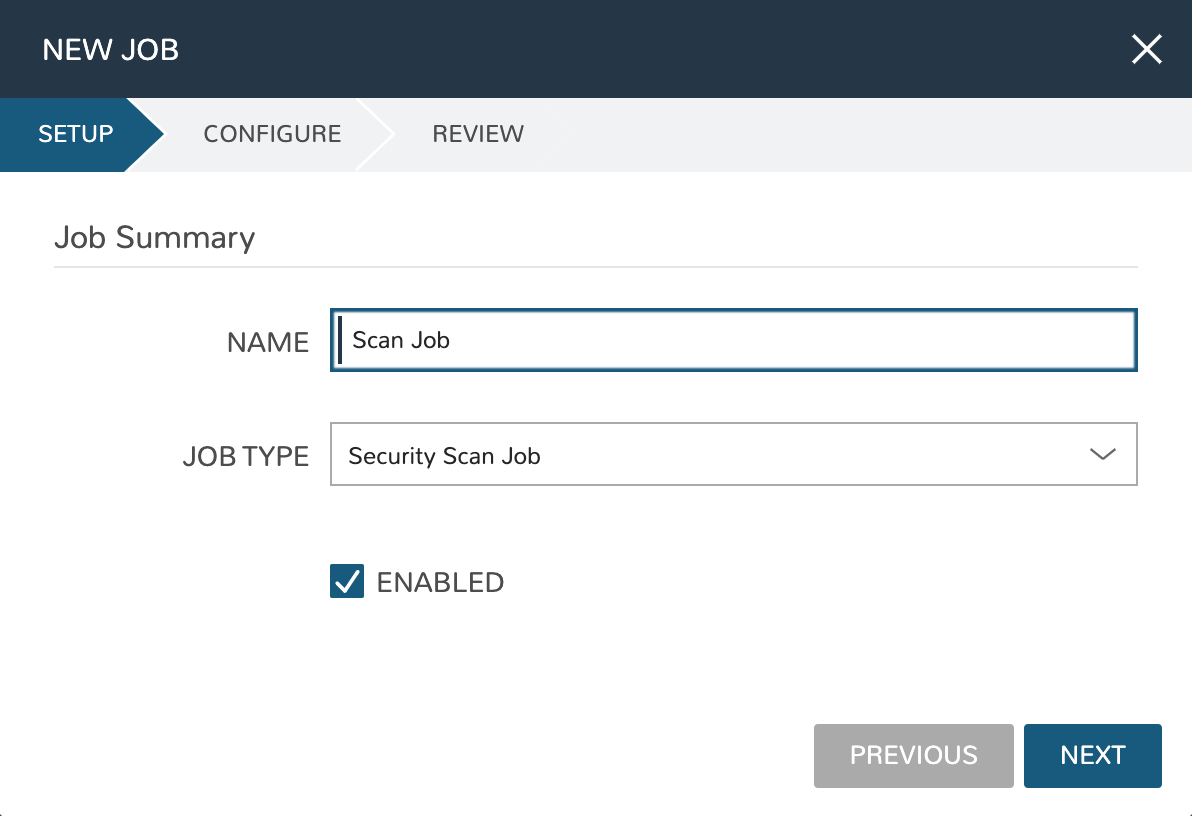
Enter the following
-
NAME: Name of the Job in Morpheus
-
JOB TYPE: A Task Job will execute a selected Task, a Workflow Job will execute a selected Workflow
-
ENABLED: When checked, the Job will run as scheduled
-
-
Select NEXT
-
Configure the Job
- Task Jobs
-
TASK: Select target Task. If relevant to the Task, Input fields will be presented
- SCHEDULE:
-
Manual: Job is not scheduled but can be executed from Provisioning > Jobs and selecting Actions > Execute
Date And Time: Job will be executed at one specific point in time and not again (unless rescheduled or executed manually)
Schedule: Select a configured Execution Schedule. Execution Schedules are created in Library > Automation > Execute Scheduling
Note
Morpheus provides two default execution schedules,
Daily at MidnightandWeekly on Sunday at Midnight. Any additional schedules were created by a User. Additional schedules can be added in Library > Automation > Execute SchedulingCONTEXT TYPE: Server or Instance
CONTEXT SERVER/INSTANCE: Select the Server or Instance you wish to target with the Job
RUN NOW: When checked, the Job will execute on save regardless of
SCHEDULEsetting.
- Workflow Jobs
-
WORKFLOW: Select target Workflow. If relevant to the Workflow, Input fields will be presented
- SCHEDULE:
-
Manual: Job is not scheduled but can be executed from Provisioning > Jobs and selecting
Actions > ExecuteDate And Time: Job will be executed at one specific point in time and not again (unless rescheduled or executed manually)
Schedule: Select a configured Execution Schedule. Execution Schedules are created in Library > Automation > Execute Scheduling
Note
Morpheus provides two default execution schedules,
Daily at MidnightandWeekly on Sunday at Midnight. Any additional schedules were created by a User. Additional schedules can be added in Library > Automation > Execute Scheduling
CONTEXT TYPE: Server or Instance
CONTEXT SERVER/INSTANCE: Select the Server or Instance you wish to target with the Job
RUN NOW: When checked, the Job will execute on save regardless of
SCHEDULEsetting.
-
Select NEXT
-
Select COMPLETE
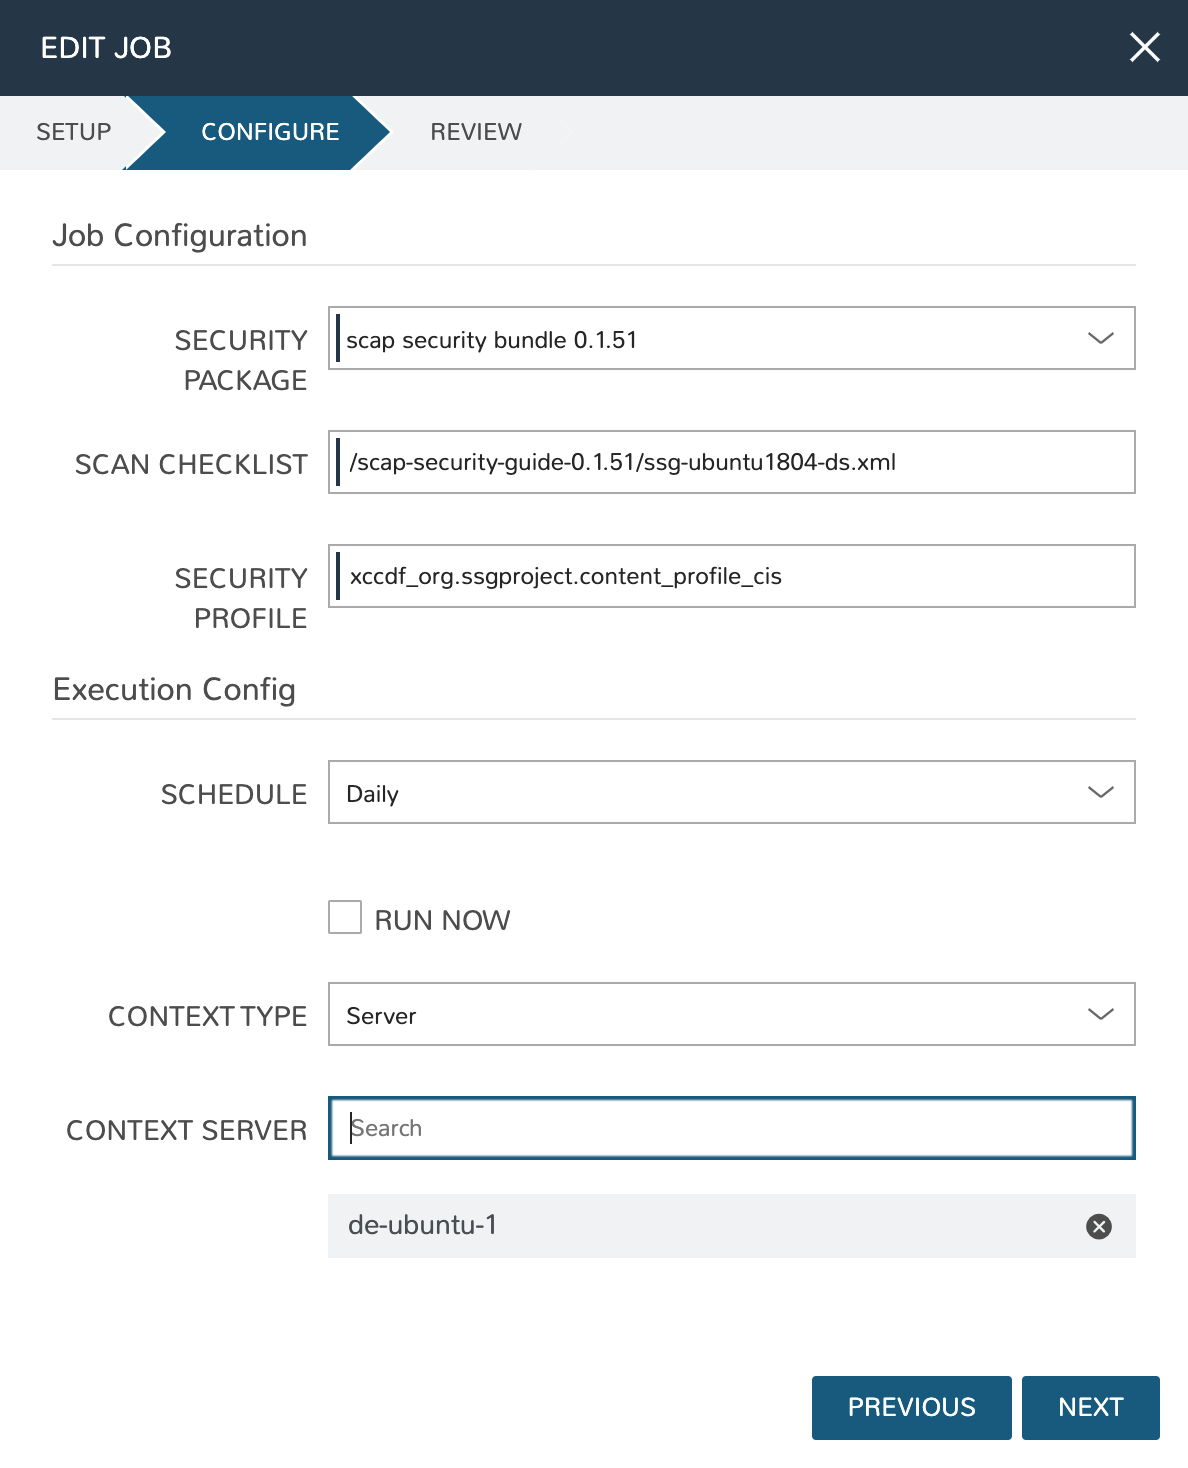
Creating and Running Security Scan Jobs
Security Scan Jobs allow users to create and schedule SCAP program (Security Content Automation Program) scans for groups of managed systems. These Jobs can call in existing SCAP packages and checklists, which are used to scan the targeted systems on-demand or on a scheduled basis. Historical data for these scans is saved in the Job Execution list and in the software section of server detail pages. Detailed scan reports can also be viewed for each system as needed once the scan is complete. See the SCAP documentation on the NIST website for information on developing your own scanning procedures.
Note
Creating and editing Security Scan Jobs requires the “Security: Scanning” Role permission set to Full. Viewing Security Scan Jobs and seeing the results for scanned servers requires at least a Read-level permission.
Add a new Security Scan Job
Note
New security scan packages are added in Morpheus Library rather than here in the Jobs section. Ensure you have uploaded the desired security package in Library > Templates > Security Packages before proceeding with new security Job creation.
-
Navigate to Provisioning > Jobs > Jobs Tab
-
Click +ADD
-
Set the Job type to “Security Scan Job” and provide a friendly name for the Job
-
Click NEXT
-
Select a security package, see the previous section to add a new one
-
Enter your Scan Checklist (XML document) and Security Profile (XCCDF document), more information on these can be found in the SCAP documentation linked above
-
Set a schedule or leave as Manual to only run this scan on-demand (new execution schedules can be created in Library > Automation if needed)
-
Set the context, can be Instance or Server. Select as many Instances or Servers as needed for this scanning run
-
Click NEXT
-
After final review, click COMPLETE
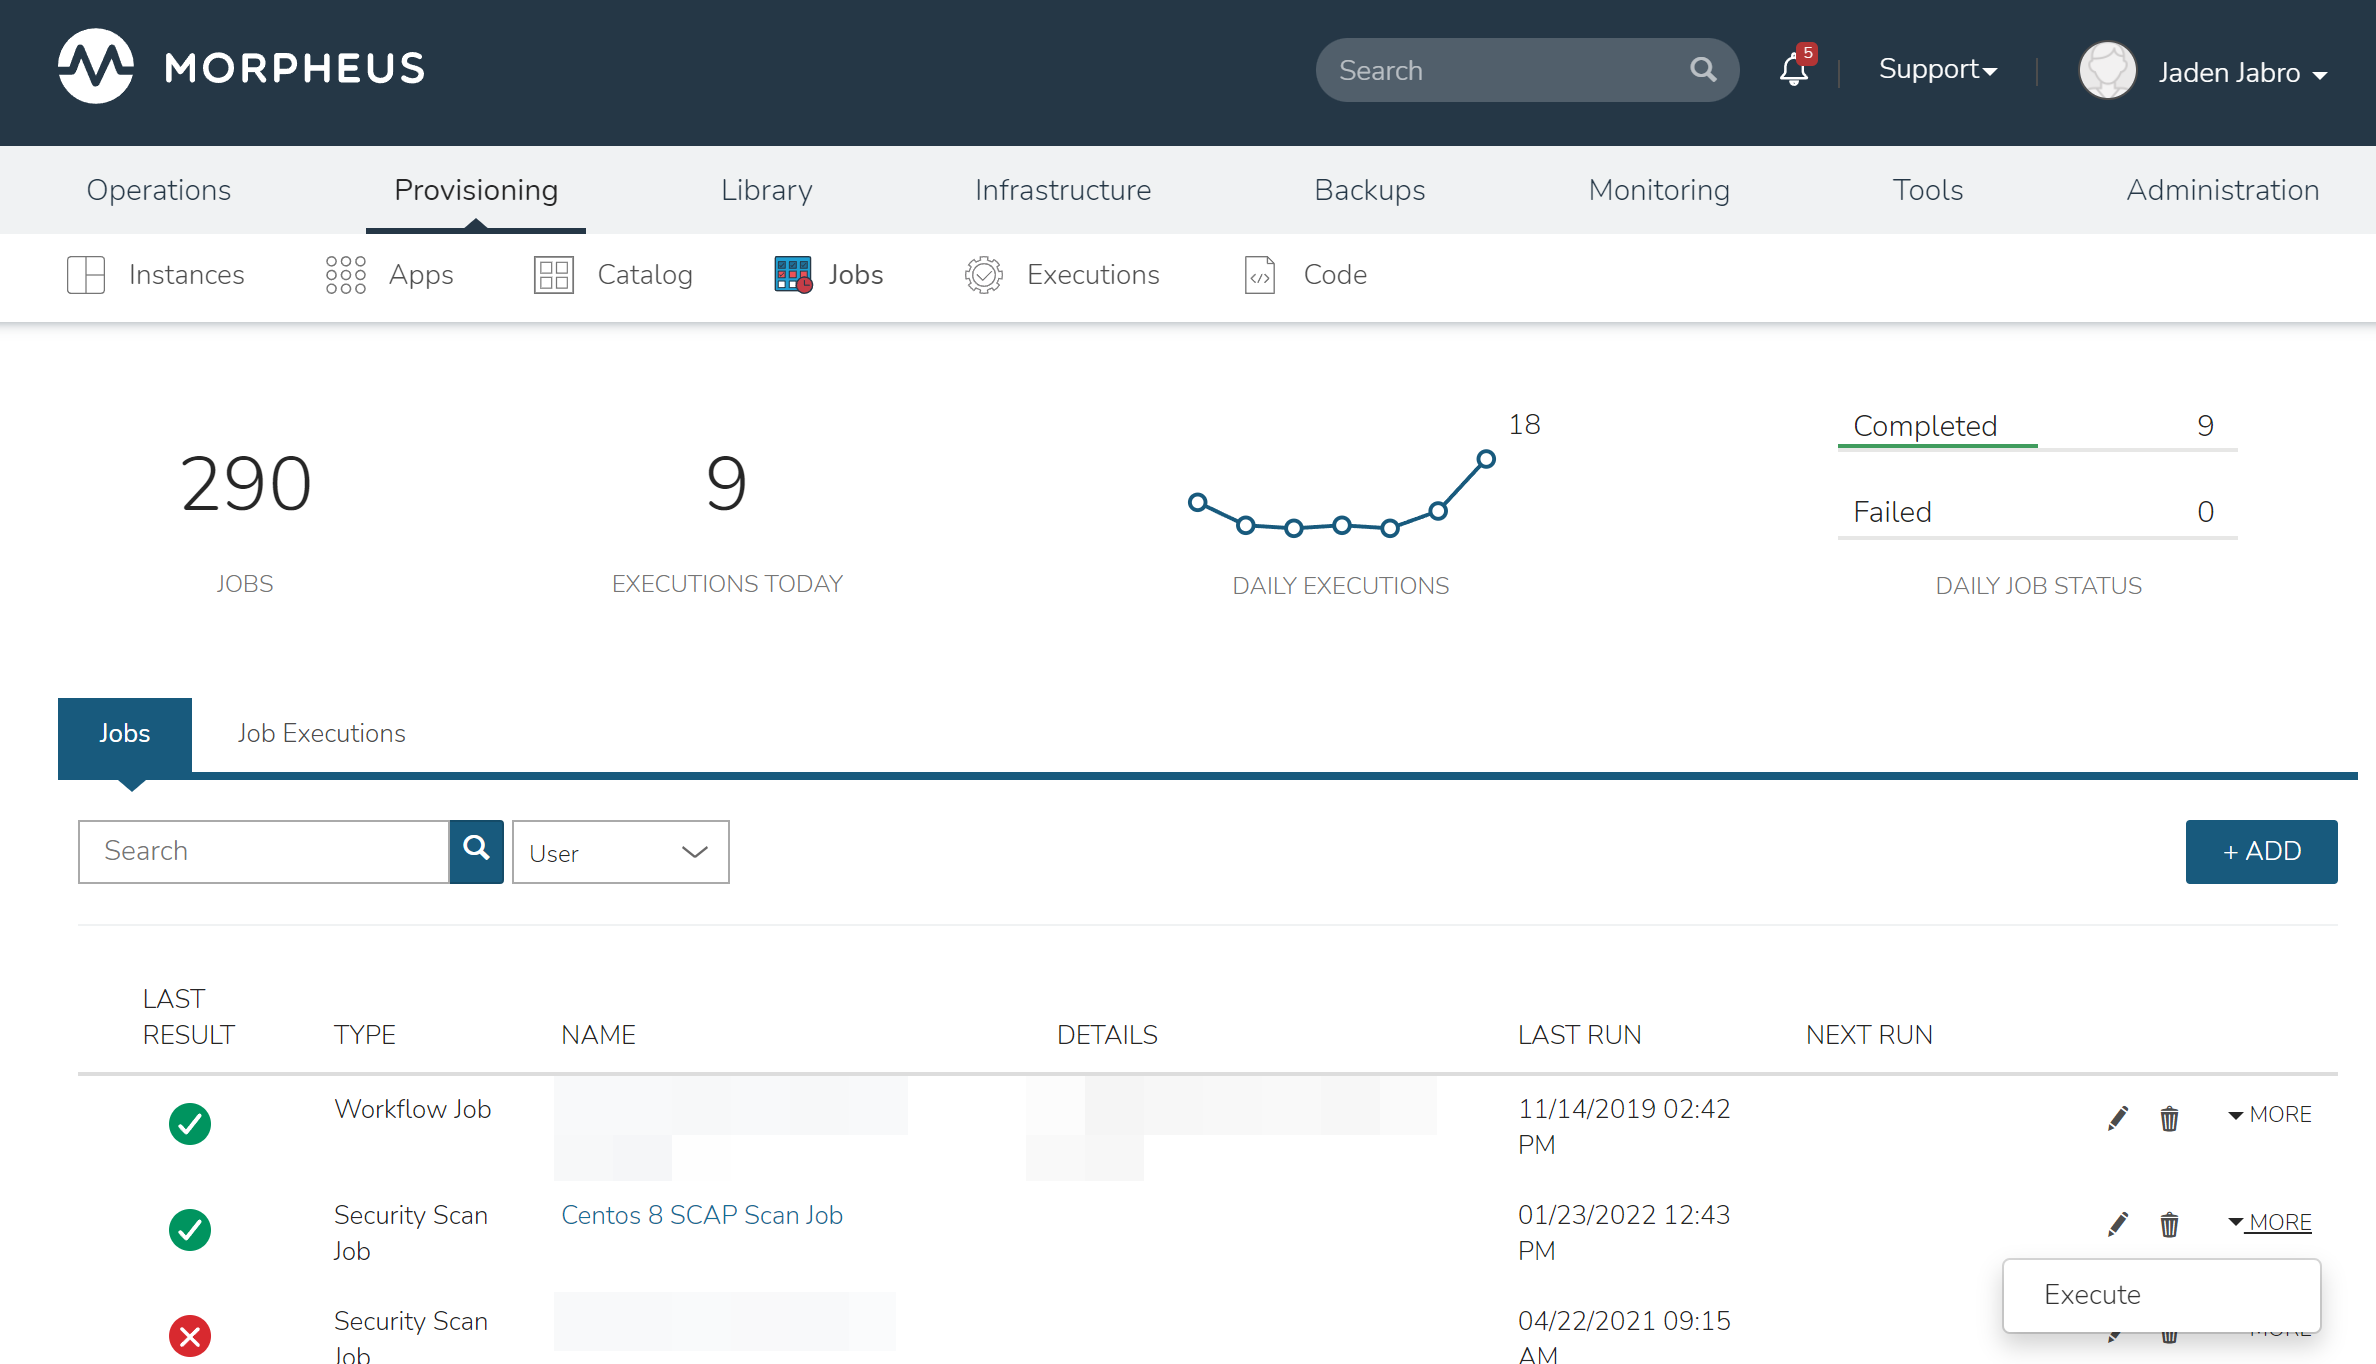
Running Security Scan Jobs
Once created, Security Scan Jobs will run based on the configured schedule. They can also be run on-demand when needed:
-
Navigate to Provisioning > Jobs > Jobs Tab
-
Click MORE
-
Click “Execute”
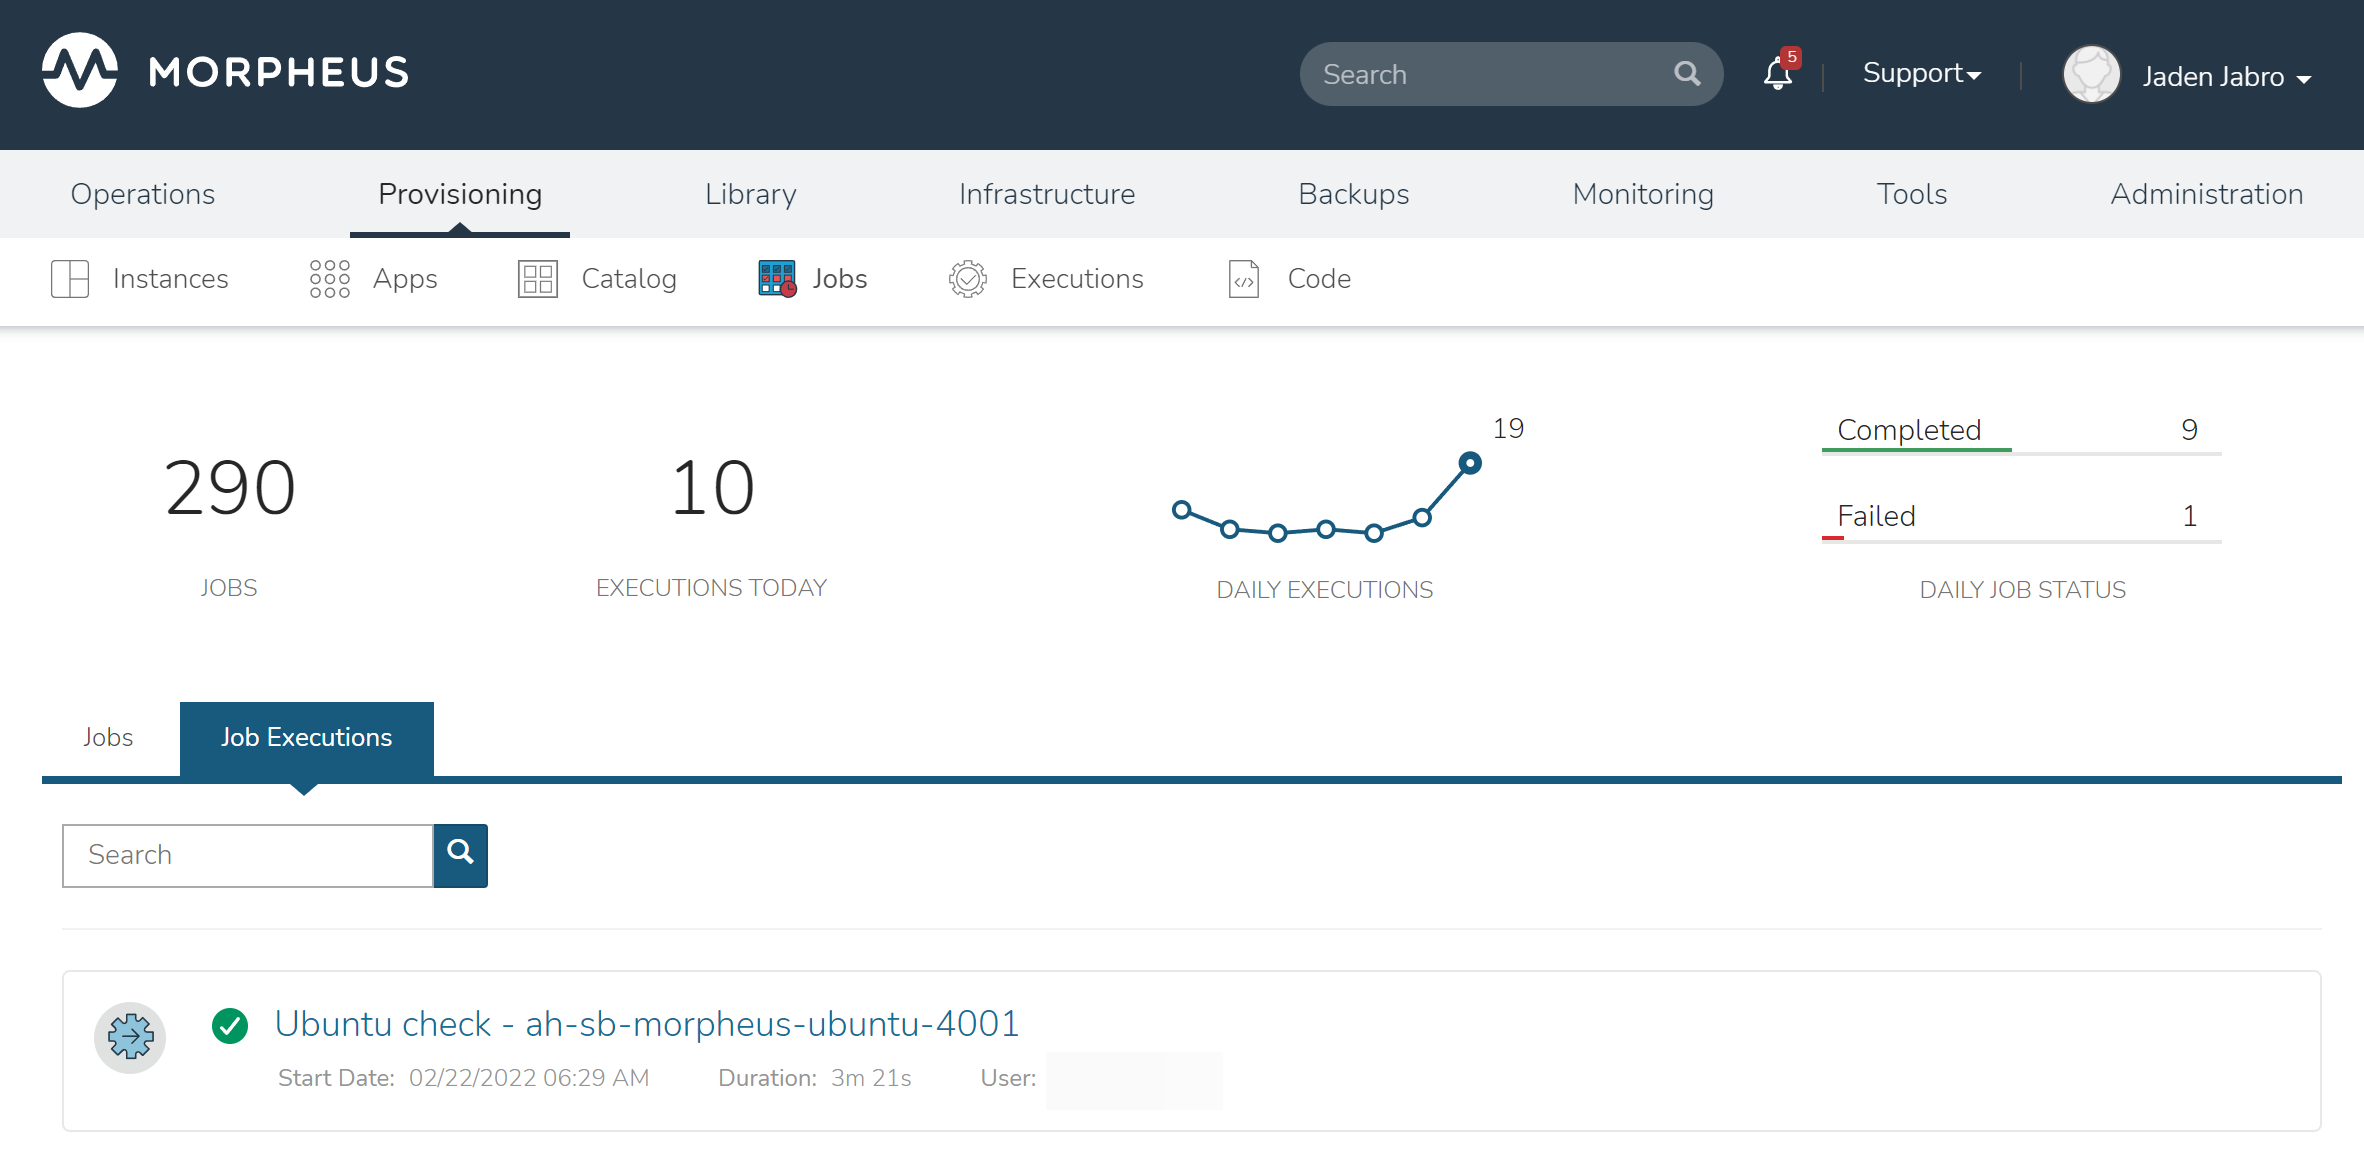
Viewing Completed Security Scan Jobs
To view a list of completed Security Scan Jobs (and Jobs of other types):
-
Navigate to Provisioning > Jobs > Job Executions Tab
-
Additional details can be viewed by clicking (I)
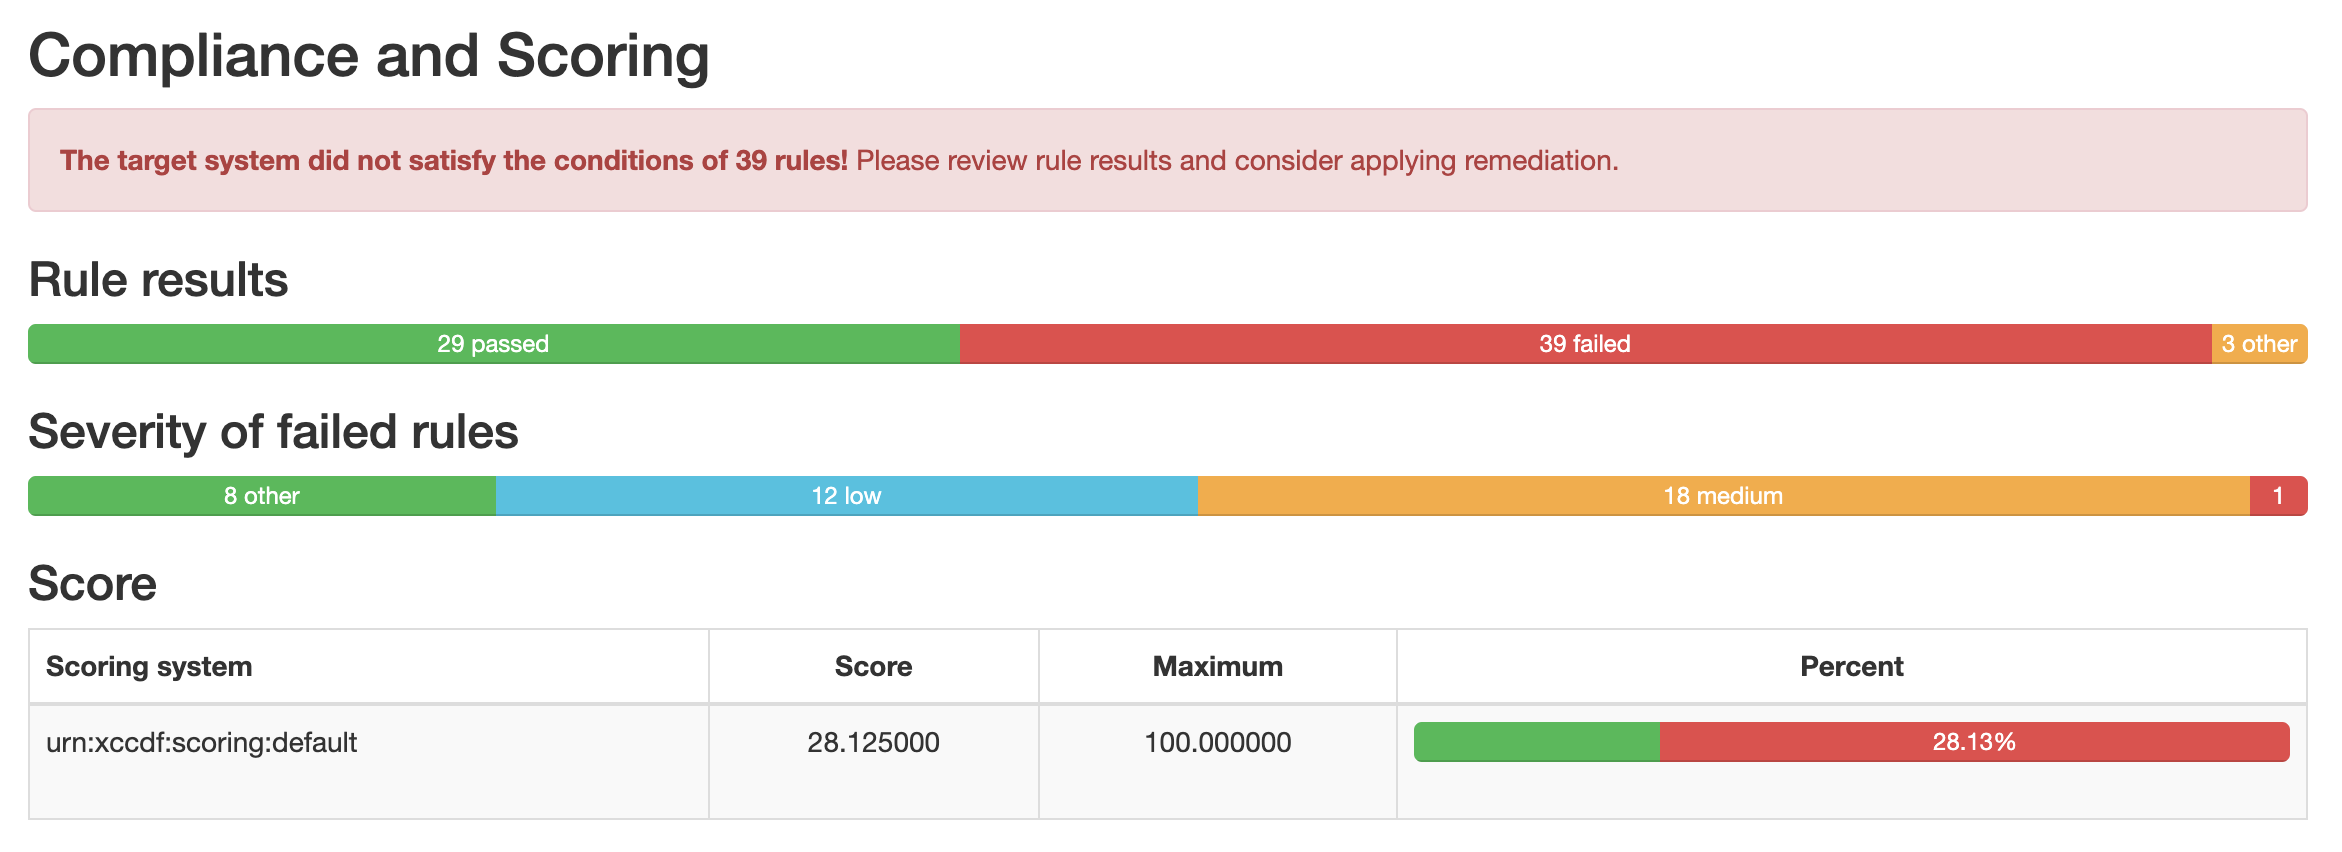
To view scan results for specific servers:
-
Navigate to the server detail page (Infrastructure > Hosts > Virtual Machines tab > Selected server)
-
Click on the Software tab part way down the page, then click on the Security subtab
-
High level details on previous scans is viewable here

-
To view the full report, click (I)
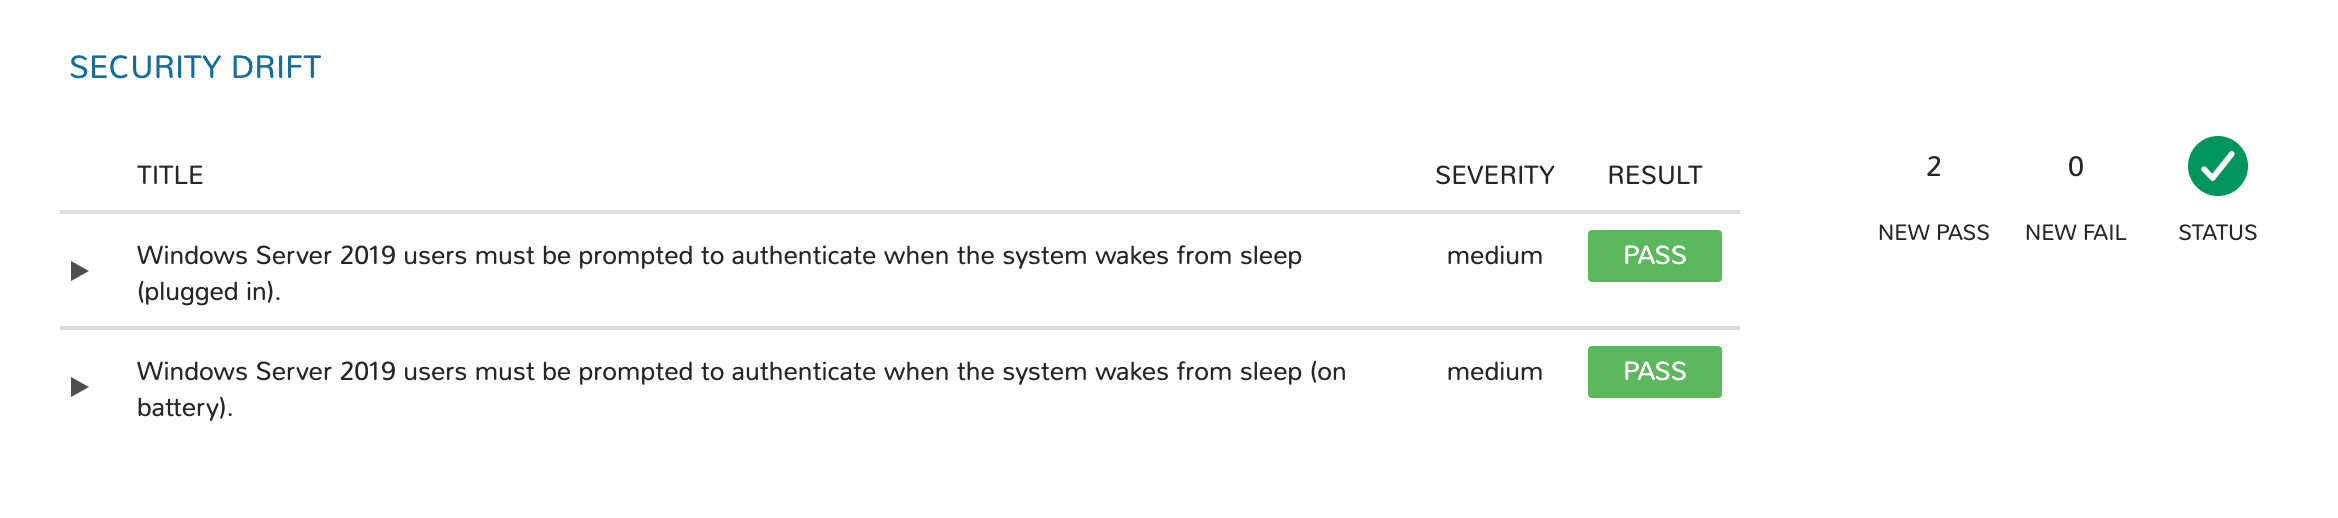
Security Drift
In addition to tracking the scan results over time as described in the previous section, Morpheus also provides detail into the change from the most recent scan to the one prior. This information is displayed in the Software tab (and Security subtab) of the detail page for the virtual machine (accessed from the associated Instance detail page or at Infrastructure > Hosts > Virtual Machines). The information surfaced by this view is listed below. If there is no change, you’ll simply see a “No Drift” message.
-
Title: The criteria for the test that has newly passed or failed
-
Severity: The severity level for the indicated security requirement
-
Result: The indicator for whether this test has newly passed or failed
-
New Pass: The number of tests that have newly passed compared to the prior scan
-
New Fail: The number of tests that have newly failed compared to the prior scan
-
Status: An indicator of the change in security posture since the prior scan. A net gain in test failures will yield a negative status indicator while net gains in passed tests (or no change) will yield a positive status indicator
Job Executions
Required Role Permissions Click to Expand/Hide
The Job Executions tab contains execution history of completed Jobs, including any process outputs and error messages. Information included in the Job Executions list includes:
-
Execution Status Icon
-
Job Name - Task Name - Result Error Message: The title of each execution includes the Job Name, Task or Workflow name (for Task and Workflow job types), and execution result error messages (when applicable) separated by hyphens (-). The title also links to the Job Execution detail page
-
Start Date: The date and time the Job Execution kicked off. When expanded, the start date and time of each individual Task are also shown
-
Duration: The time taken for the Job to complete. When expanded, the time to complete each individual Task is also shown
-
User: The user who executed or scheduled the Job
Additional details and actions are available per execution:
-
Select an execution name to go to the Job Execution Detail page
-
Select the ⌃ icon at the end of the row to expand the execution and view additional details, including task process output
-
Select the 📋 icon to copy process output to local clipboard
-
Select the ⌄ icon at the end of an expanded to to collapse additional execution details
-
-
-
-
-
-
-
Comments
0 comments
Please sign in to leave a comment.