Automation
The Automation section is composed of Tasks and Workflows. Tasks can be scripts added directly, scripts and blueprints from the Library section, recipes, playbooks, salt states, puppet agent installs, or http (api) calls. These Tasks are are combined into workflows, which can be selected to run at provision time or executed on existing instances via Actions > Run Workflow.
Tasks
Overview
There are many Task Types available, including scripts added directly, scripts and templates from the Library section, recipes, playbooks, salt states, puppet agent installs, and http (api) calls. Tasks are primarily created for use in Workflows, but a single Task can be executed on an existing instance via Actions > Run Task.
Role Permissions
The User Role Permission ‘Provisioning: Tasks FULL’ is required to create, edit and delete tasks.
Tasks Types that can execute locally against the Morpheus Appliance have an additional Role Permission: Tasks - Script Engines. Script Engine Task Types will be hidden for users without Tasks - Script Engines role permissions.
Common Options
When creating a Task, the required and optional inputs will vary significantly by the Task type. However, there are options which are common to Tasks of all types.
Target Options
When creating a Task, users can select a target to perform the execution. Some Task types allow for any of the three execution targets listed below and some will limit the user to two or just one. The table in the next section lists the available execution targets for each Task type.
-
Resource: A Morpheus-managed Instance or server is selected to execute the Task
-
Local: The Task is executed by the Morpheus appliance node
-
Remote: The user specifies a remote box which will execute the Task
Execute Options
-
Retryable: When marked, this Task can be configured to be retried in the event of failure
-
Retry Count: The maximum number of times the Task will be retried when there is a failure
-
Retry Delay: The length of time (in seconds) Morpheus will wait to retry the Task
-
Allow Custom Config: When marked, a text area is provided at Task execution time to allow the user to pass extra variables or specify extra configuration. See the next section for an example.
Allow Custom Config
When “Allow Custom Config” is marked on a Task, the user is shown a text area for custom configuration when the Task is executed manually from the Tasks List Page. If the Task is to be part of an Operational Workflow, mark the same box on the Workflow rather than on the Task to see the text area at execution time. This text area is inside the “Advanced Options” section, which must be expanded in order to reveal the text area. Within the text area, add a JSON map of key-value pairs which can be resolved within your automation scripts. This could be used to pass extra variables that aren’t always needed in the script or for specifying extra configuration.
Task Management
Adding Tasks
-
Select Automation from within the Library menu
-
On the Tasks tab, click the ADD button
-
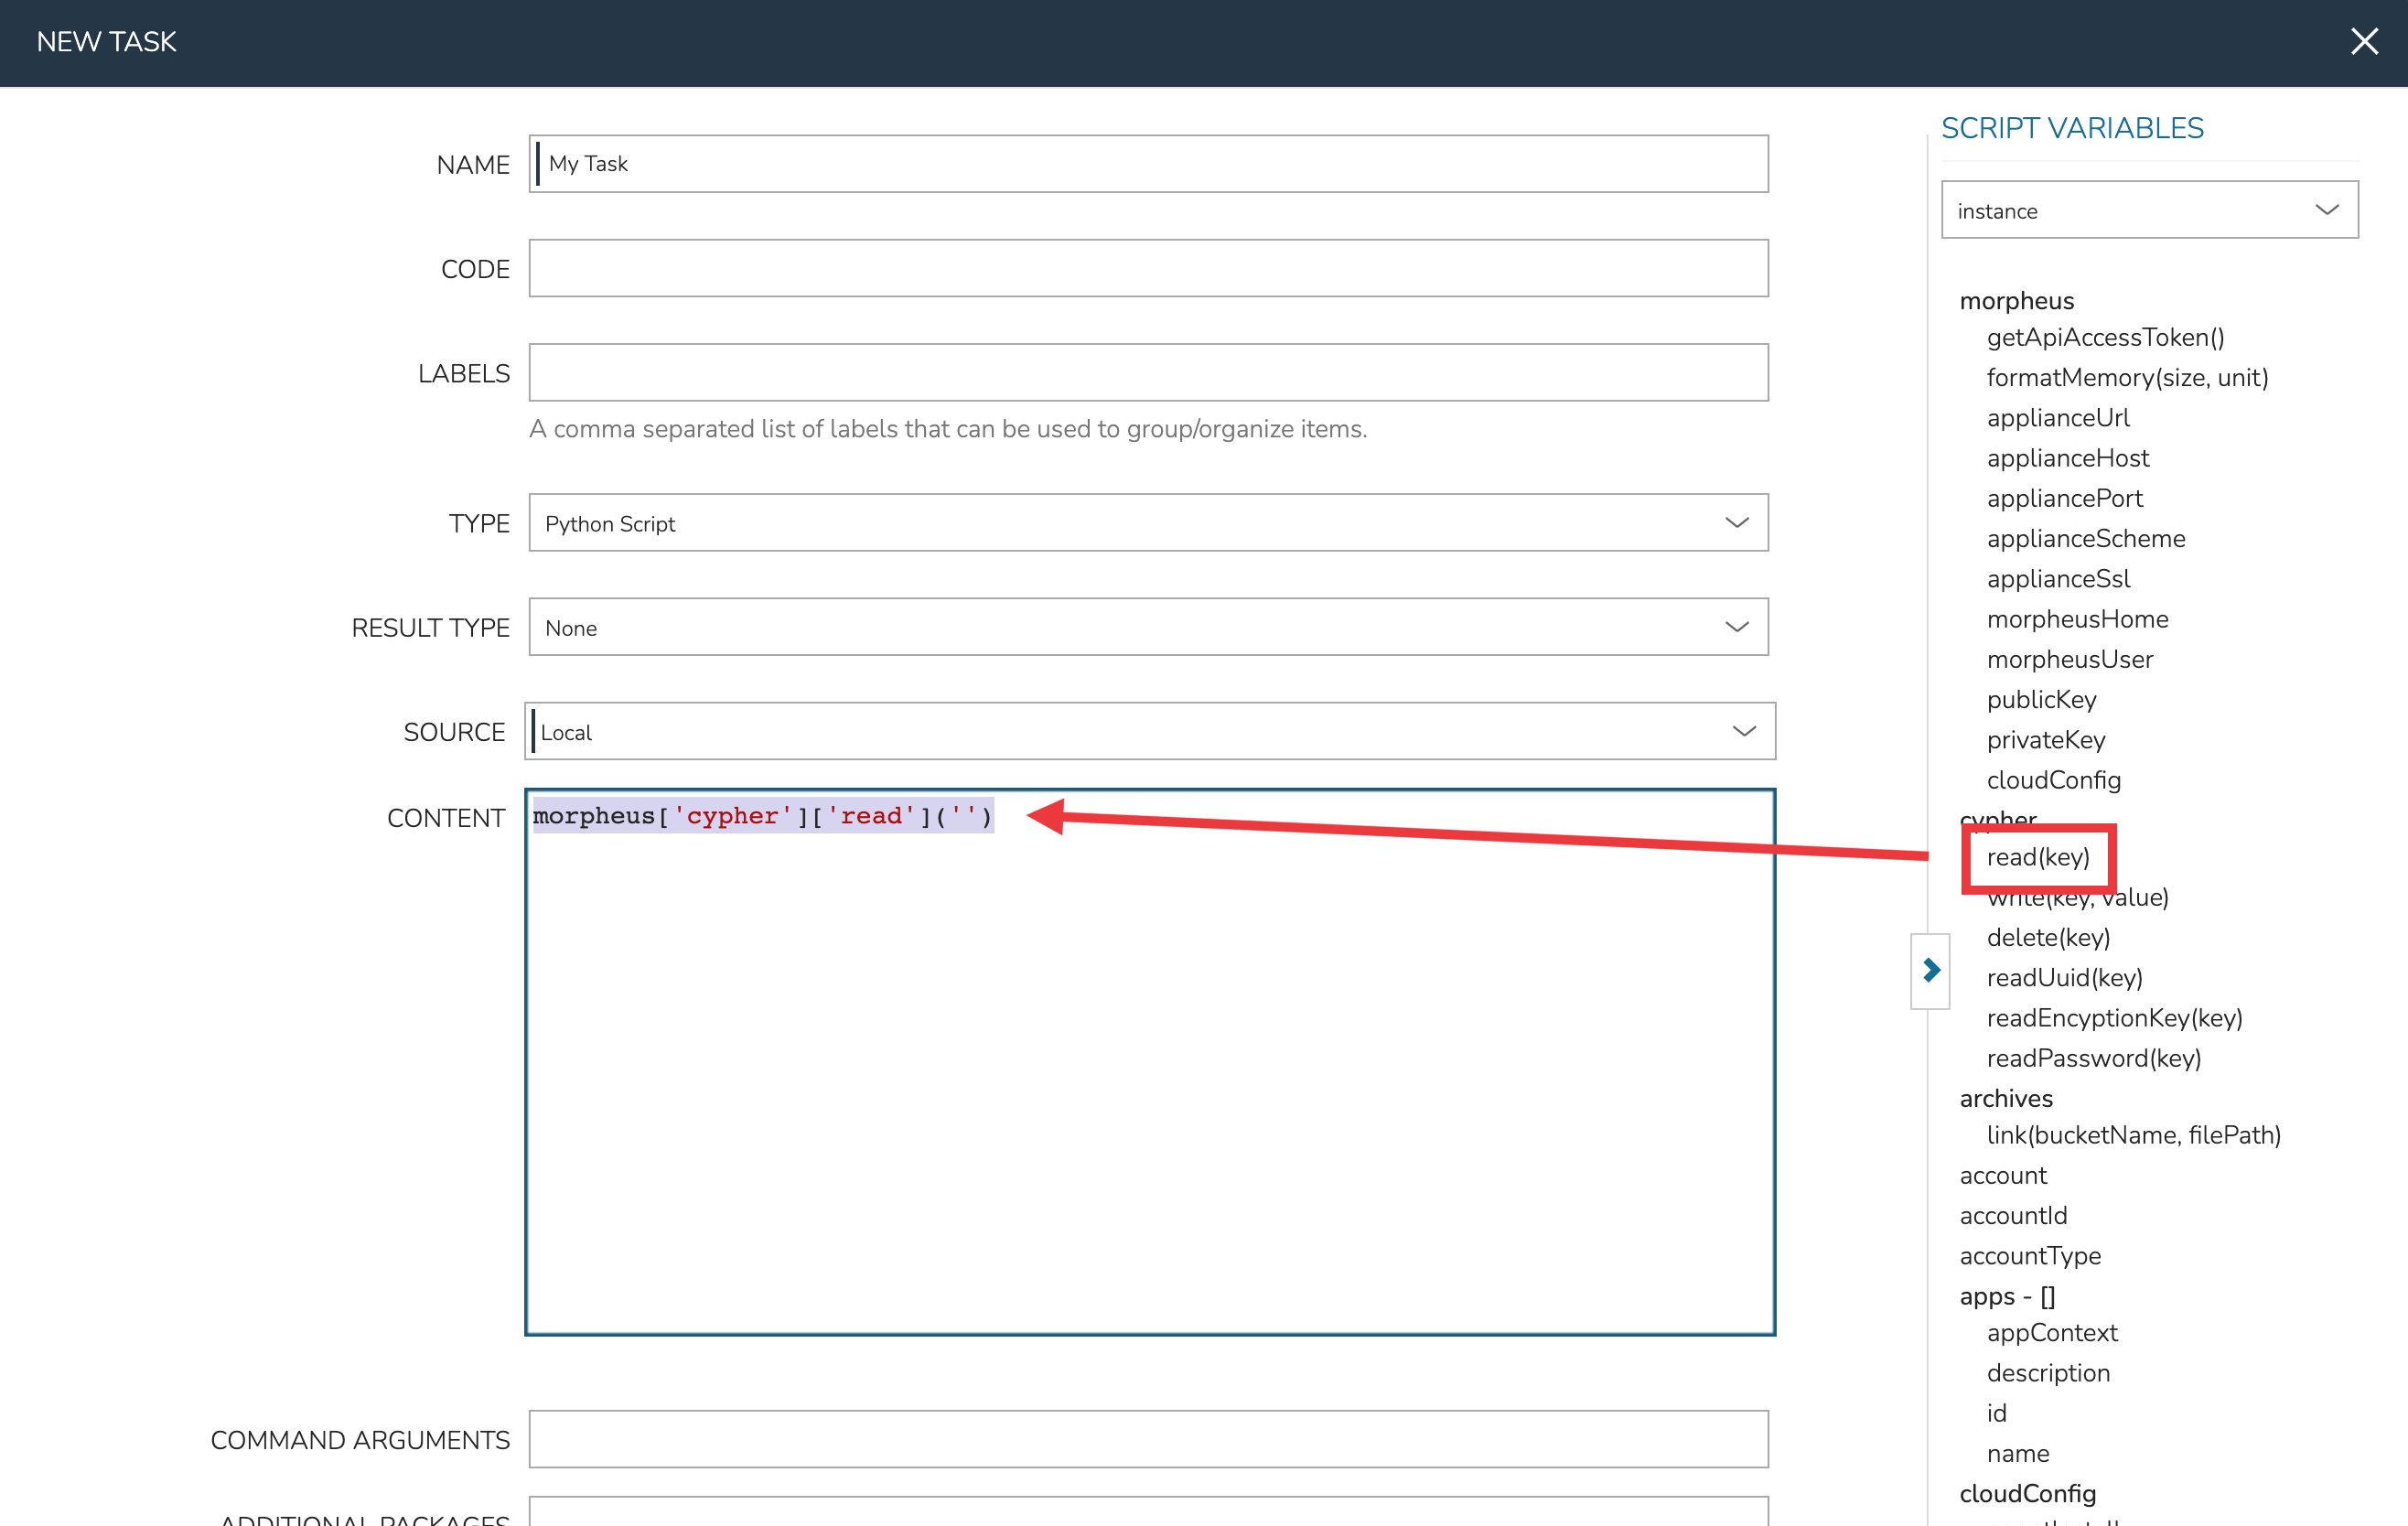
From the New Task Wizard input a name for the task
-
Select the type of task from from the type dropdown
-
Input the appropriate configuration details. These will vary signficiantly based on the selected Task type. More details on each Task type are contained in the preceding sections.
-
Once done, click SAVE CHANGES
Editing Tasks
-
Select Automation from within the Library menu
-
Click the pencil icon (✎) on the row of the task you wish to edit
-
Modify Task as needed
-
Once done, click SAVE CHANGES
Deleting Tasks
-
Select Automation from within the Library menu
-
Click the trash icon (🗑) on the row of the Task you wish to delete.
Workflows
Workflows are groups of Tasks, which are described in detail in the preceding section. Operational Workflows can be run on-demand against an existing Instance or server from the Actions menu on the Instance or server detail page. Additionally, they can be scheduled to run on a recurring basis through Morpheus Jobs (Provisioning > Jobs).
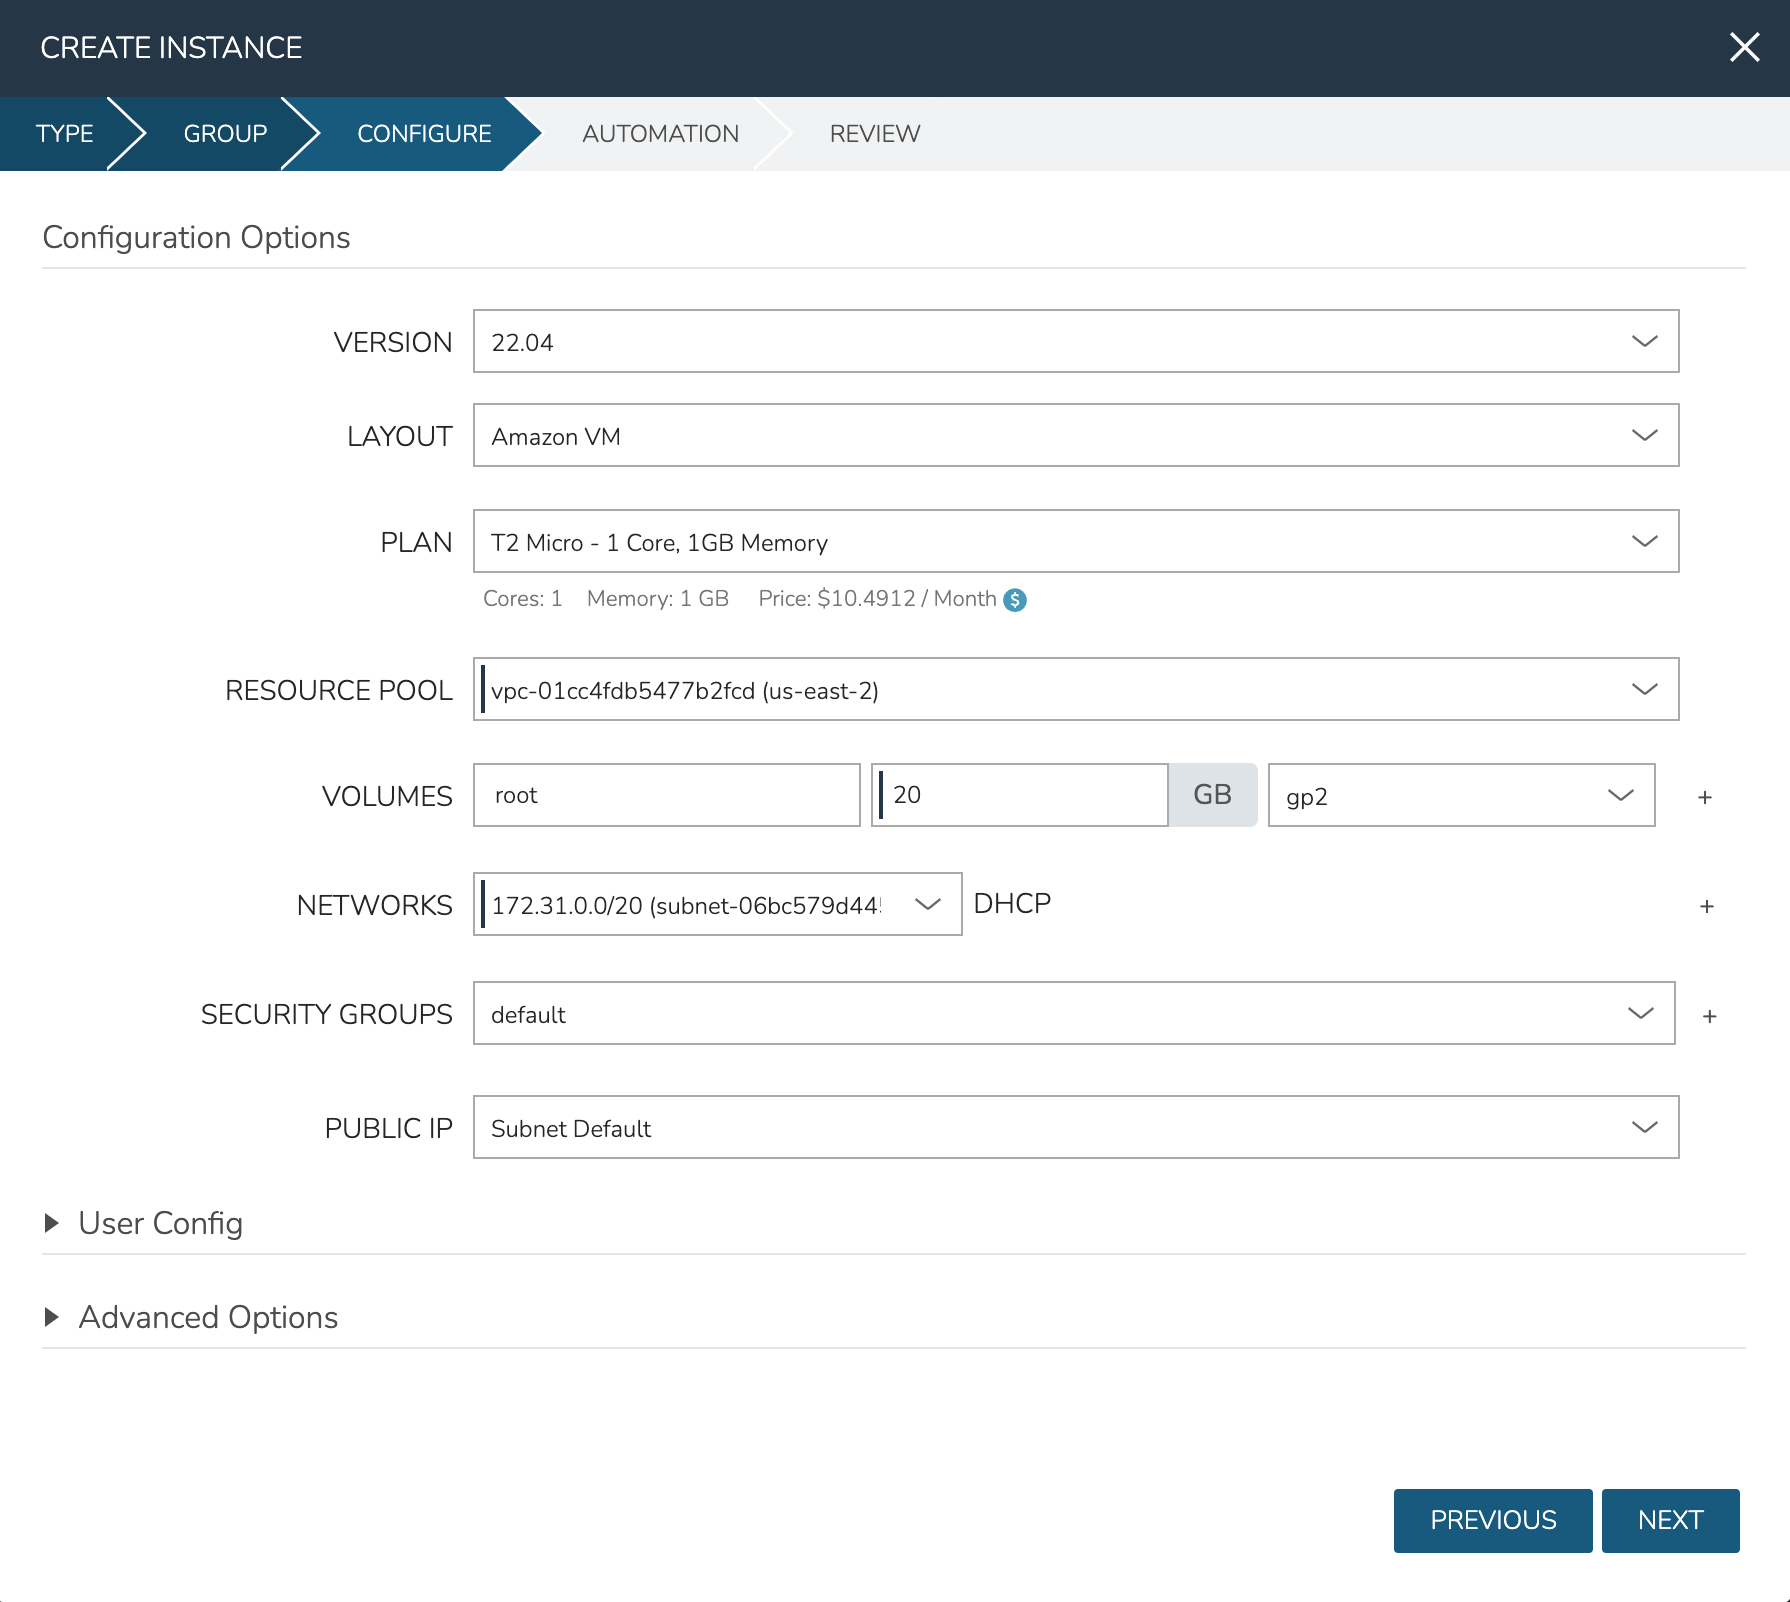
Provisioning Workflows are associated with Instances at provision time (in the Automation tab of the Add Instance wizard) or after provisioning through the Actions menu on the Instance detail page. Provisioning Workflows assign Tasks to various stages of the Instance lifecycle, such as Provision, Post Provision, and Teardown. When the Instance reaches a given stage, the appropriate Tasks are run. Task results and output can be viewed from the History tab of the Instance or server detail page.
Add Workflow
-
Select the Library link in the navigation bar
-
Select Automation from the sub-navigation menu
-
Click the Workflows tab to show the Workflows tab panel
-
Click the + ADD dropdown and select a Workflow type (Operational or Provisioning, see the section above for more on Workflow type differences)
-
From the New Workflow Wizard input a name for the workflow
-
Optionally input a description and a target platform
-
Add Tasks and Inputs using the typeahead fields, Tasks must be added to the appropriate phases for Provisioning Workflows
-
If multiple tasks are added to the same execution phase, their execution order can be changed by selecting the grip icon and dragging the task to the desired execution order
-
For multi-Tenant environments, select Public or Private visibility for the Workflow
-
For Operational Workflows, optionally mark “Allow Custom Config” from the Advanced Options section if needed. See the next section for more on this selection
-
Click the SAVE CHANGES button to save.
Nesting Workflows
Morpheus allows Workflows to be nested for easier Workflow creation when many Workflows are used in an environment which have only slight differences or which are made up of common pieces. Nestable Workflows are created like any other Operational Workflow. Once the Workflow is saved, it can be embedded into a special Task type called “Nested Workflow.” A Nested Workflow-type Task simply references an Operational Workflow which may need to be used within other Workflows. Once Nested Workflow Tasks are created they can be used as part of any new Operational or Provisioning Workflows that are created thereafter (or may be added to existing Workflows too).
Power Scheduling
Set weekly schedules for shutdown and startup times for Instances and VM’s, apply Power Schedules to Instances pre or post-provisioning, apply Power Schedule policies on Group or Clouds, or use Guidance to automatically recommend and apply optimized Power Schedules.

Blueprints
Overview
The Blueprints section is used to compose provisioning catalogs. The Blueprints section is composed of:
-
Instance Types
-
Layouts
-
Node Types
-
App Blueprints
-
Catalog Items
-
Cluster Layouts
Additionally, items from Options and Templates sections are incorporated to call in custom options for users, IaaS spec files, scripts, and more. See Options and Templates within Morpheus Library for more information on creating or sourcing the items below from version control. In some cases, they may need to be pre-existing for the most efficient creation of Blueprints.
-
Inputs
-
Option Lists
-
File Templates
-
Scripts
-
Spec Templates
Instance Types
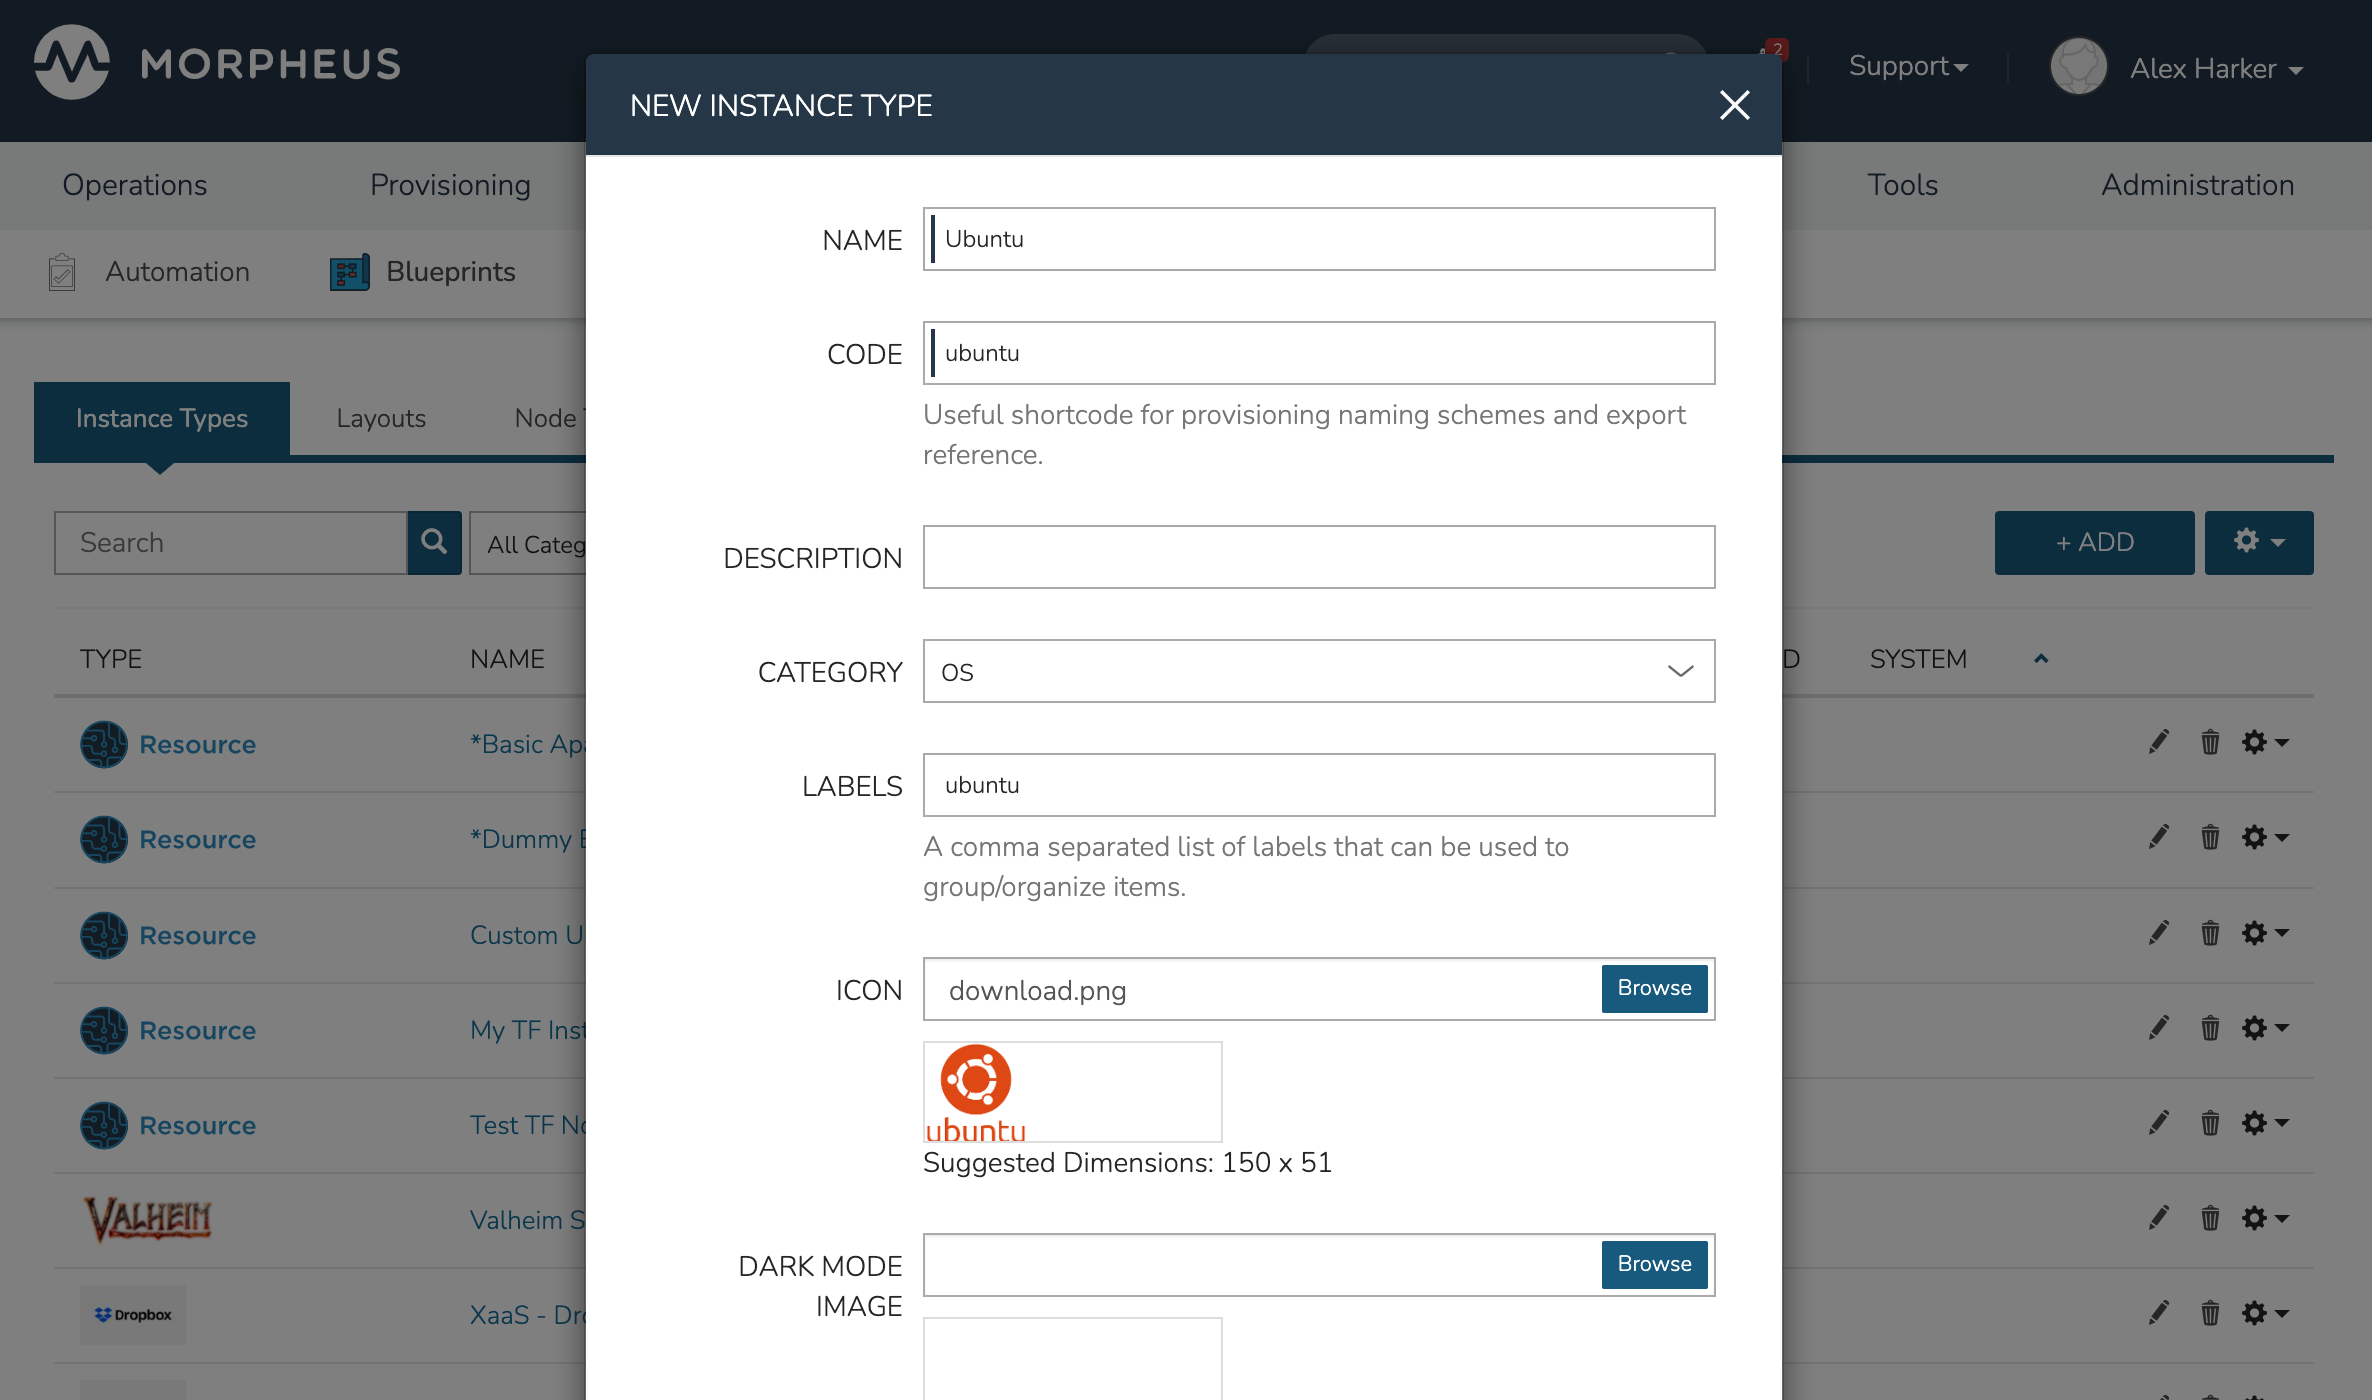
Adding an Instance Type creates a new Library item category. Multiple Layouts can be added to an Instance Type and these Layouts can have different Nodes attached. The Instance provisioning wizard will present the Layout options compatible with the selected Cloud. If Cloud selection is turned off, all Layouts will be presented for all Cloud types accessible by the User.
Technology-Specific Options
The Options fields will change depending on the Technology option selected. For VM provisioning technology options, select an image from the VM Image dropdown. This list is populated from the Morpheus Virtual Images section and will include images uploaded into Morpheus as well as synced images from added clouds.
Docker Options
For Docker, type in the name and version of the Docker Image, then select the integrated registry.
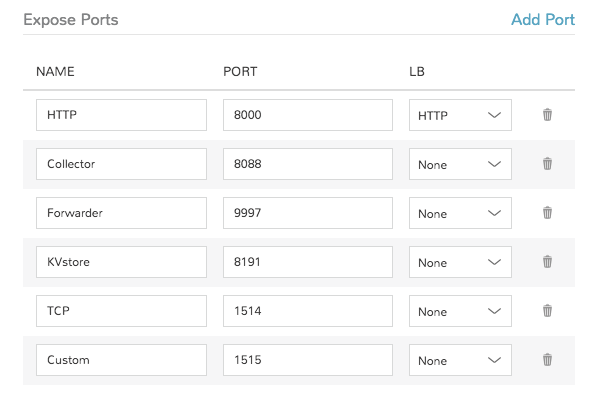
- Service Ports
-
To open ports on the node, enter the name and port to expose. The Load Balancer HTTP, HTTPS, or TCP setting is required when attaching to Load Balancers.
Defining an Exposed port will also create a hyperlink(s) on the container location (IP) in the VM or Container section of the associated Instance detail page.
- Scripts
-
Search for and select one or multiple scripts to be executed when the Node Type is provisioned
- File Templates
-
Search for and select one or multiple File Templates to be written when the Node Type is provisioned
Example port configuration:
VMware Options
When VMware Technology Type is selected, EXTRA OPTIONS will be available in the VMware VM Options section. These allow defining Advance vmx-file parameters during provisioning.
App Blueprints
App Blueprints support a vast array of providers and configurations with programmatic markup or Infrastructure as Code capabilities. Blueprints configs can be manually added or scoped to a git repo. Morpheus blueprints allows for full automation configuration, locked fields, tiered boots, and linked tiers with exported evars. All blueprints have permission settings for controlling group and tenant access.
- App Blueprint Types
-
-
Morpheus
-
Terraform
-
ARM (Azure)
-
CloudFormation (AWS)
-
Kubernetes
-
Helm
-
Catalog Items
The Self Service catalog (Library > Blueprints > Catalog Items) is where administrators can create easily-deployable items for consumption by users operating under the “Service Catalog” Persona in Morpheus. Catalog items can be fully-configured Morpheus Instances or Blueprints, complete with user input through Morpheus Inputs, automation Workflows, and more. The catalog items are presented in a simplified interface for ease of deployment without sacrificing configurability for administrators. All available catalog items are built in the Self Service area and users will see relevant items in their catalogs based on Role permissions.
Access is granted to the Self Service section through the Tools: Self Service Role permission. Users with Read rights can view the catalog while users with full rights can create and edit catalog items. Users without any rights to Self Service will not be able to access the page at all.
Additionally, a user’s Role determines access to the standard and/or service catalog persona and which service catalog items are available for a user under the service catalog persona. See the Roles section of Morpheus documentation for more information on administering Roles.
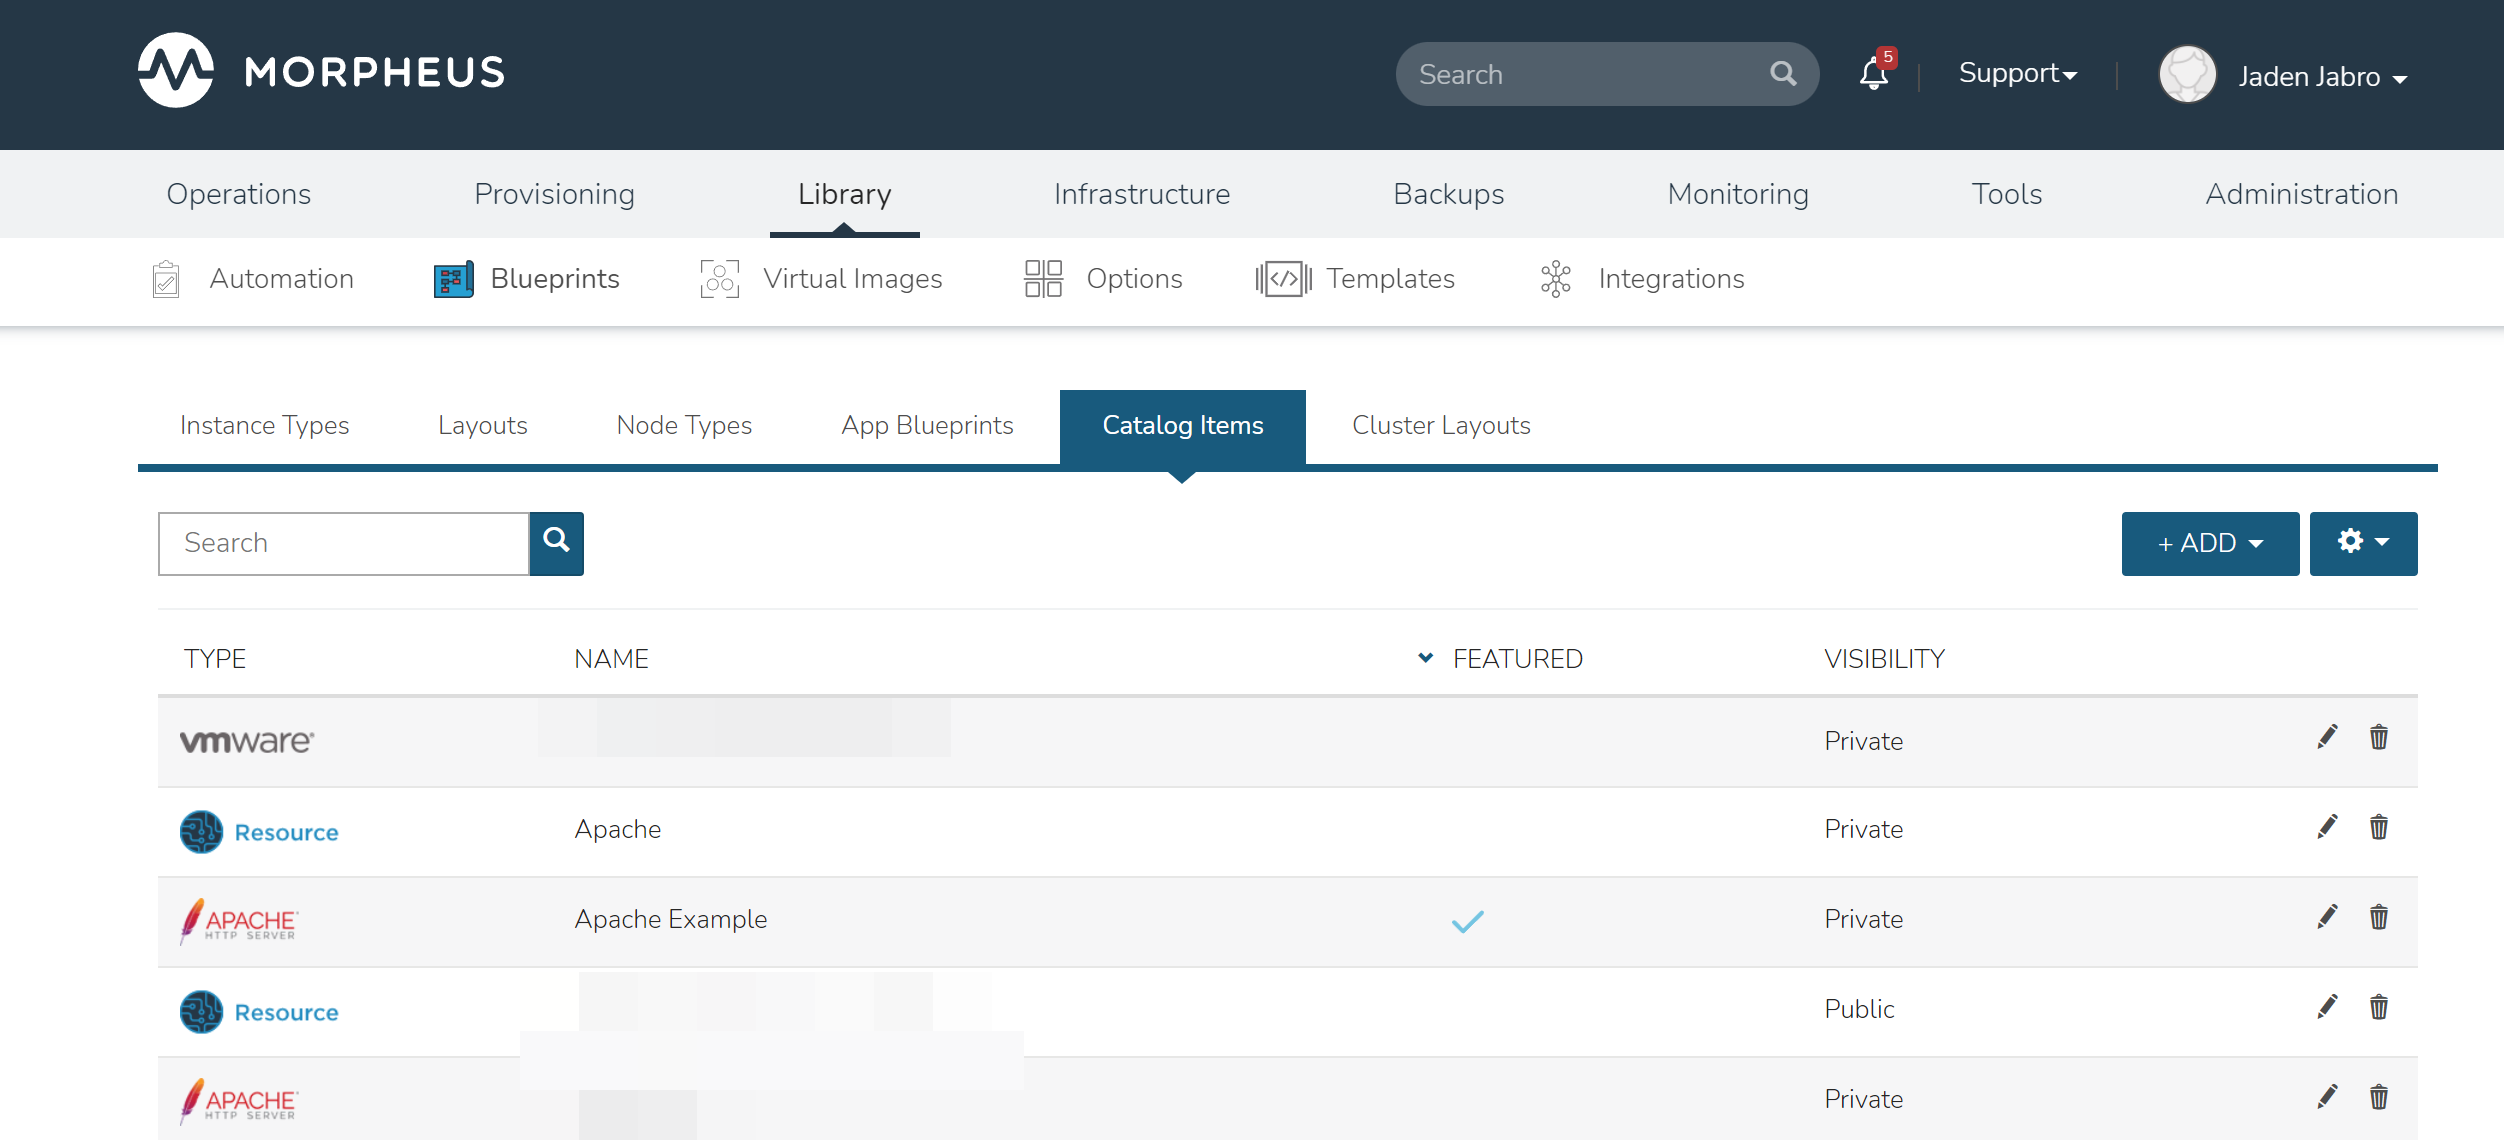
Viewing the Self Service Catalog
The complete Self Service catalog can be viewed by clicking on Self Service from the Tools menu. The complete list of items available for the Self Service catalog are shown here but users working in the Service Catalog Persona will see only those allowed based on their user role. In addition to the name and type of each catalog item, we can also see a description and whether not the catalog item is featured or active. Featured items are given special visibility in the Service Catalog Persona and inactive items will not appear as provisioning options.
Building Catalog Instances
An Instance in Morpheus is a set of one or more containers or virtual machines that correlate to a single, horizontally-scalable entity or service suite. From the Self Service section, we can pre-configure Morpheus Instances and present them to users viewing the Service Catalog Persona for one-click deployment.
From the Catalog Items List Page (Library > Blueprints > Catalog Items), click ADD. From the dropdown menu, select Instance. The modal window will appear to configure and add a new catalog Instance.
Building Catalog Blueprints
Morpheus Blueprints allow for full multi-tier application deployment. In the Self Service catalog, user can create catalog items based on pre-existing App Blueprints. If new Blueprints need to be created for the Service Catalog, see other sections of Morpheus docs on building App Blueprints of various supported types. Just like with catalog Instances, we can pre-configure Blueprints and present them to users viewing the Service Catalog Persona view for easy, one-click deployment.
From the Catalog Items List Page (Library > Blueprints > Catalog Items), click ADD. From the dropdown menu, select Blueprint. The modal window will appear to configure and add a new catalog Blueprint.
Cluster Layouts
Users can add new cluster layouts using the +ADD button. Morpheus-provided cluster layouts can be cloned for use in creating custom layouts. Custom cluster layouts can also be deleted or edited from the list view using the pencil or trash can icons.

Morpheus-provided cluster layouts can be cloned for use in creating custom layouts. Custom cluster layouts can also be deleted or edited from the list view using the pencil or trash can icons.

Virtual Images
Overview
The Virtual Image section displays a list of all images, local and synced, that are available to deploy. Morpheus includes a rich catalog of pre-configured System Images available for every cloud type. User Images are automatically synced from Cloud Integrations and added to the Virtual Images section. Images can also be uploaded directly into Morpheus via local file or url. Amazon and Azure Marketplace images can also be added to the Virtual Images Section.
Configuring Virtual Images
System Images
System Virtual Images are pre-configured with metadata and have Cloud-Init or Cloudbase-Init installed. These images are ready to be provisioned with no configuration necessary, however it is required to populate Administration > Settings > Provisioning, Cloud-Init section, with user data as well as User Profile(s) users data when creating additional users prior to provisioning, as the user data from these sections is required when provisioning System provided Virtual Images.
User Images
Typically Morpheus does not have sufficient metatdata to successfully provision synced User Images. After integrating clouds and User Images have synced, it is highly recommended to configure the images prior to provisioning.
To edit and configure an existing Virtual Image:
-
Select the pencil icon at the right of any row on the Virtual Images list page, or click EDIT on a Virtual Image detail page.
Provisioning Images
When provisioning a system image, Morpheus will stream the image from Amazon S3 to the target Cloud if the image is not local to the Cloud.
When using images that already exist in the destination Cloud, such as synced, marketplace, or previously copied images, no image stream from S3 through the Morpheus Appliance to the destination cloud will take place.
Add Virtual Image
Virtual Images can be upload to Morpheus from local files or URL’s. Amazon and Azure Marketplace metadata can also be added to the Virtual Images library, enabling the creation of custom catalog Instance Type from Marketplace images (no image is transferred to Morpheus when adding Marketplace images).
To Add Virtual Image:
-
Select + ADD in the Virtual Images page.
-
Select Image format:
-
Alibaba
-
Amazon AMI
-
Azure Marketplace
-
Digital Ocean
-
ISO
-
PXE Boot
-
QCOW2
-
RAW
-
VHD
-
VMware (vmdk/ovf/ova)
-
VMware - VM Templates Copies
In a VMware environemnt, you may have a single VM template that you use across different vCenters. Uploading an image to Morpheus, mentioned in the Add Virtual Image section, is one method to solve this. Alternatively, an organization may decide to create a VM template in one vCenter and then transfer it to other vCenters, which then could be sync’d into Morpheus. If all of the vCenters are added as clouds into Morpheus and the templates are named the same in each vCenter, they will be aggregated under a single virtual image in Morpheus. This means that as you deploy to the various vCenter clouds in Morpheus, using a this virtual image, it will choose the correct VM template to use based on the cloud deployed to.
This eliminates the need for creating multiple node types for each virtual image, if the templates were named differently in each vCenter. This can reduce the overhead of maintaing multiple node types and reduces user selections. As well, this can reduce the cloning time of VMs by avoiding network transfers of images between geographic locations, ensuring the closest VM template is selected.
Morpheus supports VMware Content Libraries to store VM templates and will be sync’d into Morpheus, the same as a template in a folder. As well, the Content Library can be used to house the same same template in multiple libraries. If named the same, these templates will be aggregated under a single virtual image. If the Content Library is stored on a datastore that the target host/cluster has access to, it will use that library first, to reduce the cloning time. If the Content Library is not stored to a datastore accessible by the cluster/host, a copy of the VM template will be performed to the target host/cluster instead.
Templates
Templates can be created directly in Morpheus and/or sourced from version control, depending on the type. They can be used to help users consume IaC technologies, generate configuration files, utilize scripts or store security scan packages. Once stored, they can be used with provisioned Instances, configured as part of Tasks or Workflows, or run regularly as part of security scan Jobs. Each section below discusses template types in greater detail.
Spec Templates
Spec Templates allow Morpheus users to leverage several major Infrastructure-as-Code solutions. These are typically JSON or YAML-based configuration files which make creating and managing multiple resource types easier. Morpheus allows users to create and/or manage a collection of these templates for different solutions and from different sources.
Morpheus currently supports Spec Templates of the following types:
-
Kubernetes Spec
-
Helm Chart
-
Terraform
-
ARM Template
-
CloudFormation Template
-
OneView Server Profile Template
-
UCS Service Profile Template
Morpheus also allows users to leverage templates pulled from URL sources, online repositories (such as GitHub), or you can write a template locally inside the “NEW SPEC TEMPLATE” modal.
File Templates
File Templates are for generating config files, such as my.cnf, elasticsearch.yml, morpheus.rb, or any text file. With full config map variable support, Template Files are dynamically generated during a Workflow phase or ad hoc via Instance actions.
File Templates can also be exposed on Instances in the Settings Tab. Ensure the Instance Type supports settings, and Category is defined in Advance Options on the Library Template config.
Script Templates
Scripts are bash and Powershell scripts that can be attached to Node Types to always execute at the selected phase when that Node Type is provisioned, added to Workflows as Library Script Tasks, and/or executed ad-hoc on Instances.
Creating Scripts
-
Navigate to Library > Templates > Script Templates
-
Select + ADD
Security Packages
The Security Packages Section is for uploading SCAP packages which can then be consumed in Security Scan Jobs (Provisioning > Jobs).
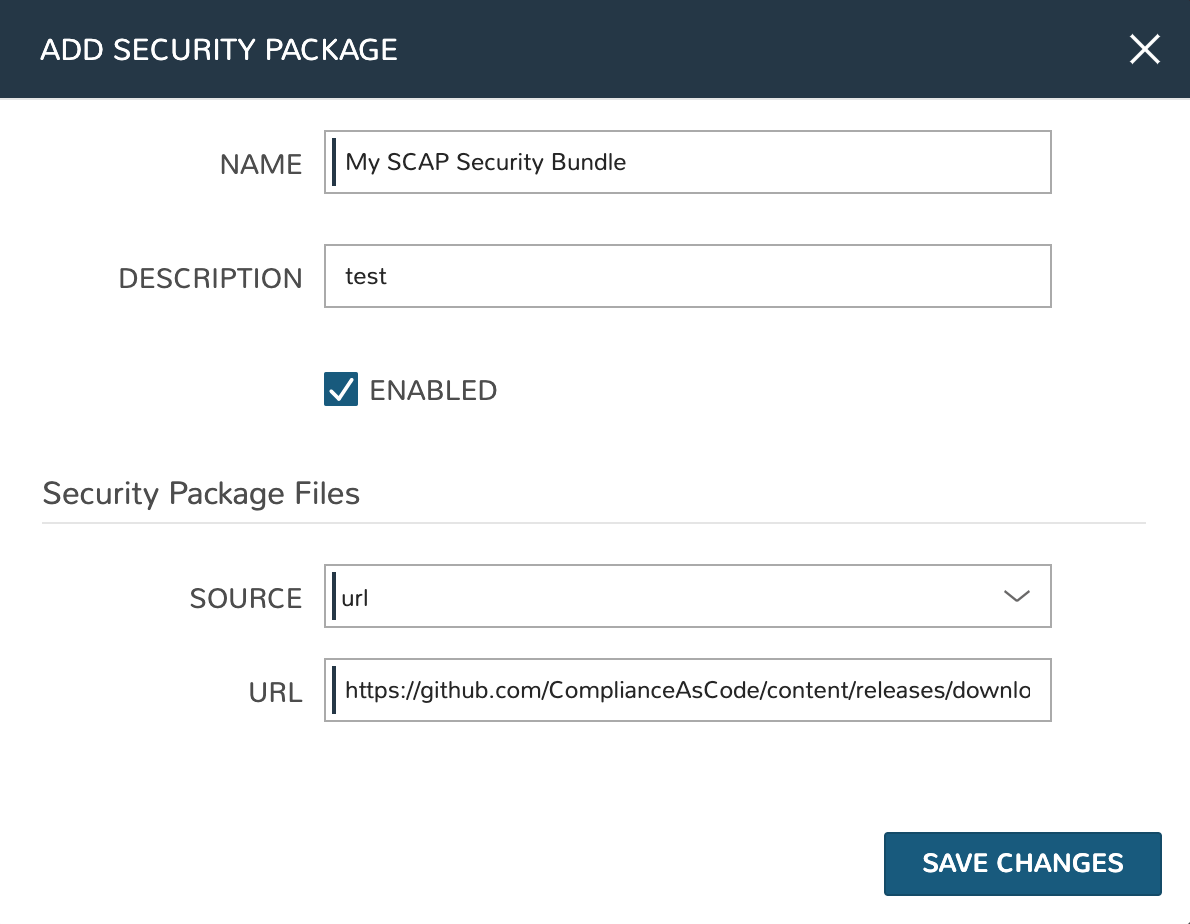
Add a new Security Package
-
Navigate to Library > Templates > Security Packages
-
Click +ADD > SCAP Package
-
Provide a name in addition to a URL to source the package
-
Click SAVE CHANGES
Note
Currently URL is the only source option for security packages
Library Integrations
The integrations section within Morpheus Library lists existing integrations and allows for the creation of new integrations which are related to automation technologies. A complete list of integrated third party technologies is available in the Administration section (Administration > Integrations). More detailed information about each Morpheus integration with third party technologies is included in our Automation Integrations section.
Comments
0 comments
Please sign in to leave a comment.