There are several administrative integrations built into Morpheus that make it great to work with within any organization ranging from small to large. Especially, with its built in white label support and multitenancy capabilities, managed service providers have a wide range of capabilities when it comes to managing customer accounts and users.
Tenants
Overview
A Tenant in Morpheus is an isolated environment with unique users and workloads. The Master Tenant is the default Tenant in Morpheus, created upon installation. All other Tenants outside of the Master Tenants are Subtenants.
-
The Master Tenant is the default Tenant created during the installation of Morpheus
-
All Tenants created after installation are Subtenants. Only one Master Tenant can exist
-
The Master Tenant creates and controls all Subtenants.
-
Tenants are isolated environments with unique users, workloads, and Groups
-
The Master Tenant can share or assign its resources to Subtenants
-
Subtenants cannot share their resources with other Tenants
-
Subtenants cannot see resources from other Subtenants
-
Subtenants can only access Master Tenant resources that have been set to Public visibility or specifically assigned to the Subtenant
Roles
There are two Role types in Morpheus, Tenant Roles and User Roles. Understanding these Role types is key to effectively administering Role permissions in Morpheus. These two Role types are discussed in greater detail in this section.
Tenant Roles
Tenant Roles set the maximum permission levels for Users in the Tenant. User Role permissions will not exceed the permissions of the Tenant Role.
-
Tenant Roles set the maximum permissions for a Tenant
-
User Roles in a Tenant cannot exceed the permissions of the Tenant Role
-
A Tenant Role can be assigned to one or multiple Tenants
-
Tenant Roles determine Cloud access for the Subtenant such that all Clouds in the Master Tenant which have visibility set to Public will show as options in the Tenant Role Cloud Access tab
-
Only Master Tenant Clouds given access in the Tenant Role will be accessible in the Subtenant.
Configuring Tenants and Resources for Multi-Tenancy
A very common scenario for Managed Service Providers is the need to provide access to resources on a customer by customer basis. Several administrative features are available in Morpheus to ensure customer resources are properly scoped and isolated. With its built multi-tenancy capabilities and white label support, managed service providers have a wide range of capabilities when it comes to managing customer Tenants and users.
Tenants
There are essentially two types of Tenants in Morpheus
-
Master Tenant
-
Sub Tenants
During the initial setup of a Morpheus Appliance, the Master Tenant is created. All Tenants created in addition to this Master Tenant are sub-Tenants. There can only be one Master Tenant, and sub-Tenants cannot become the Master Tenant. The delineation between the Master Tenant and sub-Tenants is important to understand for properly scoping resources across Tenants.
Creating Tenants
The Master Tenant is created during the initial appliance setup. Additional sub-Tenants can be created in the Administration > Tenants section.
The Tenants page displays a list of all Tenants. This page enables users to: Create, Edit, and Delete Tenants. The list of Tenants displays the Tenant Name, Role, Total Instances, Total Users, Status (active or inactive) and the Created Date. Click the Tenant Name to drill into the Tenant View where you can edit or delete the Tenant, as well as create, edit and delete users belonging to the Tenant.
Viewing Tenants
To View an individual Tenant page, select the Tenant name from the main Tenants section.
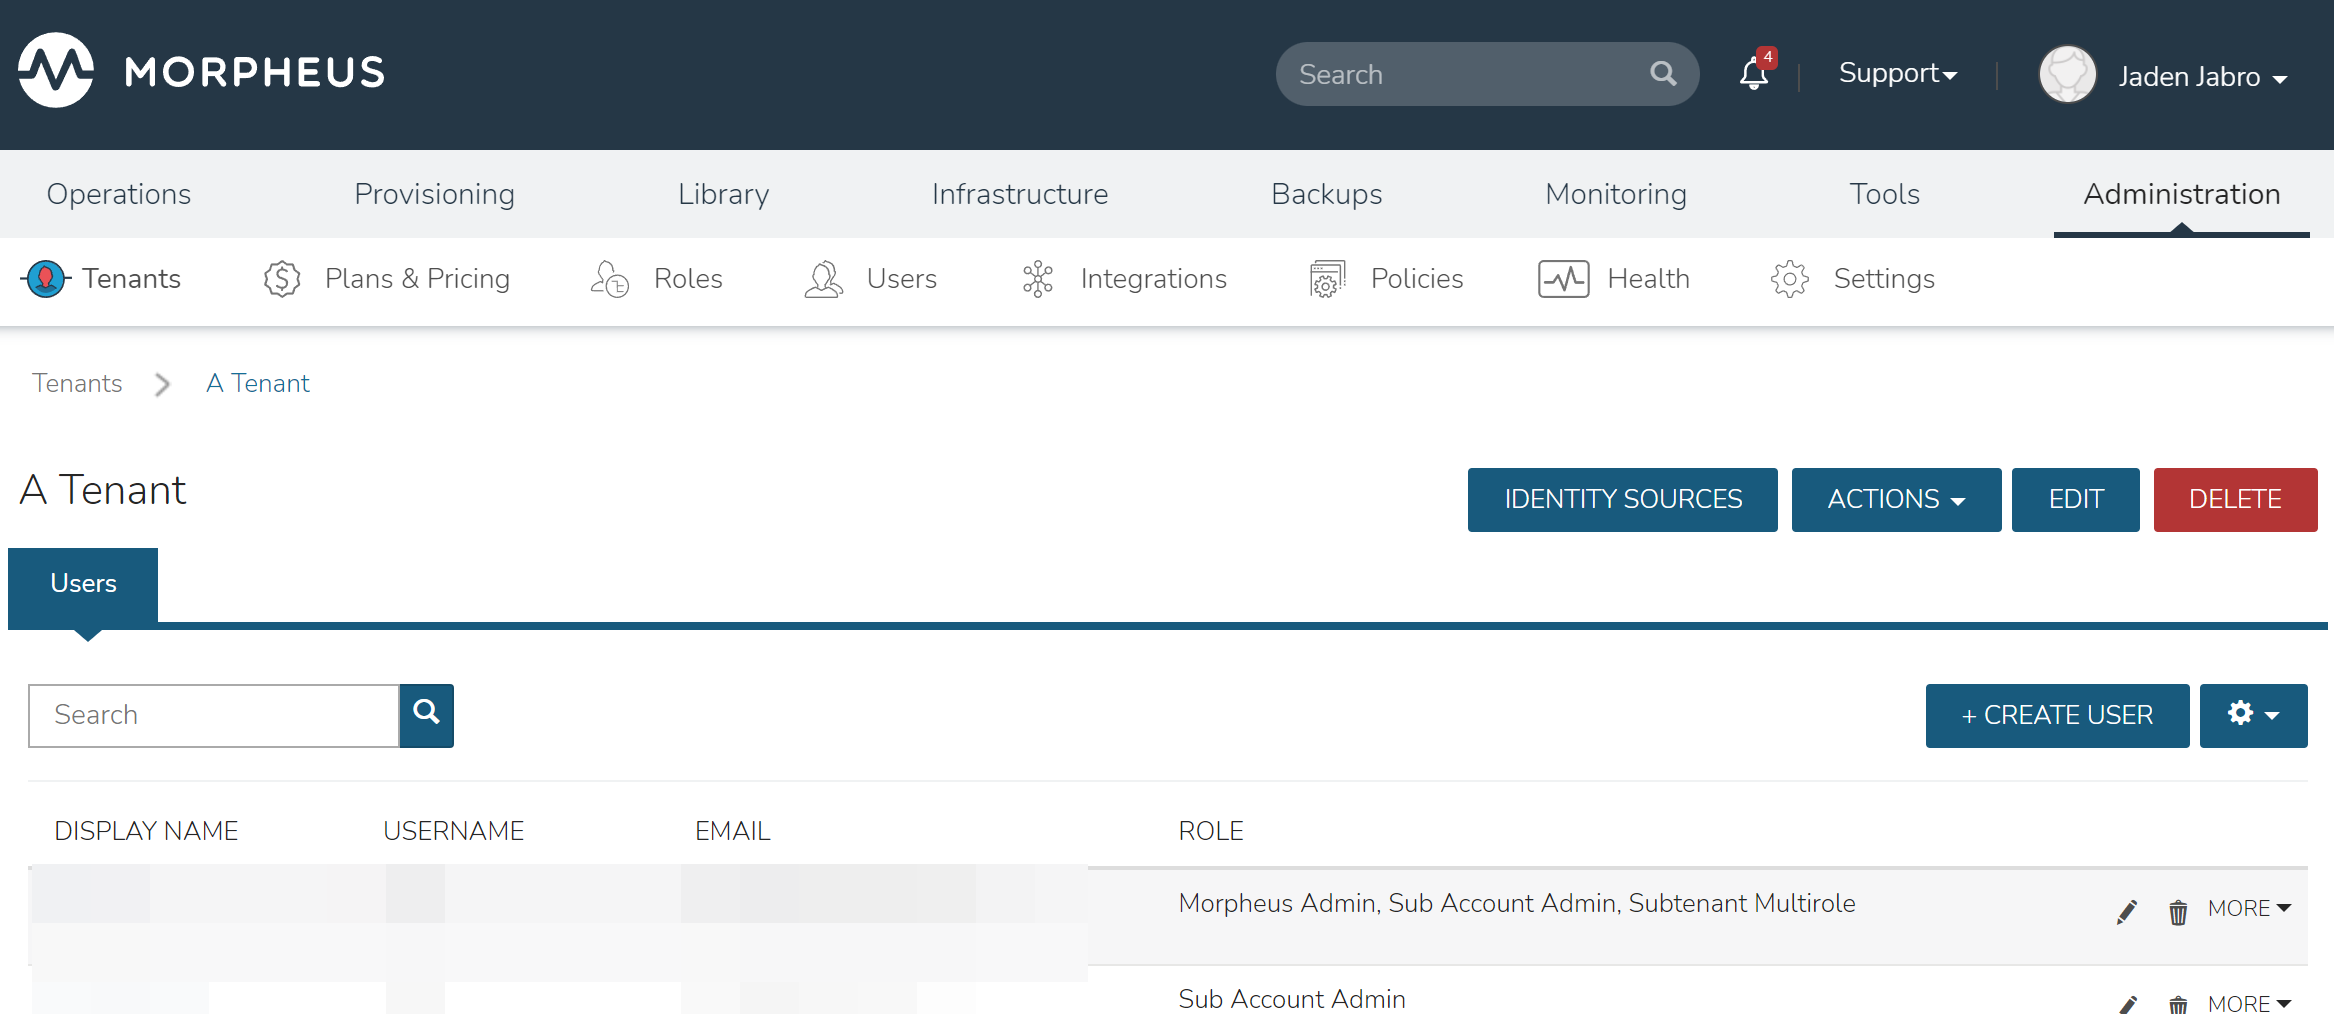
From inside the Tenant view, we can edit or delete the Tenant, as well as click into any of the Tenant’s users.
Assign a Cloud to an Tenant
To assign a cloud from the Master Tenant to a Sub-Tenant
-
Navigate to Infrastructure, Clouds
-
Select either the pencil/edit icon on the end of the cloud row, or click the name of the cloud and select “Edit” in the cloud page.
-
From the “Tenant” drop down, select the Tenant to assign the cloud to. The visibility will automatically be set to “Private” when a cloud is assigned to a sub-Tenant.
-
Select SAVE CHANGES in the footer of the Edit Cloud modal.
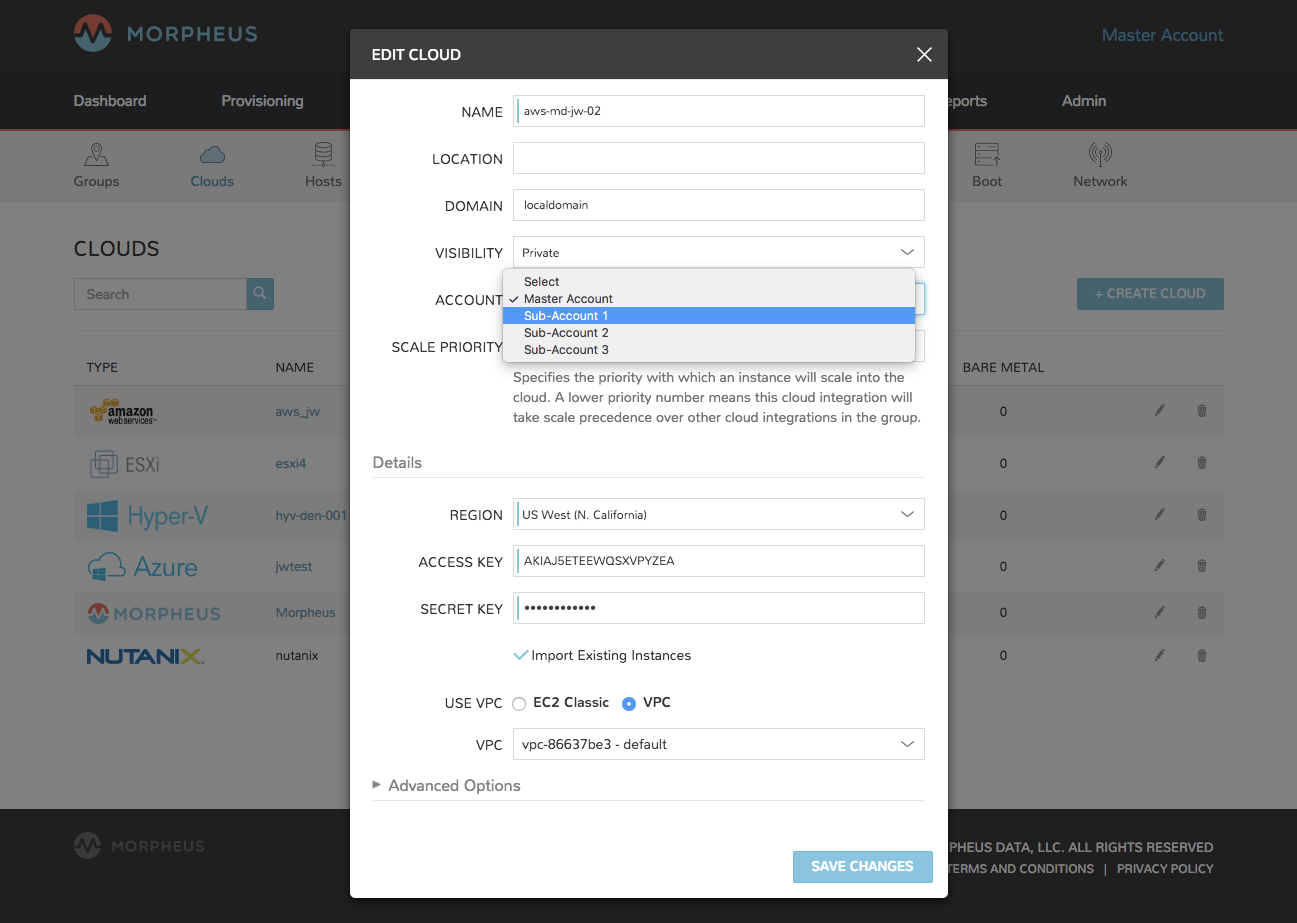
When a cloud is assigned to a sub-Tenant, or assigned to the Master Tenant with private visibility, that cloud and all of its resources are only available to the assigned Tenant. The Master Tenant still maintains control and visibility, and can edit the cloud settings or re-assign the cloud.
Individual Resource Visibility & Assignment
Similar to clouds, individual resources from the Master Tenant can be set to public and available to sub-Tenants, or assigned to sub-Tenants.
By default, any host, virtual machine, bare metal server, network, resource pool, datastore or blueprint added, created or inventoried by an Tenant is assigned to that Tenant. If these resources are in the Master Tenant, they can be assigned to sub Tenants. Assigning one of these resources will make it unavailable to the Master Tenant, but it will still be visible and editable by the Master Tenant. This allows Master Tenant resources to be isolated for use by sub-Tenants while still under the control of the Master Tenant.
Resources assigned to sub-Tenants from the Master Tenant will be visible and available for use by that sub-Tenant, however they cannot be edited or re-assigned by the sub-tenant.
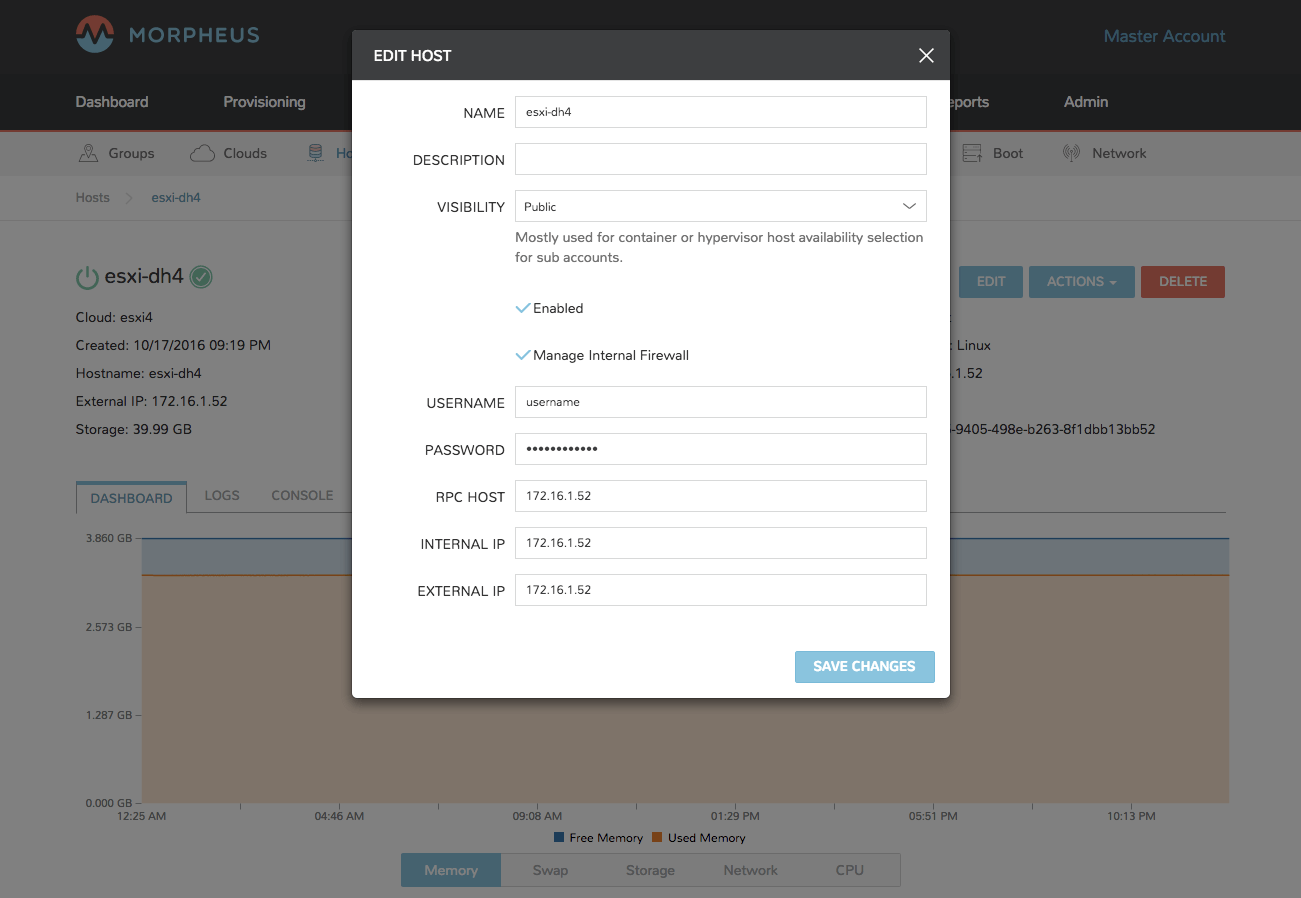
Set the Visibility of a Host, Virtual Machine or Bare metal Server to Public or Private
-
From the Master Tenant, navigate to Infrastructure, Hosts
-
Select either the Hosts, Virtual Machines or Bare Metal tab
-
Click the name of the resource
-
Select EDIT in the resource page to bring up the config modal
-
From the “Visibility” drop down, select either “Public” or “Private”
-
Select SAVE CHANGES
Assigning a Host, Virtual Machine, or Bare Metal server to an Tenant
-
From the Master Tenant, navigate to Infrastructure, Hosts
-
Select either the Hosts, Virtual Machines or Bare Metal tab
-
Click the name of the resource
-
From the “Actions” dropdown in the the resource page, select Assign Tenant
-
In the Assign Tenant modal, select the Tenant to assign the resource to.
-
Select EXECUTE in the modal
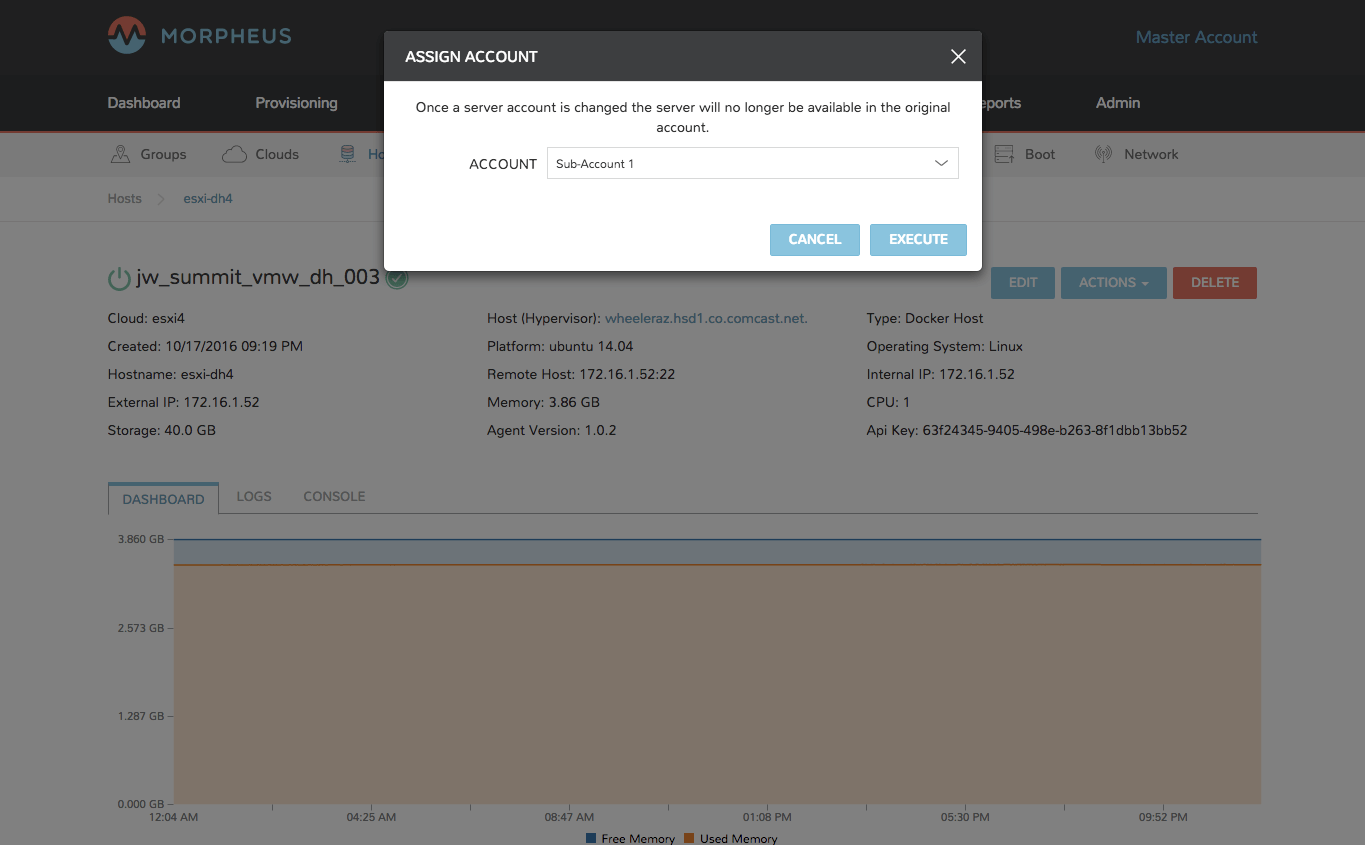
The resource will now be assigned and available for use by the assigned Tenant. If assigned to a sub-Tenant, the Master Tenant will maintain visibility and control.
Set the Visibility of a Network to Public or Private
-
From the Master Tenant, navigate to Infrastructure, Network
-
Select either the pencil/edit icon in the network row, or click the name of the network and select “Edit” in the network page.
-
From the “Visibility” drop down, select either “Public” or “Private”
-
Select SAVE CHANGES in the modal
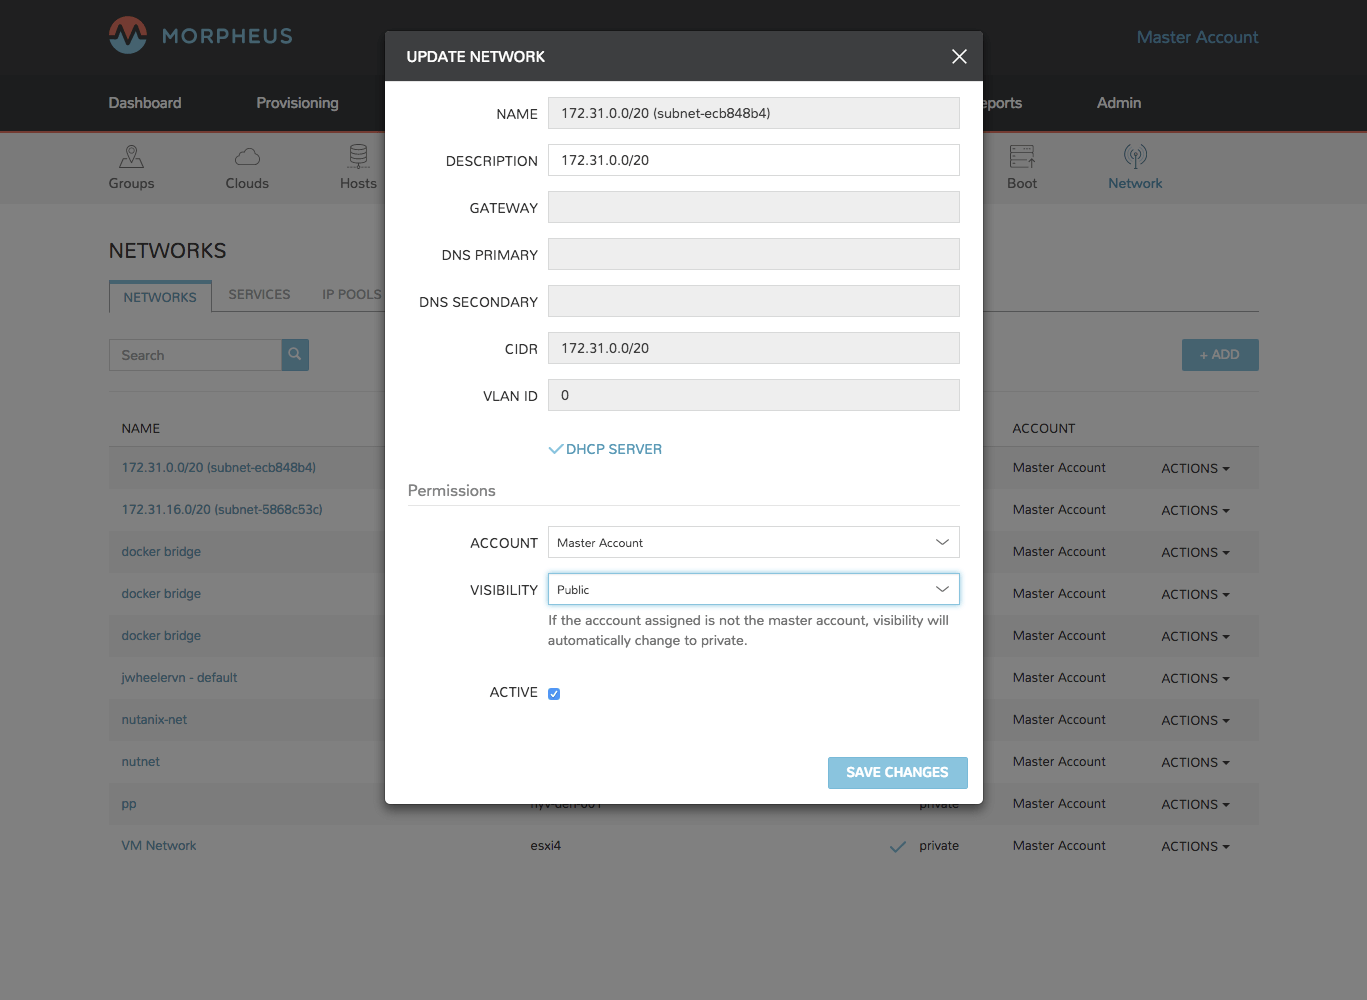
Assign a Network to an Tenant
-
From the Master Tenant, navigate to Infrastructure, Network
-
Select either the pencil/edit icon in the network row, or click the name of the network and select “Edit” in the network page.
-
From the “Tenant” drop down, select an Tenant to assign the network to.
-
Select SAVE CHANGES in the lower the modal
The Network will now be assigned and available for use by the assigned Tenant. If assigned to a sub-Tenant, the Master Tenant will maintain visibility and control.
Set the Visibility or assign a datastore to an Tenant
-
From the Master Tenant, navigate to Infrastructure, Storage
-
Select the “Data Stores” tab
-
Select Edit from the “Actions” dropdown in the datastores row
-
From the “Visibility” drop down, select either “Public” or “Private”
-
From the “Tenant” drop down, select the Tenant to assign the datastore to.
Identity Sources
Administration > Tenants > (Selected Tenant) > Identity Sources Administration > Users > Identity Sources
Overview
Morpheus can integrate with many of the most common identity source technologies, such as Active Directory, Okta, and many others. These can be configured via the IDENTITY SOURCES button on any Tenant detail page (Administration > Tenants > Selected Tenant) or on the Users list page (Administration > Users). These integrations map roles within these sign-on tools to equivalent roles in Morpheus so at first log in users are assigned the appropriate role.
On setting the type to “Active Directory,” the form will update with the needed fields. Note the following basic fields:
-
AD SERVER: The IP address or hostname for the Active Directory Server
-
DOMAIN: The AD domain in which the relevant users and groups reside
-
BINDING USERNAME: A server user which has access to relevant objects on the AD server. In my example, I’ve used the in-built Administrator user which is the easiest option. Other users may be used depending on your organization’s IT security policies but the integration with Morpheus will not work properly if the user does not have the needed access
-
BINDING PASSWORD: The password for the user in the prior field
With the basic configurations completed, the remaining configurations will affect Morpheus user and role generation. A REQUIRED GROUP is optional and is a group the user must be in to have any Morpheus access. Here we require that users be in the “Morpheus Users” group. A DEFAULT ROLE is required and will be assigned to all users regardless of any additional roles they may be assigned based on their AD group membership. Beyond that, all other Morpheus roles will be listed here and an AD group name can be associated with as many as you required. In this example, we are giving users in the “Morpheus Admins” group the Morpheus System Admin role. Though we did not use them, it’s worth pointing out that ENABLE ROLE MAPPING PERMISSION will give administrators in the Tenant the ability to update the AD role mappings (though they will not have access to the core integration fields such as AD SERVER, DOMAIN, or binding user details). MANUAL ROLE ASSIGNMENT allows users to manually update Morpheus roles outside of the automatic mappings created by the AD integration.

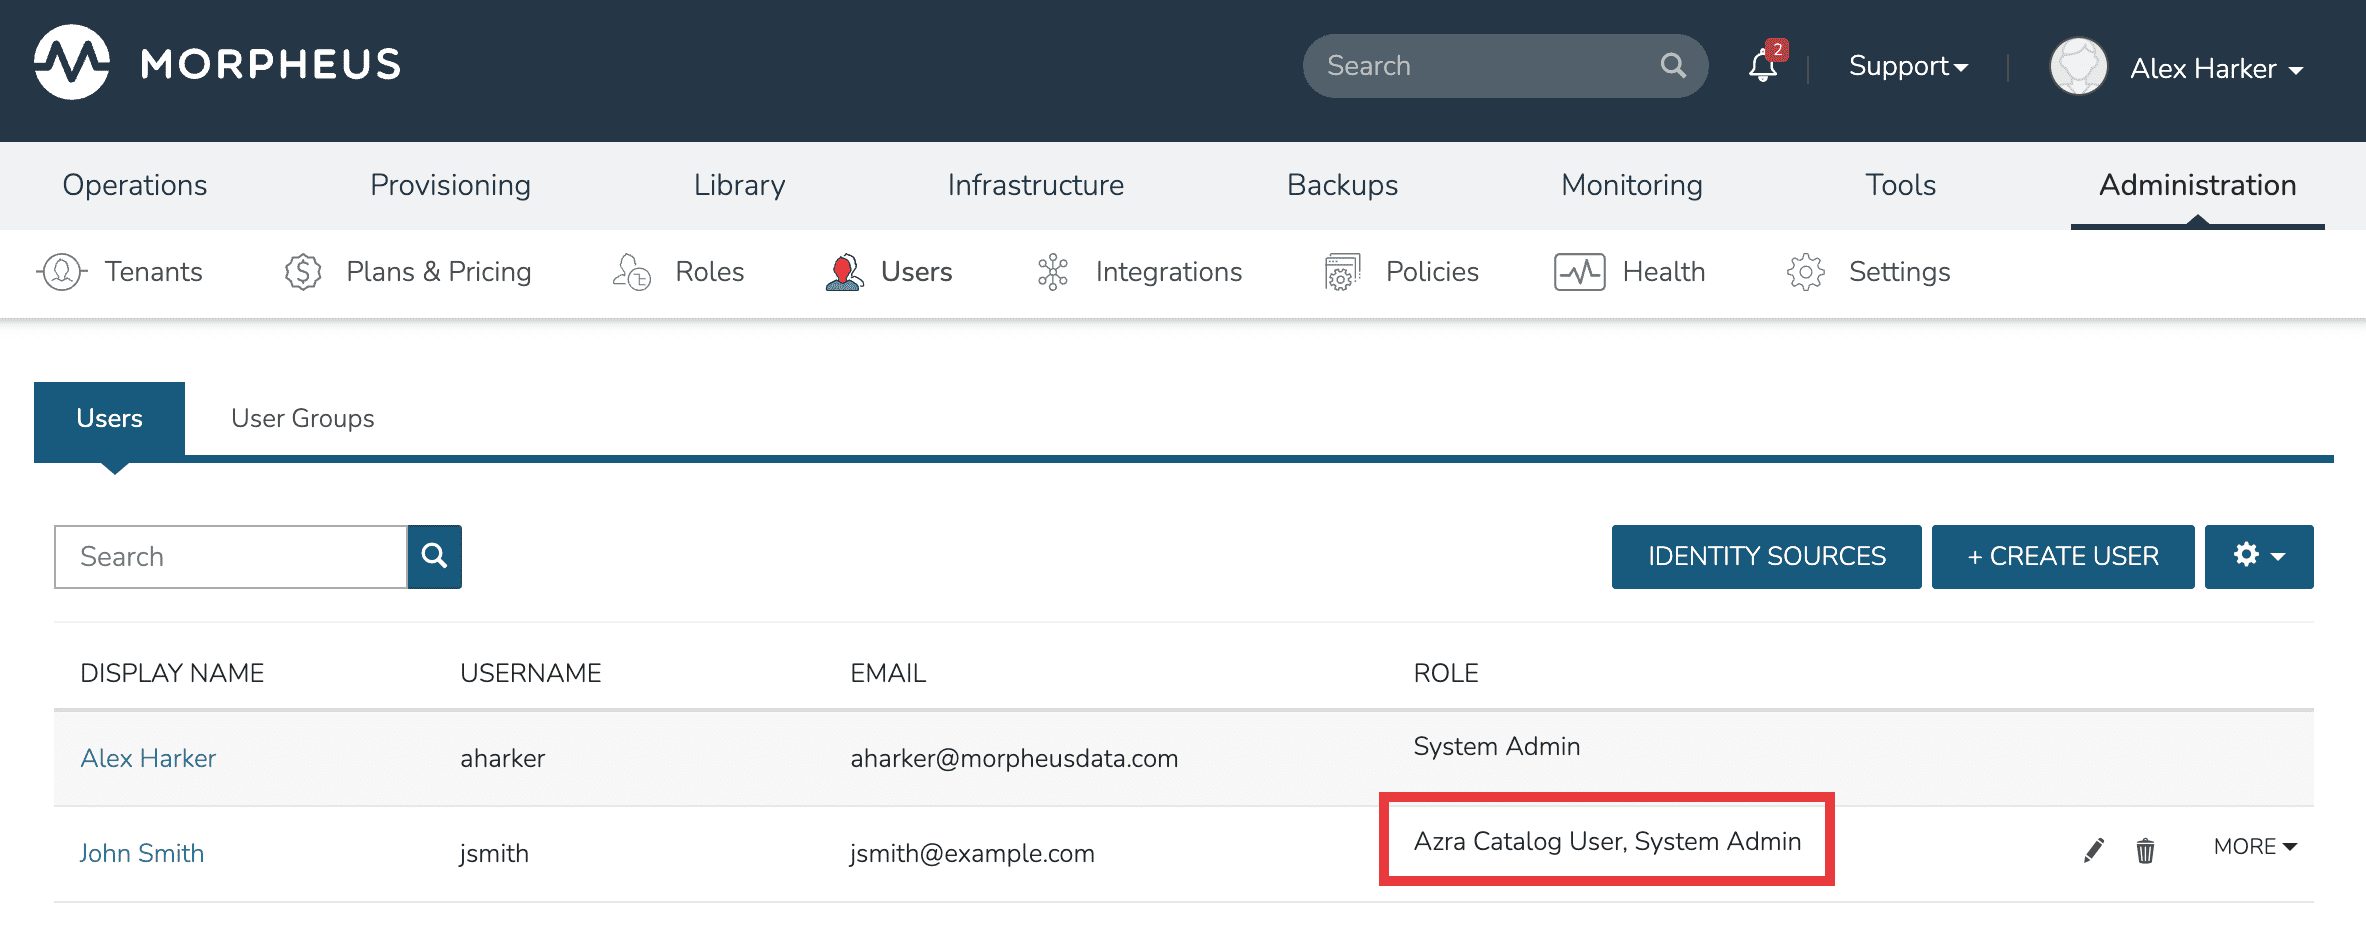
With the above integration steps completed, users can now log into Morpheus and a user account with correct roles will automatically be created. In our example case, John Smith has logged in and we can see he is assigned the default role as well as the System Admin role based on his AD group associations. Going forward, Morpheus will continue to sync any changes to these users. For example, Morpheus roles may be updated based on changing AD groups or user access may be completely revoked by disabling the user in AD.
Okta
Overview
Morpheus allows users to integrate an Okta deployment for user management and authentication. In Morpheus, identity sources are added on a per-Tenant basis and Morpheus allows you to map Okta user groups to Morpheus user groups. User accounts are automatically created with matching metadata and role permissions when users are authenticated.
Adding an Okta Integration
-
Navigate to Administration > Tenants
-
Select a Tenant
-
Select IDENTITY SOURCES
-
Select + IDENTITY SOURCE
-
Choose TYPE: “Okta”
-
Populate the following, then select SAVE CHANGES:
- Name
-
Unique name for authentication type
- Description
-
A description for your new Okta Identity Source
- Okta URL
-
Your Okta URL
- Administrator API Token
-
Your Okta Administrator API Token
- Required Group
-
The Okta group that users must be in to have access (optional)
- Default Role
-
The default role a user is assigned if no group is listed under an Okta user that maps within the Morpheus Role Mappings section
- ENABLE ROLE MAPPING PERMISSION
-
When selected, Tenant users with appropriate rights to view and edit Roles will have the ability to set role mapping for the Identity Source integration. This allows the Tenant user to edit only the role mappings without viewing or potentially editing the Identity Source configuration.
- MANUAL ROLE ASSIGNMENT
-
When selected, administrators can manually edit Roles for users created through this identity source integration from the user detail page (Administration > Users > Selected user).
SAML Integration
Overview
The Morpheus SAML identity source integration allows customers to add user SSO to Morpheus, authenticated by external login SAML providers.
Adding a SAML Integration
To add a SAML integration:
-
Navigate to Administration > Tenants
-
Select a tenant.
-
Select IDENTITY SOURCES in the Tenant detail page
-
Select + ADD IDENTITY SOURCE.
-
Select SAML SSO from the TYPE field
-
Add a Name and optional Description for the SAML integration
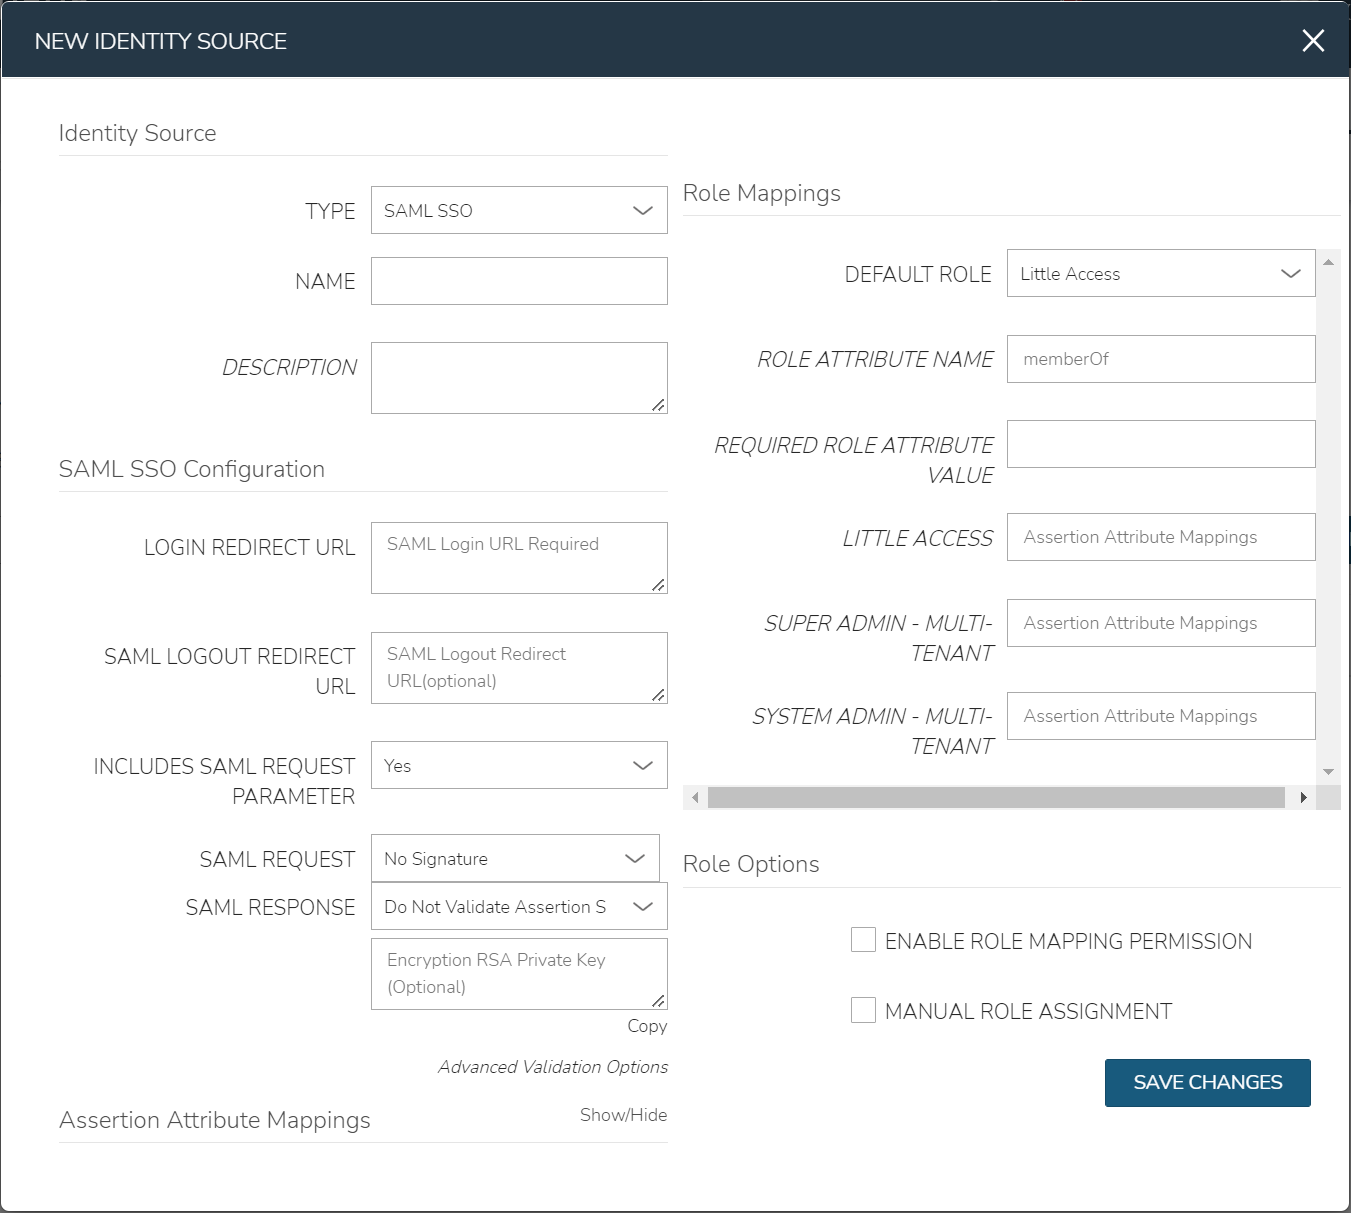
There are 4 sections with fields that need to be populated depending on the desired configuration:
-
SAML Configuration
-
Role Mappings
-
Role Options
-
Assertion Attribute Mappings
Plans & Pricing
Overview
Service Plans determine the amount of compute resources available to each Instance. When provisioning new Instances from Morpheus, a plan is selected which determines the number of CPU cores, amount of memory and the amount of storage available to the associated machines. Additionally, when converting discovered instances in integrated clouds to Morpheus-managed Instances, the user selects a plan which best fits the instance as it is currently configured. When Instances are reconfigured, a new plan may be selected which redefines the compute resources which should be available to the Instance.
Plans can be as specific or open-ended as the user would like, restricting the user to the resources defined in the plan or allowing the user to increase those amounts at provision time. Price sets are associated with plans, which is how Morpheus can compute cost values even for Instances running in private, on-prem Clouds.
The Plans & Pricing section is where Plans, Prices Sets and Prices are managed. These concepts are associated with each other in the following way: Prices are added to Prices Sets, and Price Sets are added to Plans. Plans include Service Plans, Load Balancer Price Plans, Virtual Image Prices Plans and Snapshot Price Plans. Price sets can be agnostic and available for any Plan, or specific to a Region Code, Cloud or even a specific Resource Pool. Prices are configured per Price Type and can be added to Price Set configurations that support the Price Type. Master Tenant Prices can apply to all Tenants or be assigned to a single Tenant.
A set of Service Plans are seeded by Morpheus for private cloud provision types as well as some public clouds. Additional Plans and Prices are synced in for other public clouds when the corresponding cloud types are added to an appliance. Users can create new Service Plans or edit the system-seeded Service Plans for Private Cloud types. Service Plans configurations cannot be created or edited for Public Cloud provision types.
Plans
Plans types include Service Plans and Price Plans. Service Plans determine the memory, storage and cores configuration during provisioning and reconfigure.
Service Plans
A set of Service Plans are seeded by Morpheus for private cloud provision types as well as some public clouds. Additional Plans and Prices are synced in for other public clouds when the corresponding cloud types are added to an appliance. Users can create new Service Plans or edit the system-seeded Service Plans for Private Cloud types. Service Plans configurations cannot be created or edited for Public Cloud provision types.
Load Balancer Price Plans
Load Balancer Price Plans configure pricing for Load Balancers and Load Balancer Virtual Servers.
Load Balancer Price Plan Configuration:
-
NAME: The name of the Load Balancer Price Plan in Morpheus
-
ACTIVE: When Active, Prices in Price Sets added to the Price Plan will apply to associated resources as configured
-
CODE: A unique identifier for use in Morpheus API and CLI
-
LOAD BALANCER TYPE: Select the load balancer type the Price Plan should be associated with
-
PRICE SETS: In the Price Sets tab, associate Price Sets with the Plan. Load Balancer Price Sets may be associated with Load Balancer-type and Load Balancer Virtual Server-type Prices. Fore more, see Add Price Set(s) to Plan
Virtual Image Price Plans
Virtual Image Price Plans configure pricing for Virtual Images. Pricing is associated per Price and Price Set configurations, but in general applies to Images with location records in the Price Plans specified Cloud type. Virtual Image Price Plans are for setting pricing for Virtual Image storage, not for adding pricing to resources that use Virtual Images associated with Virtual Image Price Plans. Virtual Image Price Plans do not apply to uploaded Virtual Images that have not been copied to a location in the specified Cloud type yet.
Virtual Image Price Plan Configuration:
-
NAME: The name of the Virtual Image Price Plan in Morpheus
-
ACTIVE: When Active, Prices in Price Sets added to the Price Plan will apply to associated resources as configured
-
CODE: A unique identifier for use in Morpheus API and CLI
-
CLOUD TYPE: Virtual Image Pricing applies to Virtual Images with location records in the specified Cloud type
-
PRICE SETS: In the Price Sets tab, associate Price Sets with the Plan. Virtual Image Price Sets may be associated with Storage-type Prices. Fore more, see Add Price Set(s) to Plan
Snapshot Price Plans
Snapshot Price Plan Configuration:
-
NAME: The name of the Snapshot Price Plan in Morpheus
-
ACTIVE: When Active, Prices in Price Sets added to the Price Plan will apply to associated resources as configured
-
CODE: A unique identifier for use in Morpheus API and CLI
-
CLOUD TYPE: Snapshot Pricing applies to Snapshots with location records in the specified Cloud type
-
PRICE SETS: In the Price Sets tab, associate Price Sets with the Plan. Snapshot Price Sets must have at least one Storage-type Price but may also have Datastore-type Prices. Fore more, see Add Price Set(s) to Plan
Price Sets
Price Sets combine Prices and then attach to Plans. Prices must be created prior to creating Price Sets, but it is recommended to review the Price Set Type options prior to creating Prices.
- Price Unit
-
Select the Price Unit to use for the Price Set.
-
Minute
-
Hour
-
Day
-
Month
-
Year
-
Two Year
-
Three Year
-
Four Year
-
Five Year
-
Prices
- Price Types
-
-
Everything: One price for all resources Storage, CPU, Memory, and Disks
-
Memory + CPU
-
Memory Only (per MB)
-
Cores Only (per core)
-
Disk Only (per GB)
-
Platform: Select from Windows, Linux (generic), or one of several specific Linux distributions
-
Software/Service: Add prices for software licenses which may be included with your price sets
-
Datastore (per GB)
-
Load Balancer
-
Load Balancer Virtual Server
-
Cost
The base cost of the resource(s). The Price will match the Cost unless a Price Adjustment is added.
Price Adjustment
-
None: Default, no markup added and Price will match Cost
-
Fixed Markup: A fixed amount added to the Cost. Price will equal Cost + Markup.
-
Percentage Markup: Adds a percentage markup to Cost. Price equals Cost + (Cost x Markup %)
-
Custom Price: Sets a Price independent from the Cost. If the Cost changes, a Custom Price will not.
Price
A computed value of the final price including the cost plus any applicable markup.
Apply Price Changes to Usage
If marked, when saving a Price Set (new Price Set or saving changes to an existing one), usage records will be restarted for servers affected by the pricing change.
Roles
Within Morpheus is a wide array of role based access control capabilities. These roles can be managed within the Admin > Roles section of the Morpheus UI as well as through the API or CLI. They are designed to be robust enough to fit within a wide array of enterprise and managed service provider scenarios so they can be a bit hard to grasp at first, but should make sense once a few simple concepts are explained. There are two types of roles within Morpheus called Tenant and User based roles. Both sets of roles allow restrictions to be imposed on a user at the feature access level. Entire sections within the appliance UI can be hidden based on the specified access levels for features within Morpheus. Features have different access scopes that can be selected from and can range depending on the specific feature. The most common scope set involves none, read, and full. Instance Type access is also common among both role types which allow the administrator to restrict which service catalog items they are allowed to provision within Morpheus.
Role Types
Tenant Roles
A Tenant based role (formerly called an Account based role) is used to ensure access control enforcement across an entire tenant with many sub-users. This allows the subtenant to manage their own set of internal user based roles without worrying master tenant involvement in setting them up. The master tenant is the only tenant able to create and manage these types of roles. When editing a Tenant, a singular tenant role can be assigned to the account. Users within the tenant can be assigned roles but those user based roles will never be able to supersede the level of access granted by the tenant role. This allows a super administrator the ability to restrict access at the department or organization level without having to worry about per user access control within said tenant.
Tenant roles also have an additional section not in User based roles related to Cloud Access. Cloud Access allows the master tenant the ability to assign cloud integration resources to specific subtenants or groups of subtenants. An example would be granting access to a specific VMware cluster only to a subset of tenants using the tenant based role control.
User Roles
User roles can be created by any tenant given permission at the tenant role level. These allow tenants to manage their own sets of users and their levels of access. They also allow tenants to control which users have access to specific “Groups” for provisioning into within Morpheus. Groups are not cross tenant and therefore need to be controlled within the individual tenant in Morpheus.
Master tenant users are able to create a special type of user role called a multi-tenant user role. A multi-tenant user role is copied / duplicated down to all subtenants within Morpheus. These can be viewed as canned role templates available to new tenants when their account is first created. Any changes made to the main role are propagated down to the subtenants version of the shared role so long as the subtenant users have not previously adjusted/changed that role. The moment a subtenant makes adjustments to the shared role within their account, it is unlinked from the parent role and treated entirely independently. In order to relink the Role in the Subtenant, a Master Tenant user would have to edit the Role, uncheck MULTITENANT USER ROLE, save the Role, check MULTITENANT USER ROLE once again, then save the Role once again.
Another note about user roles is that when a user role is copied down to a subtenant, the permission scopes cannot supersede the tenant’s assigned tenant role. If they do they are automatically downgraded when propagated to the specific tenant. Any changes made to the tenant role will automatically ensure roles within the tenant are downgraded appropriately.
Multi-Tenant User Role Lock
As discussed above, Multi-Tenant User Roles are made available within all Subtenants and can be thought of as ‘canned’ user role sets provided to the Subtenant. Master Tenant administrators can prevent changes to these ‘canned’ user roles by marking the box labeled ‘MULTITENANT LOCKED’ when creating or editing the role. In addition to preventing Subtenant administrators from modifying permissions of the role copied down to their Subtenant, this option also ensures Master Tenant administrators can propagate new changes to that role. Modification of the role by the subtenant (if allowed) breaks the link back to the Master Tenant and the copy of the role within the Subtenant will become its own unlinked role.
Editing User Roles in other Tenants
Administrators in the Primary Tenant have the unique ability to edit feature permissions for User Roles that exist within other Tenants (Subtenants). In order to view the Roles within the Tenant, navigate to the Tenant detail page (Administration > Tenants) and select the Roles tab. Click the pencil (✎) icon to the right of a Role in the list to edit basic information, such as the name and description of the Role. Click on the name of the Role to view its complete permission set and edit the permissions if desired. This will update the feature access rights of users in the selected Tenant which have the Role.
Roles and Identity Sources
It is very common for large Enterprises to have an existing identity source that they would like to plug in to Morpheus for authentication. This includes services like LDAP, Active Directory, OKTA, Jump Cloud, One Login, and SAML. When using these services it becomes important to configure a role mapping between the Morpheus role assignments to the equivalent identity source groups/roles the user belongs to. This is configurable within the identity source management UI. Sections are provided allowing things like LDAP groups to be directly mapped to specific roles within Morpheus. If a user matches more than one LDAP/role group then both sets of roles are applied to the user automatically. Configuring Identity Sources is done in Tenant management or user management in Administration > Tenants or Administration > Users, and has to be configured on a per-tenant basis. Additionally, administrators may opt to lock users to their mapped role in Morpheus or keep the roles unlocked to manually administer roles in one-off scenarios.
Creating Roles
User Roles
User Roles can be single or multitenant. A Multitenant User Role is automatically copied into all existing subtenants as well as placed into a subtenant when created. Useful for providing a set of predefined roles a Customer can use. The Multitenant Locked option prevent subtenant from modifying FEATURE ACCESS settings in the Role. Note Group, Instance Type and Blueprint Access settings will still be editable as Groups are unique per Tenant, and Instance and Blueprints can be a mix of unique and shared items.
Users & User Groups
Users
Overview
The Users page displays a list of all Users. The following fields are surfaced for each User:
-
Tenant
-
Display Name
-
Username
-
Email
-
Role
User Settings
Additional settings for a User can be found in the User Settings section, including:
-
User Photo
-
Default Group
-
Default Cloud
-
API Access
To access User Settings:
-
Select your name in the header
-
Select User Settings
To edit the User you are currently logged in as from User Settings:
-
Select your name in the header
-
Select User Settings
-
Make changes.
-
Select SAVE.
API Access
API and CLI Access Tokens can be regenerated from the User Settings section.
To regenerate a CLI or API Access Token:
-
Select your name in the header
-
Select User Settings.
-
Select API ACCESS under the Windows Settings section.
-
Select ACTIONS for the Client ID the token will be generated for.
-
Select Regenerate.
-
Copy the Generated Access Token.
Policies
Policies add governance, ease of use, cost-savings, and auditing features to Morpheus. Morpheus enables end users to create Policies scoped to Users, Roles, Groups, Clouds, Tenants, Networks, Plans, and Global scoping to give Admins full control and governance over their environments. The available scoping will vary from one Policy type to another. See the section below for information on each Policy type and guides for more complex Policy implementation.
Health
Morpheus Health
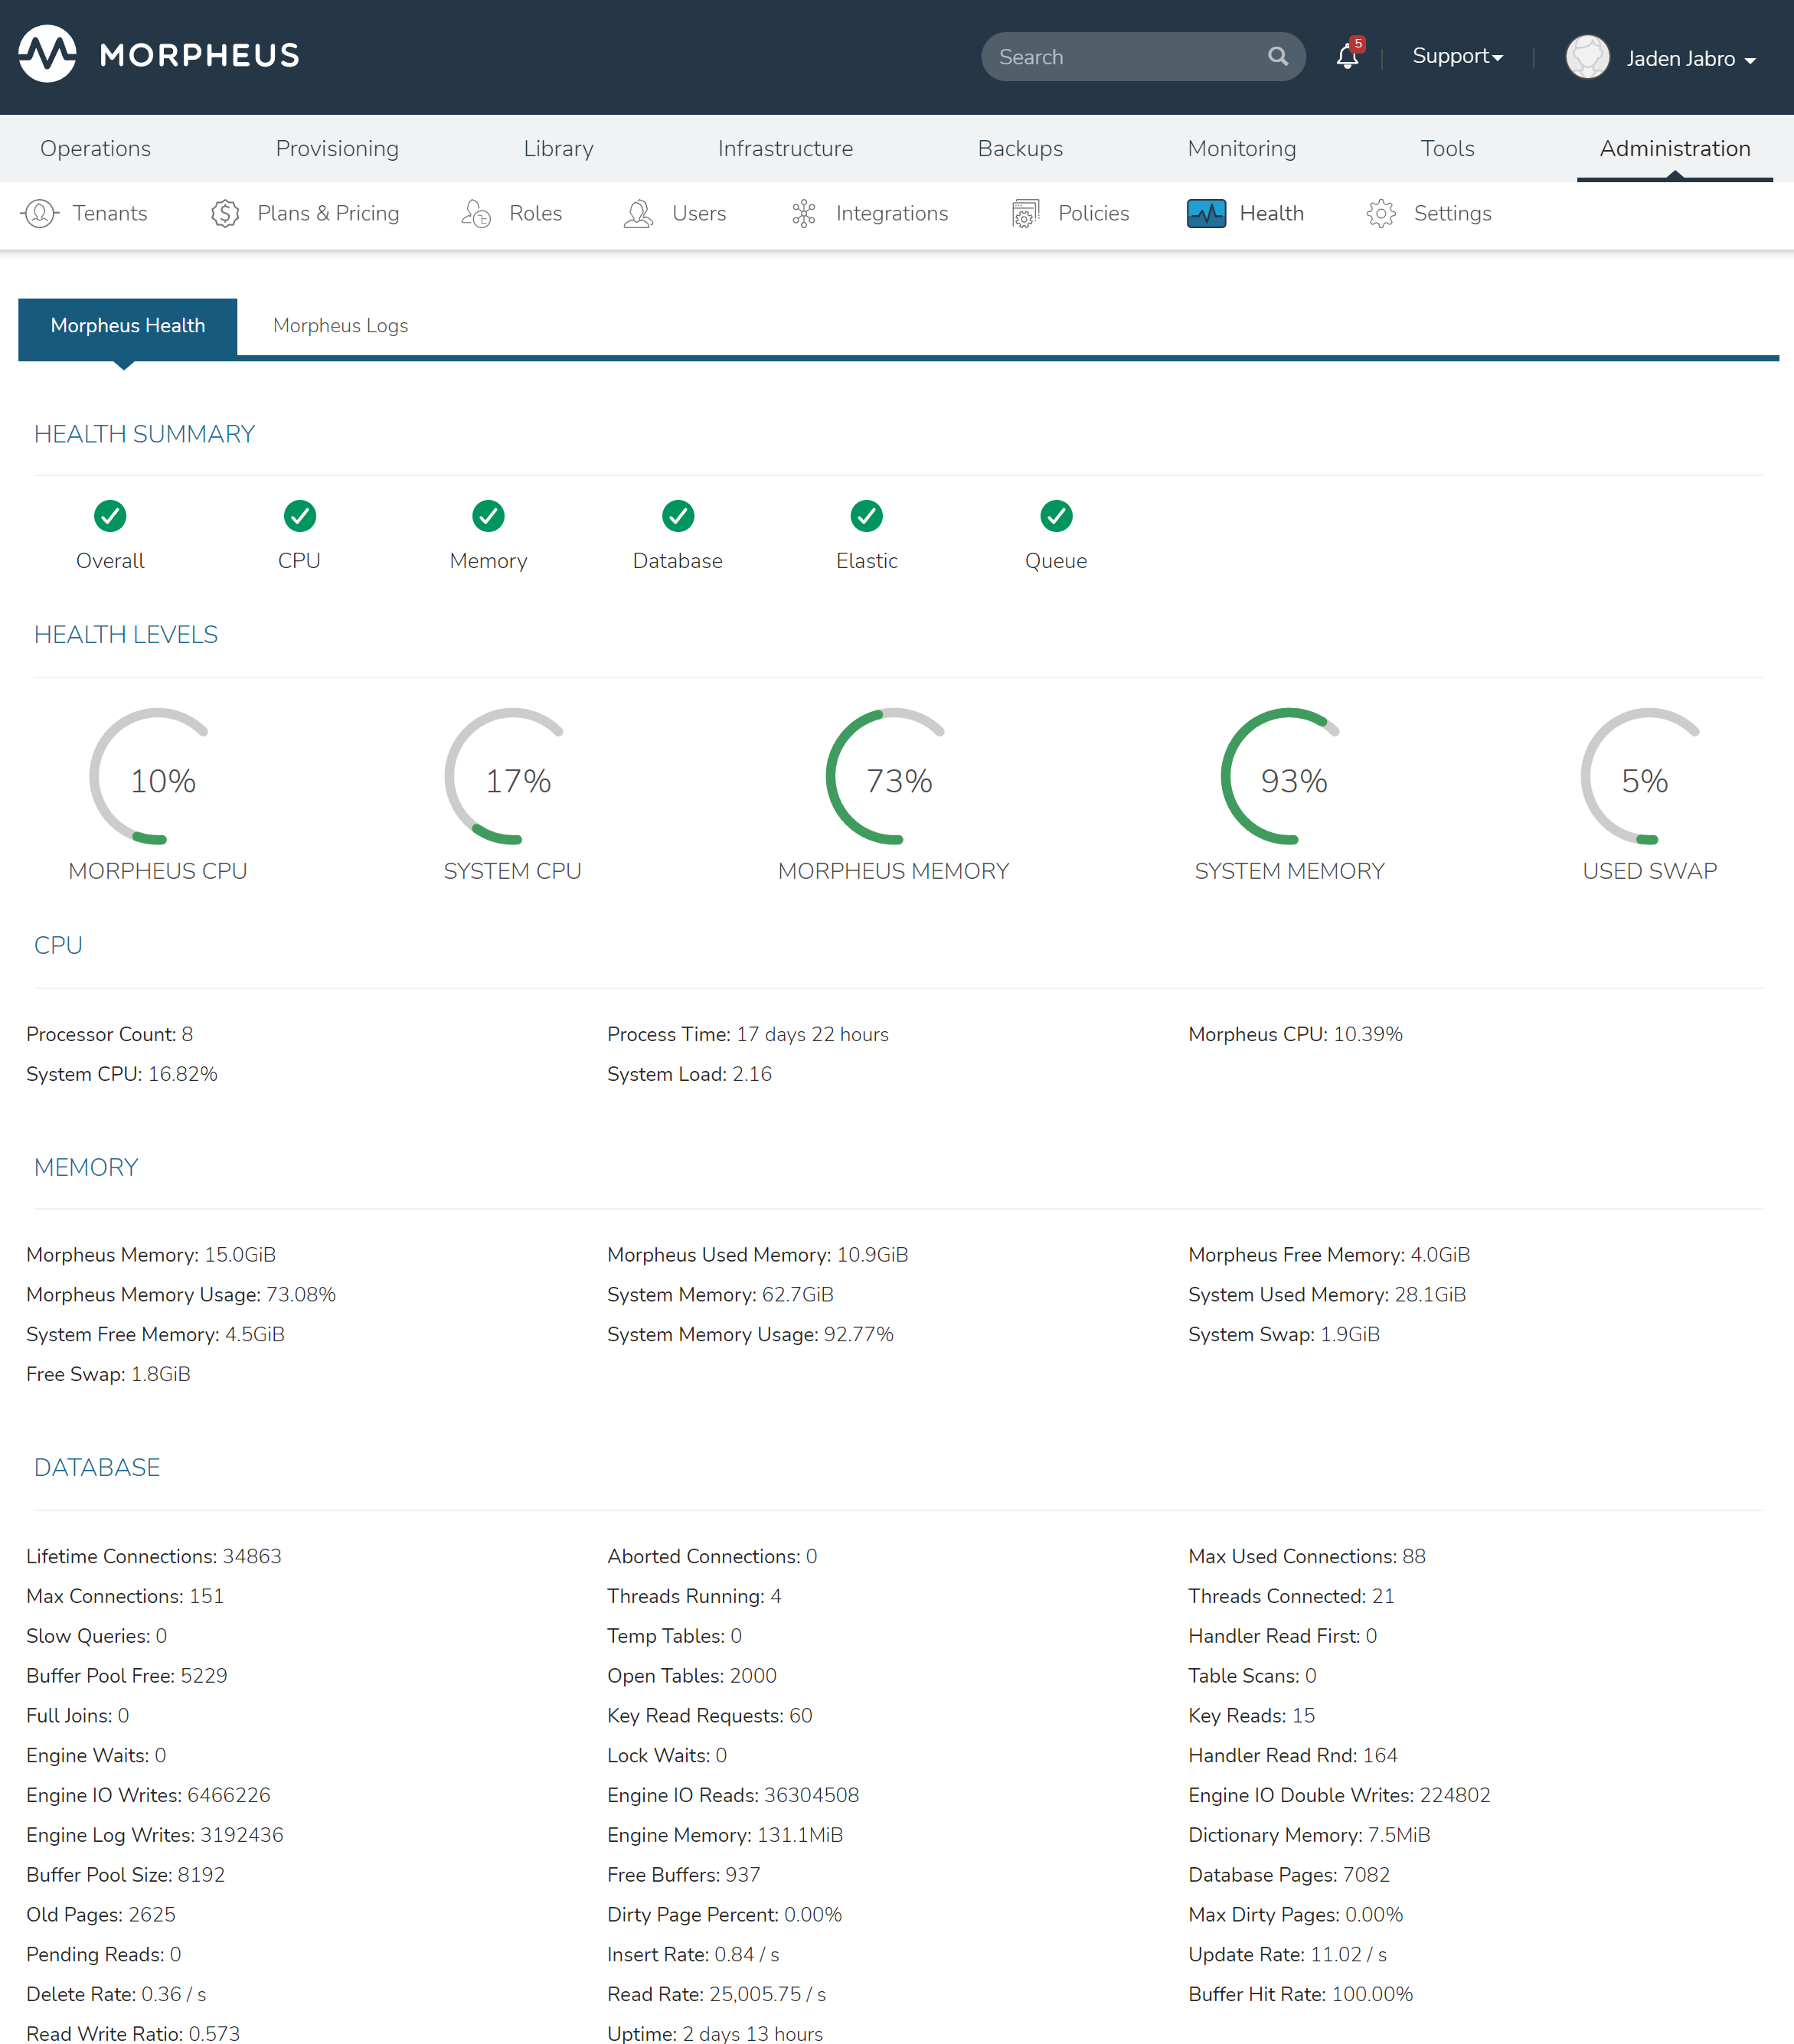
The Morpheus Health section provides an overview of the health of your Morpheus appliance. It includes an appliance health summary in the following areas:
-
CPU: Appliance CPU usage is checked. If usage is greater than 50%, this indicator will be in a yellow or warning state. If Morpheus is unable to complete the check, it will be in a red or error state. Depending on appliance performance and how frequently this indicator is in a warning state, it may be necessary to upgrade to increase CPU. The Overall health indicator will mirror the CPU health indicator
-
Memory: If swap usage is above 60% or Morpheus memory usage is above 95%, this indicator will be in a yellow or warning state. If Morpheus is unable to complete the check for any reason, it will be in a red or error state. Depending on appliance performance and how frequently this indicator is in a warning state, it may be necessary to increase swap, upgrade the appliance to add memory, or consider a different appliance architecture for those using single-node appliances
-
Storage: If utilization of the filesystem mounted at “/” exceeds 80%, this indicator will be in a yellow warned status. Above 90% will put this indicator in red or error status
-
Database: The database is checked. If the number of database connections exceeds the configured maximum number of connections or if any test queries are reported as being slow, this indicator will be in a yellow or warning state. If Morpheus is unable to communicate with the database, it will be in a red or error state. In the database section further down the page, you can check the number of maximum used connections against the number of max connections. In the case of database connections exceeding the maximum, consider increasing the maximum settings connection
-
Elastic: Elasticsearch is polled for the health status of each index. If any indices are not reporting a “green” health status, this indicator will be in a yellow or warning state.
-
Queues: RabbitMQ queues are checked. Any queues containing more than 1000 messages are considered to be in an error state. Appliance Queue health is given in a yellow or warning status when any queues are in such an error state. In the Queues section further down the page you can see the individual Queues listed and which have messages piling up. When the appliance is unable to complete the check for any reason, this indicator will be in a red or error state
Health Levels
Health levels provide a live representation of the current memory and CPU load on the appliance. Bear in mind that in an HA appliance, this data will be specific to the appliance node you happen to be using. By default, Morpheus does not include any endpoint or UI tool which can show you the currently used app node. However, a plugin has been developed which can surface this information if needed. See this thread in the Morpheus official forums for additional details about accessing and using the plugin.
-
Morpheus CPU: Instantaneous amount of CPU capacity in use by Morpheus processes
-
System CPU: Instantaneous amount of CPU capacity in use by all processes
-
Morpheus Memory: Instantaneous amount of system memory currently in use by Morpheus processes (see the Knowledge Base article linked in the TIP box below for more information on how Morpheus claims and manages available memory)
-
System Memory: Instantaneous amount of total system memory currently claimed (this is commonly a high percentage, see the TIP box below)
-
Used Swap: Instantaneous amount of total available system swap in use
-
Storage: The instantaneous percentage utilization of the filesystem mounted at “/”
-
Morpheus Logs
The Morpheus logs section aggregates appliance-specific logs into one list. If needed, users can export the logs by clicking EXPORT. This action triggers a download containing the last 10,000 log entries as a
.logfile.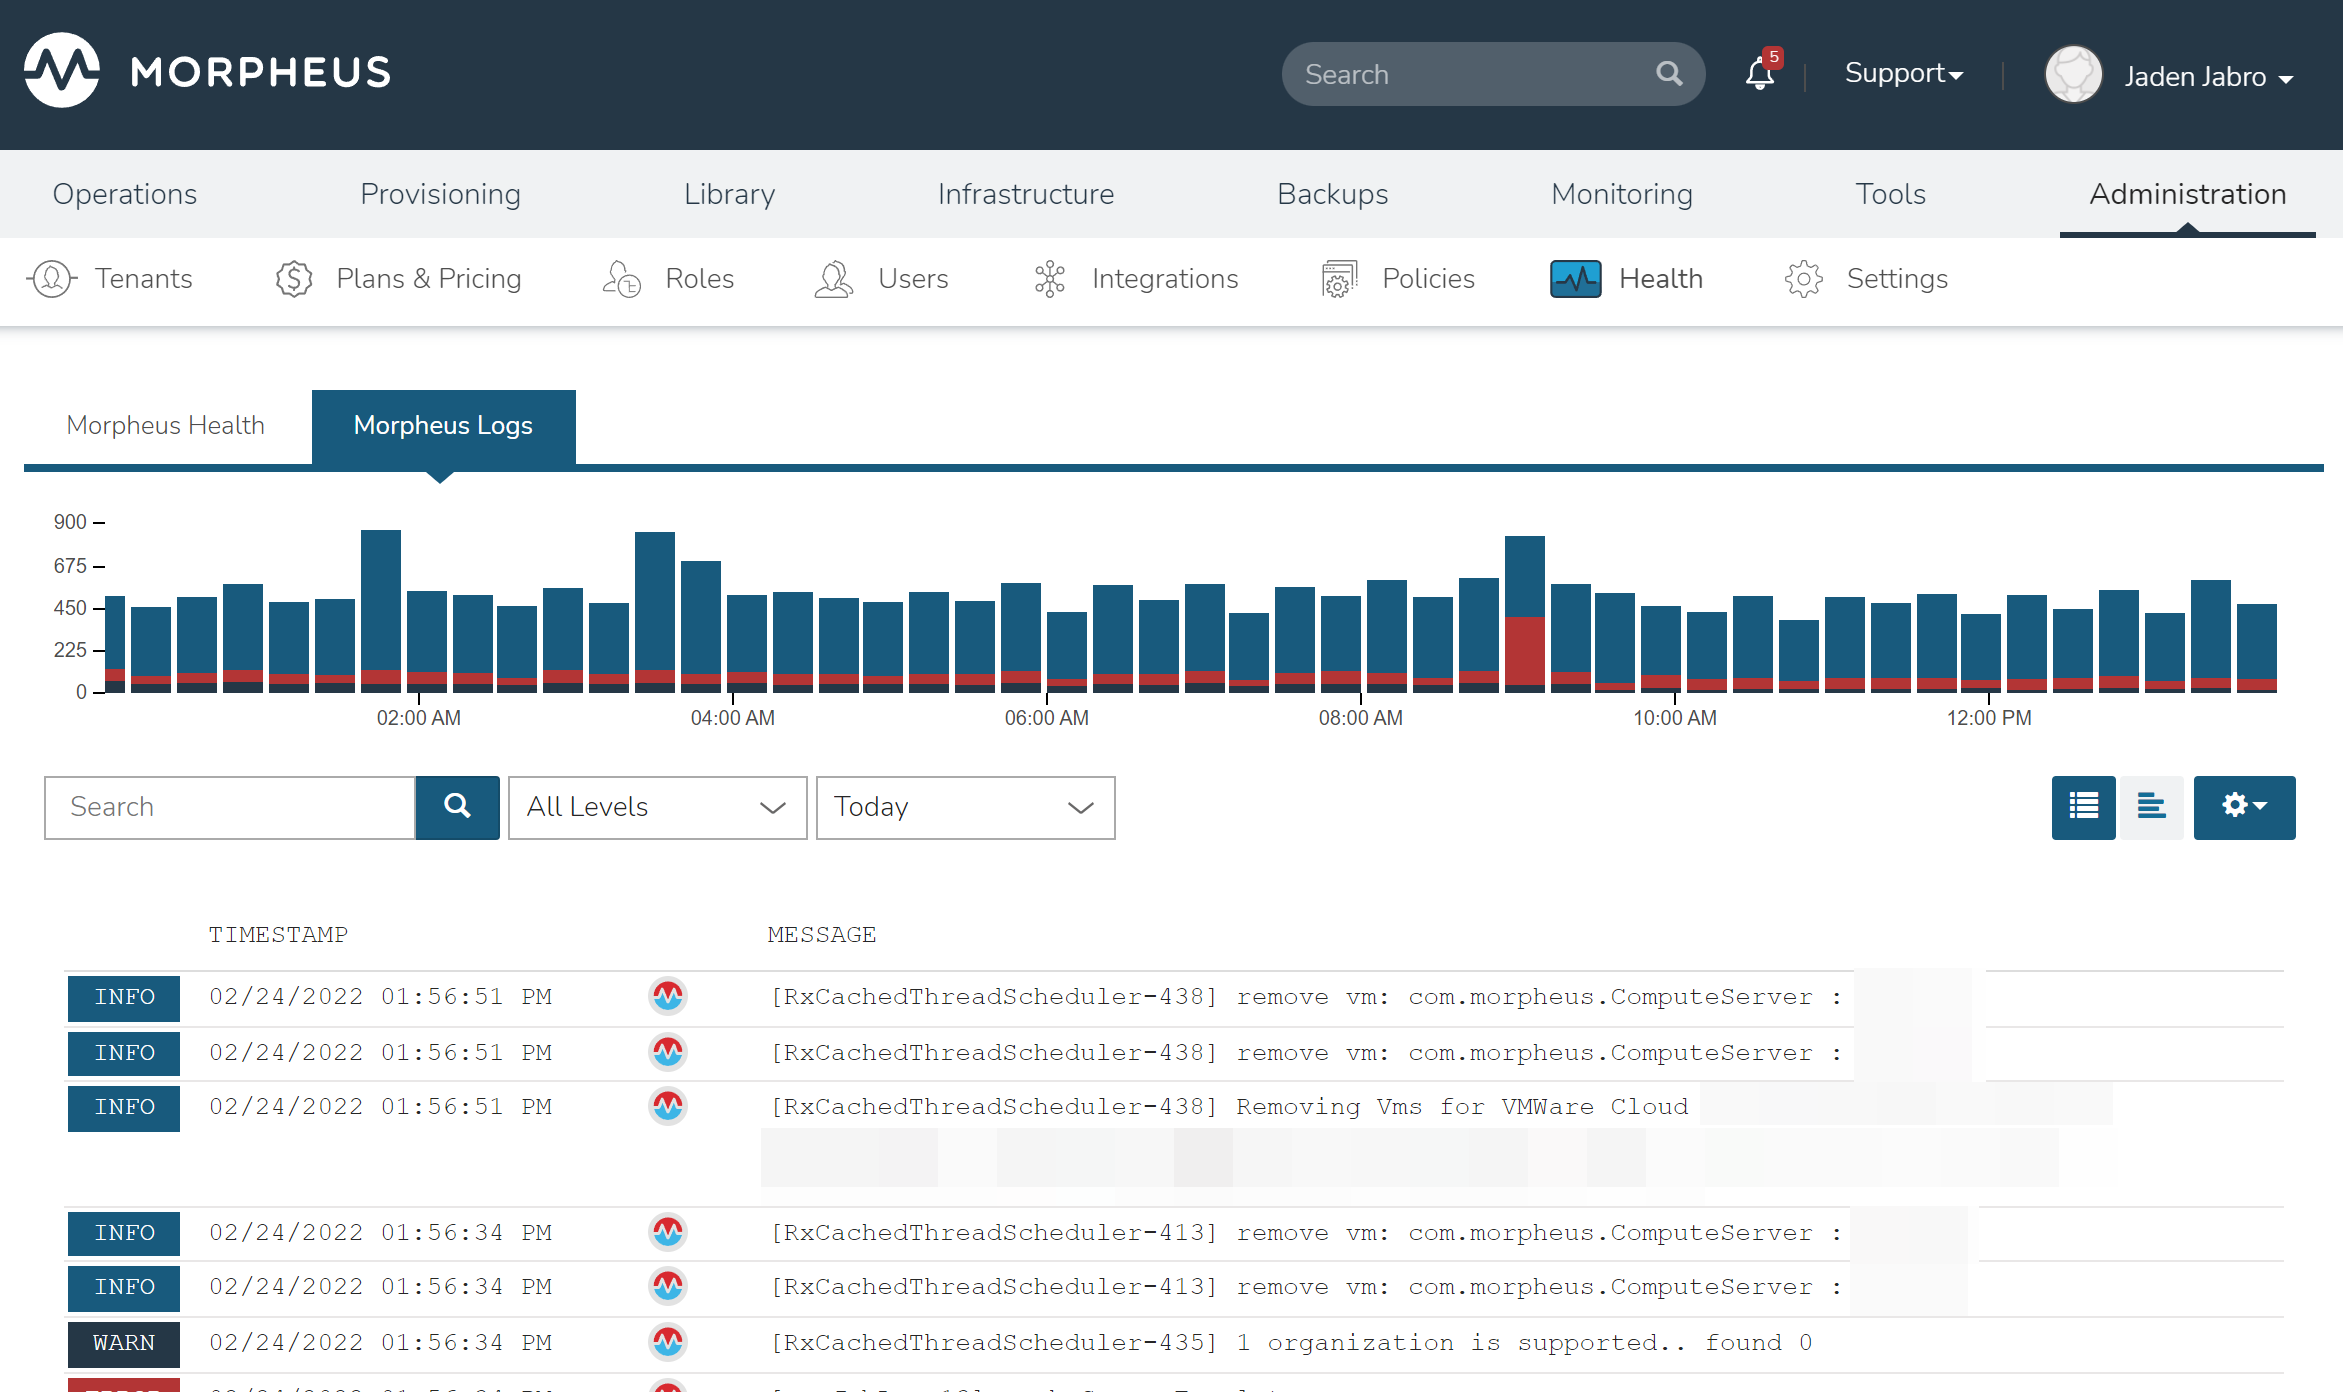
Monitoring
Morpheus Monitoring Settings
- Auto Create Checks
-
When enabled a Monitoring Check will automatically be create for Instances and Apps.
- Availability Time Frame
-
The number of days availability should be calculated for. Changes will not take effect until your checks have passed their check interval.
- Availability Precision
-
The number of decimal places availability should be displayed in, can be anywhere between 0 and 5. Instance availability is shown on the Instance detail page (and used elsewhere) and refers to the percentage of time the workload is up.
- Default Check Interval
-
The default interval to use when creating new checks.
Backups
Backup Settings
The Backup settings page allows you enable or disable scheduled backups, select a default backup bucket, and administer global settings related to backups. Changes to global settings only affect new backups going forward and do not affect existing backups.
Morpheus Backup Settings
- Scheduled Backups
-
Enable automatic scheduled backups for provisioned instances
- Create Backups
-
When enabled, Morpheus will automatically configure instances for manual or scheduled backups
- Backup Appliance
-
When enabled, a backup will be created for the Morpheus appliance database. Select the
Backuptext link to view or edit settings related to the appliance backup - Default Backup Bucket
-
Select an existing bucket as the default for future backup runs. Click the
Infrastructure Storagetext link to add a new storage bucket to Morpheus if needed - Default Backup Schedule
-
Choose a default schedule interval for automated backups. The available selections in this dropdown menu are Execution Schedules defined in Library > Automation > Execute Scheduling
- Default Backup Retention
-
Choose the default number of backups to be retained for automated Instance and appliance backup jobs.
-
User Settings
User settings are accessed by clicking on your display name in the far upper-right corner of the application window. In this dropdown menu, click on the “USER SETTINGS” link.
2 Factor Authentication
Morpheus supports two-factor authentication (2FA) for local user accounts as well as those authenticating through Active Directory and LDAP identity sources. Authentication is handled through a 2FA app such as Authy or Google Authenticator. Other common methods for handling 2FA, such as through email or SMS text message are not currently supported. Two-factor authentication is handled on a per-user basis through the User Settings section. There is not currently a way for an administrator to enforce the use of two-factor authentication appliance-wide.
Linux Settings
When provisioning a Linux-based resource and opting to have your user created during the provisioning process, the credentials entered in this section will be used to seed that user into the provisioned resource.
-
Username: The username that will be used with your Linux user
-
Password: The password that will be used with your Linux user (optional if specifying key)
-
Confirm: Confirm your entered password. These must match in order for the new password value to be saved
-
SSH Key: Select a pre-existing SSH key pair object in Morpheus. Required of not specifying password and creating your user during provisioning, or required if ssh password authentication has been disabled.
-
Windows Settings
When provisioning a Windows-based resource and opting to have your user created during the provisioning process, the credentials entered in this section will be used to seed that user into the provisioned resource.
-
Username: The username that will be used with your Windows accounts
-
Password: The password that will be used with your Windows accounts
-
Confirm: Confirm your entered password. These must match in order for the new password value to be saved.
API Access
Click the API ACCESS button to expand the “API ACCESS” modal. In this modal you can generate or refresh access tokens that can be used with Morpheus API and Morpheus CLI.
If no token yet exists for a particular “CLIENT ID”, click ACTIONS and then Generate. If a token has expired, we can also regenerate that token by clicking ACTIONS and then Regenerate. After regenerating a particular token, you would need to ensure any scripts using those tokens are updated.
If needed, Primary Tenant administrators may configure the expiration periods for existing clients or create new clients from Morpheus global settings (Administration > Settings > Clients). See client configuration documentation for more details.
-
morph-api: Used for Morpheus API access and should be the default token-type used
-
morph-cli: Used for Morpheus CLI access
-
morph-automation: Used by the internal Task engine and by jRuby-type Tasks to make API calls. It shouldn’t be used externally for other types of access or in external automation. It is surfaced in the UI so users can see if a token exists and can clear it when necessary
-
morph-customer: This token is available for legacy implementations and was previously recommended for custom API access (similar to the morph-api token). It’s not recommended for use but is still available to maintain support for legacy custom automation which may still be in use on customer sites.
-
Comments
0 comments
Please sign in to leave a comment.